Breaking a mesh into pieces in Maya for a simulation or modeling purpose, it’s always fascinated me. Although the built-in shatter tool in Maya, didn’t meet my expectatios as a 3D Artist. So i decided to build my own Maya fracture tool.
This fracture tool is design to break any closed mesh into many pieces, and generate inner faces for those broken pieces. It gives you easy access to the inner generated UVs, either by object or by piece, in order to work on them. You can also break the already broken pieces again and again, with just one click. It’s renderer agnostic, which means it can work with any kind of material. Additionally it’s also material friendly, and support multi materials, simulation-ready output, automatic scene cleanup, clean hierarch, and others. Lastly, but not least, it’s fast and reliable.
Some technical notes:
- It’s a BSP (Binary Space Partitioning) tool
- It use modern Boolean (polyCboolop)
- UV-space tagging for reliable interior face detection across re-fractures
- Duplicate geometry guard, detects and discards silent Boolean no-ops
- Automatic scene cleanup
You can use this tool mostly for dynamics. But you can also use it for modeling purpose.
Full disclosure: As a 3D artist I use Maya for over 10 years. Knowing the software inner and out, but I am not a programmer, I have build this tool with AI-assistance from scratch. It took several days of coding, testing, suggestions, and again, coding, testing, suggestions, until we get it right. The whole process was quite interesting and fun.
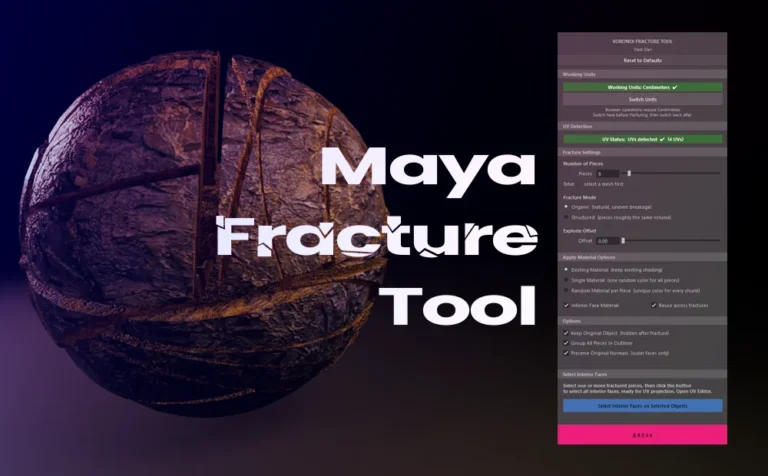
This is the UI of Maya fracture tool we are going to explore in this article:
Before we dive into this fracture tool, a little words about the competition in Maya.
Solid Shatter (built-in tool in Maya): The competition:
Maya built-in shatter tool eventhough it’s a great tool, and i know that because i have use it plenty of times in the past, when i had to deal with fracture objects and dynamics. It was my way to go. But let’s face it. It has a lot of limitations.
Some things that solid shatter (built-in tool in Maya) is not good at:
- You can’t iterative re-fracturing pieces easily
- Doesn’t support multi-material objects
- It generate unnecessary geometry (increase the polycount)
- No full UV preservation for outer faces (it’s slightly distort them)
- Preserve original normals option is missing
- Selection of inner faces in order to work on their UVs should be easier
- No pre-fracture budget estimation
- Messy production naming
To be honest, solid shatter tool, is still a nice tool, particularly i really like the “Edge jagginess” feature. This feature will be definetly been included in the next version of this tool.
Let’s dive into this fracture tool and see all it’s capabilities.
The Fracture core operation:
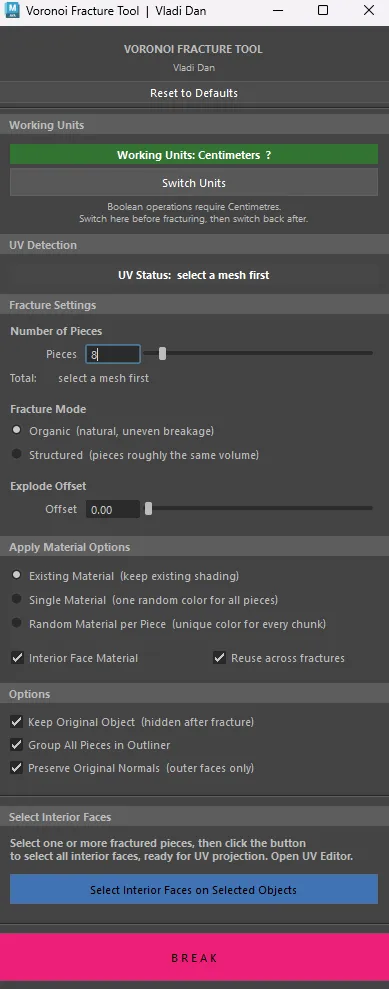
Before you fracture/breake any mesh, there is one thing you need to do, in order the tool to work as expected. You just need to switch Units to centimeters through the tool, by pressing “switch units” from the UI. You can go back and fourth as you please, when you are not fracturing. When you want to fracture again, click on the switch button.
What this does is to temporally switch the working units from your current system units to centimeters in Maya (Settings/Preferences – Settings – Working Units – Linera).
Note: The “Break” button is only available when you switch to centimeters units.
The whole process of fracturing with this tool is goes like this:
- Select your mesh, you want to break into pieces
- Specify the number of pieces
- Apply the material option your want
- Check/uncheck a few options
- Hit breal
- Connect a texture map to the new inner generated material (optional)
- Adjust the inner geometry UVs (optional)
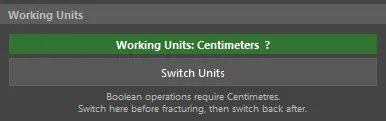
Fracture Modes:
Currently there are two modes to fracture your selected mesh:
- Organic (natural and random, uneven breakage)
- Structured (random pieces roughly the same volume)
Those two modes are completely different from each other. The organic mode, as the name suggest is more organic and natural, and can produce uneven pieces, if that’s the case for your project. You can go with structured mode, if you like more even pieces. It’s up to you and your specific needs.
Re-fracturing of broken pieces:
There is no limitation of how many times you can re-fracture your already fractured pieces, again and again. So if you fracture your mesh the first time, and some chunks are bigger than others, you can re-fracture those big chunks again. And of course you can adjust the number of pieces, or really any other settings from the UI, while you do it.
Note: You can switch between fracture mode (organic, structured) while you re-fracture.
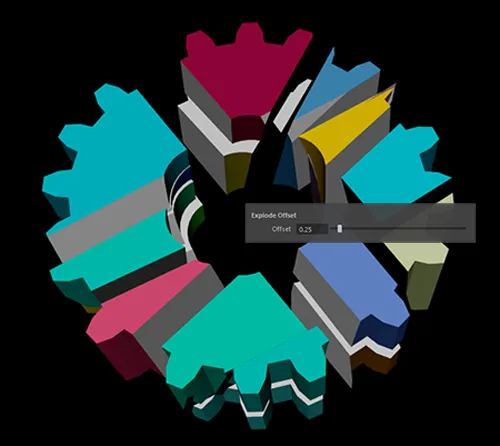
Explode Offset:
You can also imitate an explosion style of fracture, although is more for modeling purpose and not for dynamics.
Pre-fracture poly budget estimate:
While you increase and decrease the number of pieces to be fracturing, there is a pre fracture budget estimation underneeth it. It show you approximately the total number of faces and tris of your fracturing pieces before you hit break.
I think it’s pretty usefull, especially when you are dealing with a heavy geometry and your number of pieces is pretty high, since it’s going to take a little time longer. Additionally, is super usefull, when you have poly count limitations when are fracturing for a game engine.

Loading bar:
There is a loading bar, after you hit the break button, to give you an estimation feeling of how much time the process of fracturing is going to take.
Note: Keep in mind, there is another processing time after the loading bar has finished. Just give it a few seconds as well.
Undo Support:
You hit the break button and you didn’t like the way it cut your geometry, ctrl+Z (undo) a few times, and go back, before the operation. All 3D artist knows the power and flexibility undo gives them.
Materials and UV Workflow:
Materials and UVs are very essential part of the process in order your 3D models to look right. This tool has been designed, to give you flexibility on both, and not lock you in, in any way.
Materials:
As I said, this Maya fracture tool, is renderer agnostic and material friendly.
Renderer agnostic: With this tool, you can work with any renderer, such as Maya software, Arnold, V-ray, etc.
Material friendly: If you apply default Maya material (blinn, phong, lambert, etc) into your mesh, this tool is going to respect your default material. Additionally, the new generated material for the inner faces will be also the same kind that you have applied into your mesh.
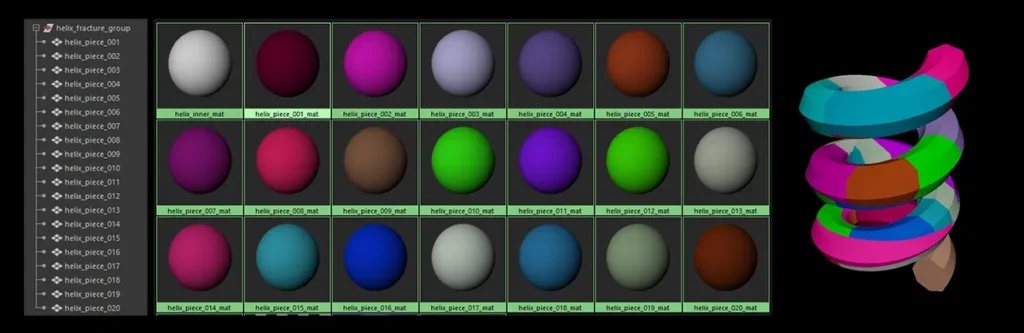
It’s also support multi materials, which is huge (soldi shatter built-in Maya tool, doesn’t). What that means, is in your mesh has been applied multi materila (more than one materials per faces), this tool is going to respect that, and work with it perfectly.
There are three material option you can apply to your fracturing/breaking mesh.
- Existing material (keep existing shading)
- Single material (one random color for all pieces)
- Random material per piece (unique color for every chunk)
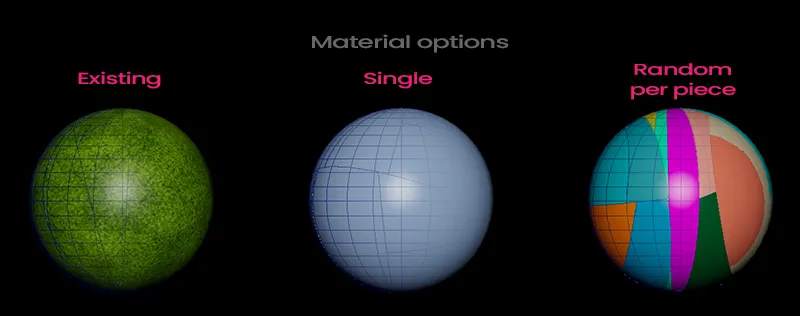
What will be created, based on your “Apply Material Options”:
- Existing Material option, will create only one material (inner material) for your inner faces (It will match the kind of material you already have). Keeping your original material for the outer faces intact.
- Single Material option, will create one material for the outer faces and one for the inner faces.
- Random Material per Pieces, will create one material per piece, plus one inner material.
Note: For single and random material options, if you haven’t apply any specific material into your mesh, the tool will create those materials as Lambert (included the inner material. Keep in mind, those two options will generate random colors materials, but they will respect your original material kind.
Additionally, there is “reuse across fractures” option, that i think is very usefull. What that doesn is to either reuse the same inner material that will be generated for all your fracturing operation on scene, or not. So if you want each fracture operation to have their own inner material, you may want to uncheck “reuse across fractures” option. Of course you can check/uncheck it each time you re-fracture a mesh.
UVs:
The first thing you notice about UVs, after you open the UI of this tool, is the UV detection section.
- If your mesh has UVs (green message)
- If it doesn’t has UVs (red message)
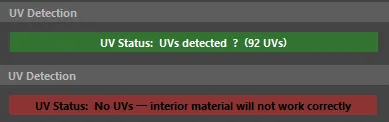
Note: Even if you mesh hasn’t UV the tool will work, but the detection method for the inner faces, in order to automatically apply the new generated inner material, won’t be accurate. So you need to have some UVs, even just draft (a simple automatic or plan projection it will be more than enough).
After you fracture your mesh, you can either select all pieces or one or more, and click on “select interior faces on selected objects” button, and two things will happent:
- it will automatically select all the inner faces of that selection
- it will open up the UV Editor in Maya, so you can start working on those inner UVs
Note: The inner generated UVs will be propably distorted, but it doesn’t really matter. There was no point to automatically apply a specific UV projection method through this tool. Since we need to work manually in the UV Editor in Maya to make them exactly as we want.
Production-Ready:
This tool has some options for production-ready workflow:
- Keep original object (hidden after fracture)
- Group all pieces in Outliner (creates empty parent groups)
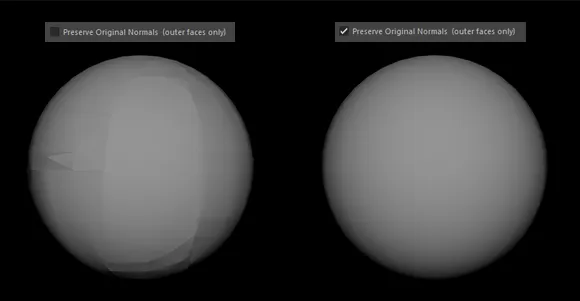
- Preserve original normals (outer faces)
Keep Original Object:
When you first fracture your mesh, if you have checked this option, it will hide your original mesh in the Outliner. But it goes beyond the first cut-fracture. If you re-fracture one of those new pieces, it will do the same for that mesh too.
Group All Pieces in Outliner:
When you fracture a mesh, it will automatically create an empty parent group and put every fracture piece underneeth it. And again if you re-fracture one of those new pieces, it will do the same. That way it keeps your Outline clean and organized.
Preserve Original Normals:
I don’t have to tell you how importan this one is. If you fracture with small number of pieces you can do it manually, and it won’t take much time. The real issue is when you have a lot of pieces and you need to do it for all of them. Likely, you won’t need to do a thing, since this tool will preserve the original normals of your selected mesh.
If you are not familiar with the manually process of fixing vertex normals, here is a link, when doing it manually.
Keeps Poly Count Low:
No unessesary geometry after fracruting a mesh, either for outer or inner faces, will be added.
Simulation-Ready Output:
Every fracture operation produces pieces that are immediately ready for dynamics. Each piece comes with clean geometry, no construction history, centered pivot, and frozen transforms. All pieces are grouped under a single parent node in the Outliner (additional parent nodes will be created if you re-fracture already fractured pieces.
Whether you use Maya’s built-in Bullet dynamics, nDynamics, or bring the pieces into another application like Houdini or a game engine, the output is clean and predictable with no extra cleanup required.
Good Name Convention:
Good name convention, is really important subject when working in production pipeline.
Get the Tool:
The tool is available on Gumroad as a single Python script for $12, no installation required. Download it, drop it into Maya’s Script Editor, and you are ready to go.
If you have any questions, run into issues, or want to share what you made with it, drop a comment below. Feedback is always welcome and helps shape future versions.
How to Run this Maya Fracture Tool:
This is a python script. You have a few options to load it in Maya:
- Open the Script Editor, go to file – open script and locate the Voronoi_fracture_v1.py file.
- Open the Voronoi_fracture_v1.py file and copy all the lines of code. After that open the Script Editor in Maya, and after you open a new Python tabe, paste all those lines. Press ctrl + Enter, to run the tool.
For easily access you can also put it on a shlf in Maya.