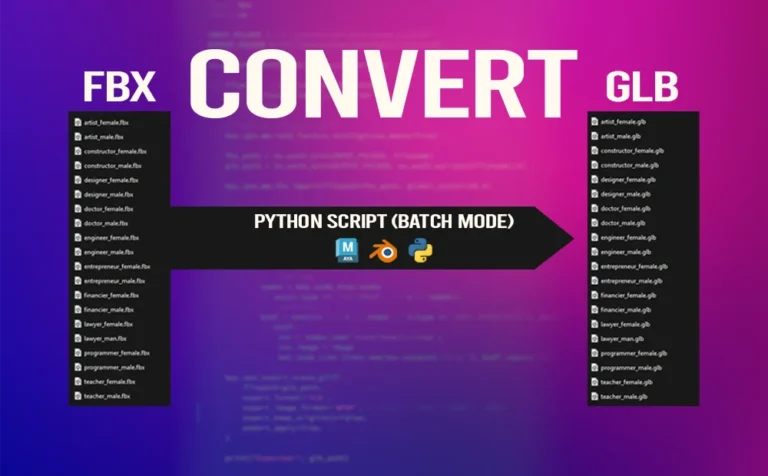
Converting FBX to GLB files using Maya, Blender, and a Python script is the way to go for a production workflow, since it’s fast, reliable, and free of human error.
If you are a Maya user, this is the only production-ready way to go. To my current knowledge, this is also the approach used by big studios.
There are plenty of GLB exporters for Maya, but none of them are fast or reliable, at least to my knowledge. I have used a lot of them in the past, trying to find the right one for my workflow, but none of them has even come close to meeting my needs.
The last one I used was the Babylon Exporter, but since it’s an old tool, is no longer supported, and doesn’t work with the newest Maya versions, I had to find a better way to convert/export GLB files.
I have uploaded a few months ago a video about Babylon exporter approach, just in case you give it a try.
The method we are about to explore involves Blender, but actually, it doesn’t. Since we are using a Python script that runs Blender in the background in batch mode, you won’t even need to open Blender to convert FBX files to GLB.
You can watch the following video, but keep reading so you can copy the scripts and use them in your workflow.
You can find both the script and the command-line code for Windows in this post.
The process of converting FBX files to GLB files is not complicated, especially the second time you try it. It might seem overwhelming at first, but trust me, it’s just a few simple steps. Nothing complicated at all.
So, let’s get into the whole conversion process.
Convert FBX to GLB files (at a Nutshell):
You use the Python script provided in this post to read all the FBX files in a specific folder, convert them to GLB files, and place them in a specific GLB folder. The script is run through the command line on Windows.
The script runs in Background Mode, which means Blender runs without opening its normal graphical interface.
You don’t need to change anything in the script if you follow the same folder structure and folder naming convention that I’m using. Otherwise, you’ll need to modify the script to reflect your changes.
Organization of Folders and Files:
You need to have a specific folder structure and naming convention in order for the script to work as it is. However, if you understand the logic behind the script, you can of course change the structure and the names of your folders, as long as you update the script accordingly.
My folder structure and name convention:
I have a folder in my desktop called “to_GLB”. Inside that folder i have two additional folders “fbx”, “glb”. Additionally inside “to_GLB” folder i have also two python scripts convert_fbx_to_glb.py and export_individual_fbx.py (optional). Lastly i have a text file command.txt which has the actuall command i will use in command line on Windows in order to run the convert_fbx_to_glb.py script.
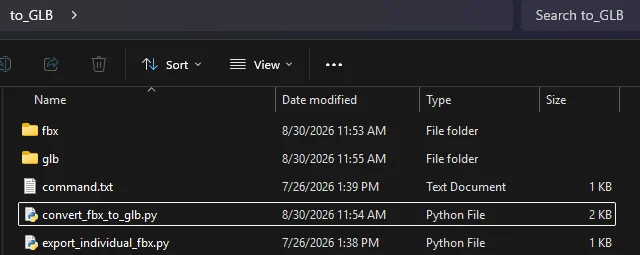
If you change the folder structure described above, you will need to change the script accordingly. For example:
If your main “to_GLB” folder is not located on your desktop, you will need to modify the Convert FBX to GLB script to reflect its new location. If you rename the “fbx” or “glb” folders, you will also need to update the script accordingly. Lastly, if the “convert_fbx_to_glb.py” script is located somewhere else, you will need to modify the command.txt file as well, so that it points to the correct location of the script.
FBX(s):
Of course, we need FBX 3D files. It doesn’t matter whether you exported those FBX files from Maya, 3ds Max, or really any other 3D package. As long as the format is FBX, you’re good to go.
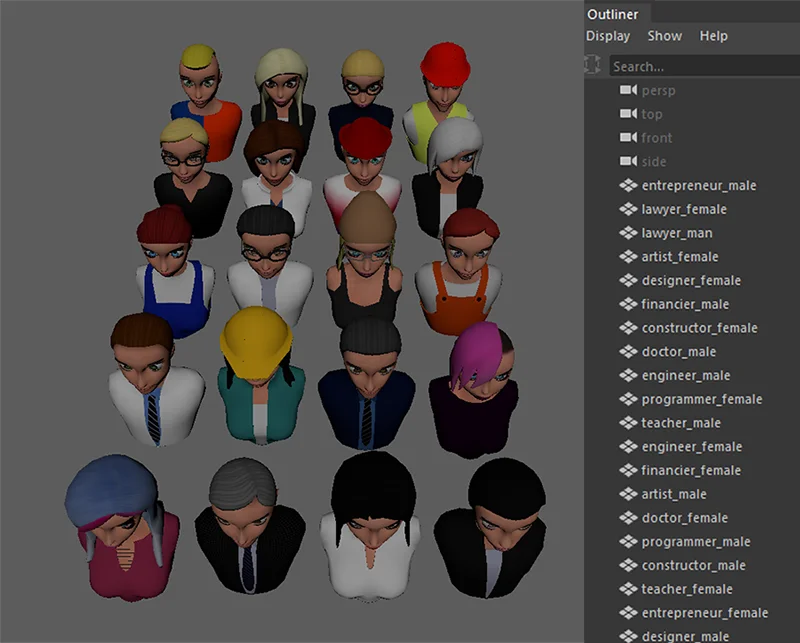
In my case, I have a Maya scene with a lot of 3D avatar characters, as you can see in the image below:
If you are interested for those 3D avatar models, here are some links:
- Male-female (turbosquid), Male-female (cgtrader)
- Male (turbosquid), Female (turbosquid)
- Male (cgtrader), Female (cgtrader)
I could export each one of those avatars individually from Maya (File → Export Selection), which is totally fine. But, as you can imagine, it could take some time—especially if you have more characters in your scene, let’s say 100 or more.
We can batch export individual fbx files in two ways:
- With the python script approach below
- with the build-in Game Exporter.
Batch Export Individual FBX(s) with Python Script (Optional):
For that reason, i have writing a free python script with AI to batch export individual FBX(s), to simplify the process. Basically, what it does is to export all those 3D avatar characters at once as invididuall fbx files.
If your characters or props are coming from a single Maya scene and are top-level nodes, you will definitely benefit from this script. You can grab the Batch Export Individual FBX Python script from the link above and use it.
It’s a simple python script, you just open it through Script Editor in Maya and execute it.
Note: Using the above script is optional of course. You can export your FBX(s) in any way you see fit.
Blender 3D Software:
You need to have Blender installed on your PC. In my case i have installed Blender 5. However, you don’t need to have any knowledge of Blender at all, since the Python script will use Blender and run it in the background.
If you already have Blender great. If you haven’t, you can free download it from their official site.
Convert FBX to GLB Files (Python Script):
This is the actuall script used to convert FBX(s) to GLB(s) files. Click on it to expand:
Python script to convert FBX(s) to GLB(s) files:
import bpy
import os

INPUT_FOLDER = r"C:\Users\vladi\Desktop\to_GLB\FBX"
OUTPUT_FOLDER = r"C:\Users\vladi\Desktop\to_GLB\GLB"

os.makedirs(OUTPUT_FOLDER, exist_ok=True)

for filename in os.listdir(INPUT_FOLDER):
    if not filename.lower().endswith(".fbx"):
        continue

    # Reset to an empty scene
    bpy.ops.wm.read_factory_settings(use_empty=True)

    fbx_path = os.path.join(INPUT_FOLDER, filename)
    glb_path = os.path.join(OUTPUT_FOLDER, os.path.splitext(filename)[0] + ".glb")

    bpy.ops.wm.fbx_import(filepath=fbx_path, global_scale=100.0)

    # If a material has no texture node but an image got loaded anyway
    # (this happens with Arnold materials, whose 'baseColor' link Blender
    # doesn't recognize), just wire that image straight into Base Color.
    image = next((i for i in bpy.data.images if i.name != "Render Result"), None)
    if image:
        for mat in bpy.data.materials:
            if not mat.use_nodes:
                continue
            nodes = mat.node_tree.nodes
            if any(n.type == 'TEX_IMAGE' for n in nodes):
                continue
            bsdf = next((n for n in nodes if n.type == 'BSDF_PRINCIPLED'), None)
            if bsdf:
                tex = nodes.new('ShaderNodeTexImage')
                tex.image = image
                mat.node_tree.links.new(tex.outputs['Color'], bsdf.inputs['Base Color'])

    bpy.ops.export_scene.gltf(
        filepath=glb_path,
        export_format='GLB',
        export_image_format='WEBP', # 'AUTO', 'JPEG', 'WEBP', 'NONE'
        export_keep_originals=False,
        export_apply=True,
    )

    print("Exported:", glb_path)
Download it:
in the script above, you can change a few things before using it.
- Input and output folder
- global_scale, which is currently set to 100
- export_image_format, which is currently set to WEBP
Note: Remember, if you change the folder structure or folder names I mentioned earlier, you will also need to update the script accordingly.
Command Line on Windows (Run the Convert FBX to GLB Script):
This Python script is designed to run with Blender, specifically in Background Mode. Therefore, we need to run it through the command line on Windows.
To run it, open the Command Prompt on Windows and type:
“C:\Program Files\Blender Foundation\Blender 5.0\blender.exe” -b –python “C:\Users\vladi\Desktop\to_GLB\convert_fbx_to_glb.py”
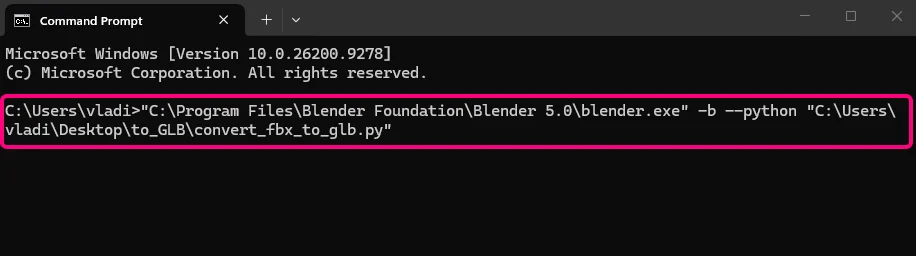
Note: Save the above command as command.txt in your “to_GLB” folder, for easy access.
Of course, you need to change the part that indicates the location of your Python script, which is this part of the code above: “C:\Users\vladi\Desktop\to_GLB\convert_fbx_to_glb.py”
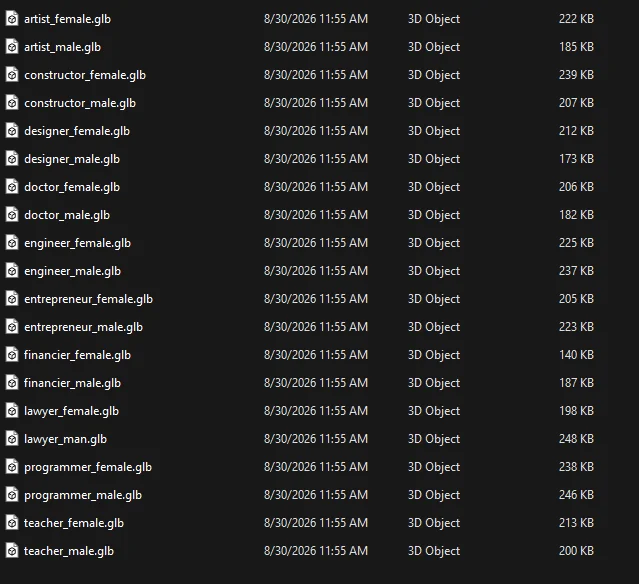
After I run the script i get all those GLB files in the “glb” folder:
There are plently of free online platforms, that you can use to check weather your GLB files are working correctly.. One of them https://gltf.report/.
Conclusion:
And that’s really all there is to it. Once you have your folder structure in place and the script pointed at the right paths, converting FBX to GLB stops being a chore and becomes a one-line command you run in the background while you get on with actual work.
This workflow has saved me a huge amount of time compared to exporting GLBs one by one, especially when I’m dealing with dozens of characters or props from a single Maya scene. No plugins to maintain, no exporter compatibility issues to chase down with every new Maya release, just Blender doing the conversion reliably in batch mode.
Keep in mind that everything we covered here is for static, still FBX files, meshes, materials, textures. We haven’t touched animation at all. If your FBX files contain rigs, skinning, or animation clips, the script as it stands won’t carry that over correctly out of the box. You’ll need to adjust the export settings of the python script from Blender side, like enabling export_animations, etc.
If you give this a try, let me know in the comments how it works for your workflow.