Enlarge a picture without losing any quality at all with 3D render. We are going to enlarge our picture dramatically inside Autodesk Maya with a few steps. It’s not about improving your pictures it’s about enlarging them. But when you enlarge a picture, without losing any details from the original, you can call it improved too.
Use of enlarge a picture without losing any quality
Pictures are very powerful media as you already know. A picture is worth a thousand words, right!
A lot of times you have the right picture which will deliver the right message to your audience, but there is a small issue. Actually, the word “small” is precisely the issue. Your picture is too small for the media you are trying to use it.
For example, if you have a picture with 500 x 500 pixels resolution and you are planning to use it to fully cover your next poster, roll-up banner, etc. which are much bigger in dimensions than your picture, you are going to have a tough time. The end result will be quite blurry for your picture, which is not good at all.
If you make the conversion from 500 x 500 pixels to centimeters, the result will be 17.64 x 17.64 cm. Knowing this, you shouldn’t have tried to fully cover your poster, roll-up banner, etc. with your small picture.
With the following method, we can enlarge a picture without any issues.
The method:
The method I am going to use to enlarge a picture is the actual rendering of the original picture in 3D applications such as Autodesk Maya. In that way, you get the final picture exactly the same in the matter of details but you get it bigger. No losing any quality at all.
What we will need:
- A copy of Autodesk Maya or any 3D package
- a picture 🙂
Note: if you are not fond of Maya you could use other 3D packages as well. But in this post, we will cover the process in Maya. Of course, the method works with the other 3D package as well.
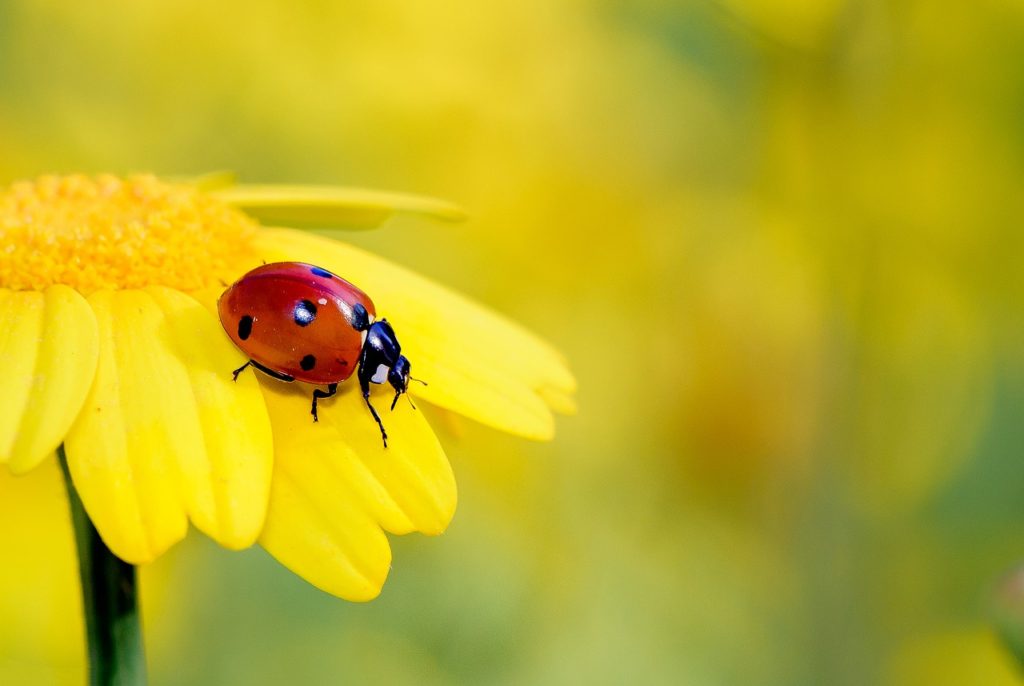
I found an interesting image by nimrodins at Pixabay. You could download the image from here. Or use one of yours of course.
Our goal:
Our goal is to render the image above to a much higher resolution. The original image is 1280 x 857 pixels. We are going to enlarge it by at least 10x. In that way, we will get a picture of 12.800 x 8.570 pixels. Without losing any quality of course.
Choosing renderer:
Since we are not using any actual geometry, shaders, and lighting at all, we do not need a fancy renderer like V-ray, Mental ray, Arnold, etc. to get the job done. We will just need the “Maya Software” renderer.
The process enlarge a picture without losing any quality inside Maya:
We are going to enlarge a picture inside Maya with the rendering process. Shall we start!
Open up Maya and create a brand new scene to work with.
Create a new plane by going Create – Polygon Primitives – plane.
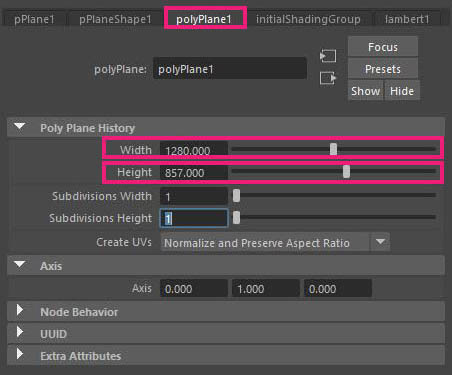
Open the attribute editor for the plane geometry, and look for the polyPlane1 tab. We need to adjust the width and height as our image which was 1280 x 857. You could set the value of 1 for the subdivisions width/height.
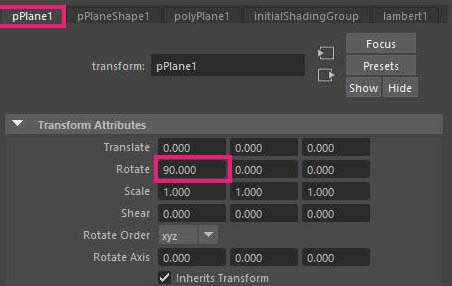
Go to pPlane1 tab and set the rotate x (the first left box) to 90 degrees.
Ok cool. Now it’s time to assign material to it.
Assign material:
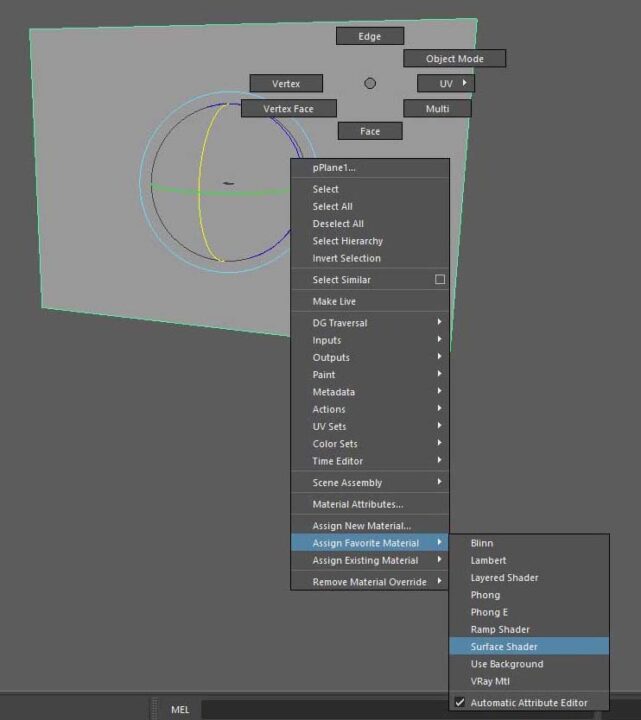
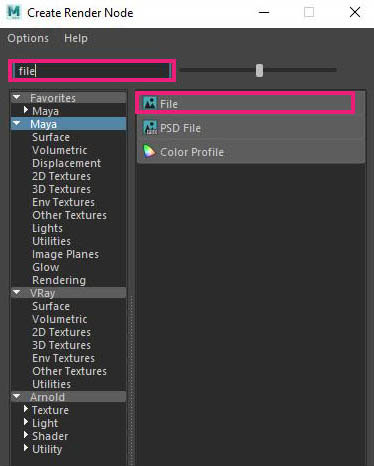
Select the plane geometry once again and right-click on it and go to assign favorite material – surface material. Go to the Attribute Editor and look for surfaceShader1 tab. In the out color section, click on the checkerboard icon on the right. The “create Render Node” window appears. In the search bar type “file” and select it in the right section.
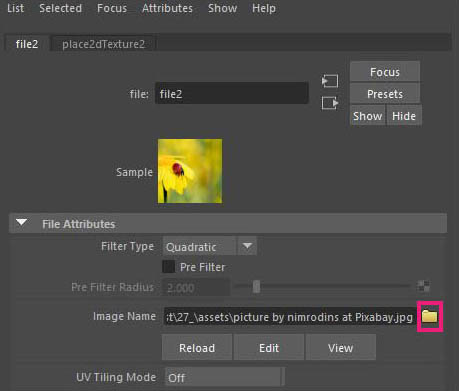
The file node is open in the attribute editor, waiting for you to locate the texture file by pressing the yellow icon folder. Locate your file and press open.
Other settings:
To render our picture we can go in two ways. Creating a camera or using one of the already orthographic views we have. We will use the second option. We will render through the front view. So, switch to the front viewport.
Also, open the Render Settings we have to make some changes. In the renderable camera choose front and in the image size set the width and height like our picture (1280 x 857), for the moment anyway. We will be multiplying it later.
In the front view, go to view – camera settings – resolution gate, or just click the button of the below image.

As you can see in the image above, we have covered our front viewport with the plane geometry, to be an almost perfect fit. We do that because when we render our picture we want not to leave any information outside. Zoom in – out in the viewport in order to cover your frame.
If we render right now, we are going to get a distortion of our image, because of the UV that plane geometry has. In order to fix that, select the plane geometry and go to Uv – camera-based. ok great.
Final step:
Now is the final step, to actually render our picture by 10x or even bigger. And the way to do that is by multiplying our existing resolution by 10.
So, we are going to Render Settings in the image size section and putting in the width field 1280×10 = 12.800 and for the height 857×10 = 8.570.
That’s it, just press the render button and you are good to go.
We have successfully enlarged our picture by 10. Of course, you can go higher or lower, it’s up to you and your needs.
That’s all:
Rendering a picture inside 3D application to get a bigger size of it, is the most efficient way to enlarge a picture. If you do that for example with Photoshop and just scale up your image by 10, you would get a quite blurry picture.
If you find the process inside Maya to have a lot of steps, it hasn’t. You could even save a template scene in Maya and the only thing you have to change every time before you render another enlargement picture would be the texture (your image), the dimension of your plane geometry and the final resolution in the Rendering Settings.
Keep in mind that you can’t go as higher as you want, there is a limitation, around 25.000 or 30.000 pixels, at least in my system.
Let me know if you bump up in any limitations about the high-resolution output that Maya couldn’t handle..


2 Responses
Your ideas absolutely shows this site could easily be one of the bests in its niche. Drop by my website 57N for some fresh takes about Cosmetics. Also, I look forward to your new updates.