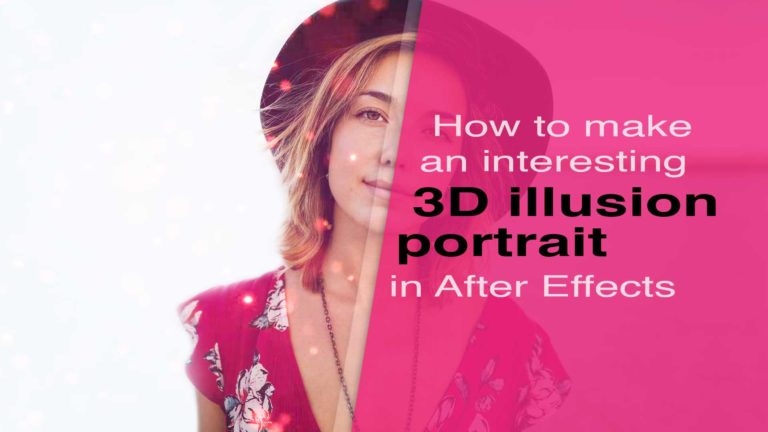
3D illusion portrait in After Effects is an interesting and fun technique. You could just brag to your friends or you may implement it in one of your personal or commercial projects.
So, what is a 3D illusion portrait in After Effects, right!
3D illusion portrait is a technic that allows you to make a traditional 2D image to give the feeling that is more than a 2D image, that it has more depth in it through animation – video. Is more like a cheating feeling of 3D in a way. 3D Artist will probably know what I am talking about, right 🙂
If you want to take a look at what we are going to create today, just go to the bottom of the page and play the video.
How works the 3D illusion portrait in After Effects:
The way you achieve this technic is quite easy and fast. As everybody knows the more you practice at something the better you get at it each time.
So, how it works! Basically, the way the 3D illusion technic works are by making a “mask” inside Photoshop on top of your original image, which has to be a grayscale mask. That mask will determine the depth of your image, where white – color is the highest value and black – color will be the lowest value. Of course, mid – tone colors will determine mid-tone value accordingly.
But what highest value and the lower value mean, right! Basically is how much is close to the camera. Let me put it that way. For the face area, the highest value (white color) will be the area of the nose, the mid-tone will be the area of the chin and cheeks and the lower (black color) value will be the area of the ears and back of the head.
Of course, we are not going to use pure black and white color in our mask. The reason is, we want to achieve a small effect for the 3D illusion effect to work properly.
Note: We can approach the technic in two ways as far as concern the “mask” creation process.
- creating the mask with Photoshop
- creating the mask inside After Effects with the pen tool
* As everything is CGI and Graphic Design there is no right and wrong, as the output is great. Either you go with Photoshop or After effects for creating the mask, it’s up to you. But I want to say that because Photoshop is the master of brushes I will go with it. If you decide to create the mask inside After Effects the way to go is with the pen tool, pretty straightforward process.
The process:
Ok fellows, let’s jump into the process. It will be fun 🙂
First thing first, in order to make 3D illusion effect we have to get an image to work on, right! So, I found and download this image of a young woman portrait by Pexels on Pixabay. So, I will be working on that image for the purpose of this post. Feel free to download the image or you may as well work on your image of course.

Secondly, we have to create the depth mask we have been talking about.
Let’s start with..
Creating the mask with Photoshop:
Ok then, starting with Photoshop. Open up the image of your choice inside Photoshop.
Notes: Try to separate each layer from each others, in order for you to have the flexibility you will need in After Effects for your final PSD file. There is no need for you to be precise about your brush strokes, in a later step, we will blur our mask so don’t spend much time perfecting your mask. Also, as you create all layers you will need, you have to lower and raise the opacity of your existing layers for visual purposes.
And make the following:
- create a new layer and fill it with black (it’s about the background)
- make a new layer and draw with a dark brush to cover the whole character silhouette (lower depth / dark color)
- create a new layer and draw with a brighter brush this time areas that are closer to the camera (mid-depth and high-depth / mid-color, white-color)
- create as many layers as it’s necessary
In my case was three-layers.
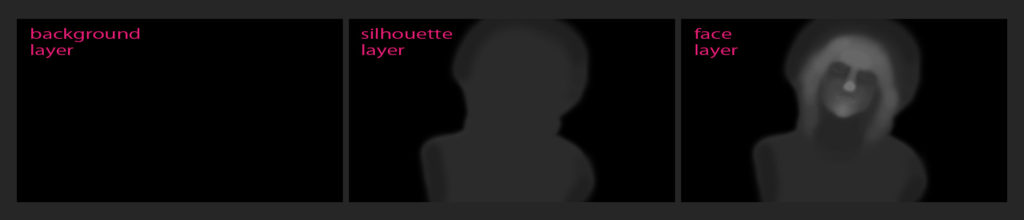
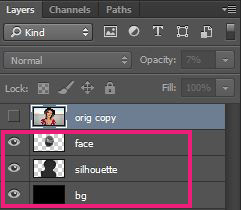
So I have three layers, right! The black background, the lower-depth (dark), the silhouette mid-depth (mid-gray), and the face high-depth (bright). That’s it, we made our grayscale mask in Photoshop. It wasn’t so hard right! Save the file as PSD and you may close it.
It’s time to switch App and go to After Effects for the actual effect.
3D illusion portrait in After Effects:
At this point, you have a PSD file with all of your layers in it (mask)
Open up After Effects, import the actual image of yours, and also drag and drop your PSD file in the Project panel. The following pop-up windows appear. Choose the setting below:
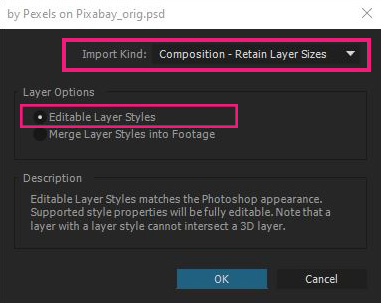
As I said earlier, “try to separate the layers from each other in Photoshop” I was referred to this stage. With this setting, you have the flexibility to control each layer in After Effects individually, which gives you a great advantage.
Note: it’s not crucial to separate layers in Photoshop, you could make all the strokes you need in one layer. It’s up to you.
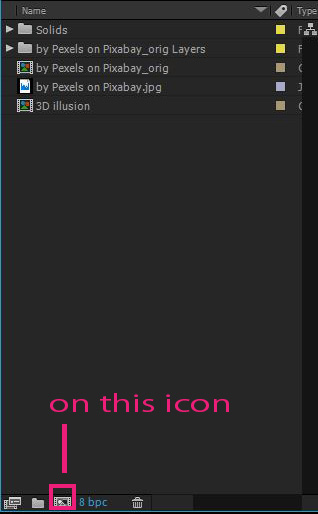
Now, drag the new composition into the “create new composition” button, in order to create a new composition to host the PSD file. Also, drag the actual image file on top of the PSD composition layer.
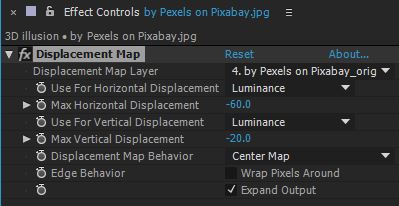
Now it’s time to apply the Displacement Map effect to the actual image layer. So, select the image layer and go to Effects – Distort and look for Displacement Map. In the Effect Controls, you can see all the properties of that particular effect. For the displacement map layer choose your PSD composition, and set luminance for both “use for horizontal and vertical displacement”. And depending on the mask you create in Photoshop you have to experiment a bit on both max horizontal and vertical displacement paraments, in order to get the best results. In my case was -60 and -20 accordingly. But at this point leave it as mine.
Go to the PSD composition and create an adjustment layer on top of everything by going to Layer – New – Adjustment Layer (Ctrl + Alt Y) on PC. After that, apply a Gaussian blur effect on that layer, and set the blurriness around 50 – 100. In my case was 80. Again depending on the mask you have created in Photoshop, you may have to play with these settings. The reason we apply a gaussian blur on the adjustment layer was that the mask was too sharp, therefore the displacement map would be too sharp as well. We don’t want that, we want a smooth result in order for the 3D illusion effect to work properly.
Note: After you adjusted the blurriness you may want to go back and also re-adjust the max for horizontal and vertical displacement paraments in the actual image layer on the main composition. Keep playing with those two settings in order to have the best results.
At this point, you may want to scale up the actual image a bit, in order to avoid a black spots in your composition.
Make the animation:
We are nearly done. It has left the animation process. It would be just a few keyframes. Just hung in there 🙂
So, make sure you are in frame 0 in the timeline. Select the actual image layer and go to Effect Controls for that layer. Press the clock watch for both max horizontal – vertical displacement and set some value. In my case was -60 and -20 accordingly. Go a couple second let’s say 4 and adjust the sliders once again in the opposite direction. Again in my case was 70 and 30.
That’s it 🙂
Play the animation you have got.
If you want some extra movement as well, you could make two keyframes for scale parament as well, the process is the same you followed for the above paraments. I did it in my 3D illusion portrait 🙂
Note: if you are not getting good results feel free to re-adjust the blurriness and max for horizontal and vertical displacement values as many times as you have to. Also, you can go back on your mask inside Photoshop and make some adjustments too. Of course, the After Effects file will be updated itself after you save the mask file inside Photoshop. Although if you create new layers inside photoshop, the bridge between Photoshop and After Effects will not work, so you will have to re-import the PSD file again in After Effects.
My 3D illusion portrait.. I am looking forward to see yours 🙂