Integrating a Cryptomatte render pass in V-Ray for Maya is a life-changing improvement to your workflow. Giving you more precise control over your final 3D renders. Whether you’re rendering a still image or an animation, you’ll definitely appreciate the flexibility and speed that Cryptomatte brings to the post-processing stage.
This article will cover:
- Cryptomatte render pass inside Maya with V-Ray renderer
- Cryptomatte effect in After Effects (final composition)
We can use, that powerfull render pass for our final composition stage, whether for just a still render or an animation.
Let’s take a look at what we’re trying to accomplish in the following video (although I’ve added some extra layers during the compositing process). If you’d like more information on the subject, keep reading.
I applied the same cryptomatte technique we’re about to discuss in my recent 3D animated short film, “The Last Dream“. Feel free to watch it.
What is a Cryptomatte Render Pass:
Cryptomatte in V-Ray for Maya is a render pass that automatically generates precise mattes (masks) for objects/materials in a scene during rendering (infinity numbers, it doesn’t really have limitations). Those information masks it’s been storing in a special image file format (covered in more detail later). For easy selection and isolation in a compositing software, during the final stage.
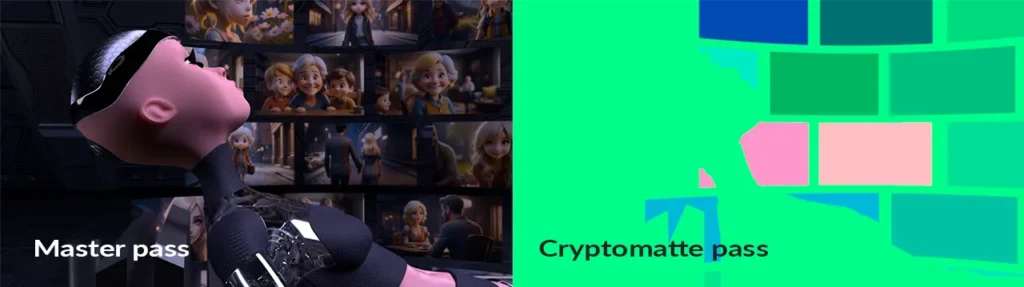
To better understand what a Cryptomatte pass looks like, take a look at the following shot. I used a Cryptomatte render pass with a separate render layer that includes only the small screens, not the character or the environment. The reason behind that decision was based on size file, which will be explained in more detail in the output image section.
Instead of using multiple V-Ray render passes in Maya (such as multi mate, object ID, etc.) to create masks. We only need a single cryptomatte pass to handle all masking for a 3D scene.
You can adjust and controll each individual “object” from your 3D scene seperately. You can apply any kind of effect you need seperately, adjust the transparency, use diferente blending option, and more. The sky is the limit.
Usefulness of Cryptomatte Render Pass:
To better understand the importance and usefulness of this render pass, consider the following example:
Let’s say you have 60 mesh-object in your Maya scene, and for some reason you want to create masks for all of them. Without a cryptomatte render pass, you will probably try to create all those masks, by using a multi matte render pass. Unfortunately, those render pass, can only hold three masks (R, G, B). So the workaround with that render pass, will be to create 20 multi matte render passes.
It sounds pretty tedious process, I now. I have been there. That’s excactly the purpose of the cryptomatte render pass. To make our lives easier, so we can focus on the creative side of a project.
Note: We can work with cryptomatte render pass in Maya, either with render layers or without. It really depents on your workflow. Render layers offer great flexibility, but you need to be comfortable working with them.
Now that we have a better understanding of the usefulness and impact of this render pass, let’s take a look at how to integrate it into our workflow in Maya when using the V-Ray renderer.
Add Cryptomatte Render Pass in V-ray for Maya:
Adding a Cryptomatte pass is straightforward, just like any other V-Ray pass in Maya. Make sure you have already selected V-Ray as the renderer in the “Render Using” option.
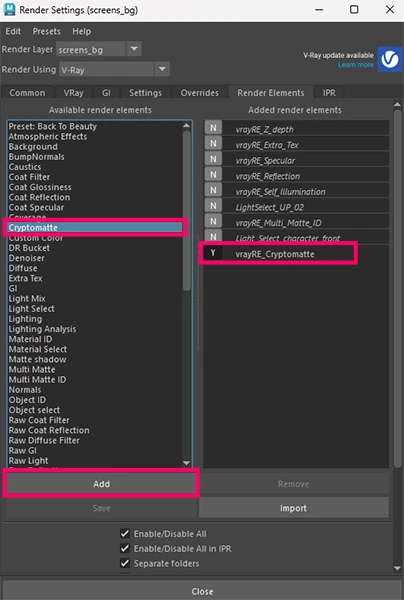
Open Render Settings (Windows – Rendering Editors – Render Settings). And go to Render Elements tab.
Note: Another name for render elements is render pass.
From the left column list, select Cryptomatte and either double-click it or select it and click the “Add” button.
Another V-Ray render element you can find useful is Z-depth. You can easily create a depth of field (DOF) either in Photoshop or After Effects. In the same spirit of useful render elements when usin V-Ray in Maya, you can also add, Ambient Occlusion (Dirt), Light Select.
Options for Cryptomatte Render Pass in V-Ray for Maya:
To see the options available for this particular pass, like any other render pass, we need to select it and open the Attribute Editor.Then, expand “Extra VRay Attributes”.
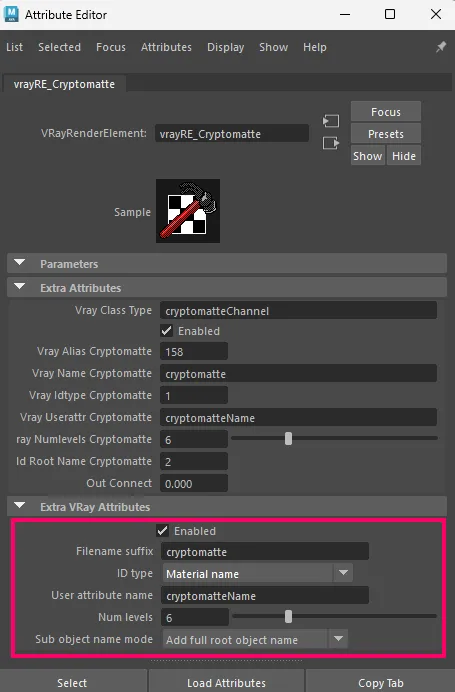
Among these attributes, the most important is the ID Type. Basically, it determinate the process we will get our mattes(masks). Based on your working project you can set it accordingly to suit you best.
We will cover the frist two options. So we can see the diference:
- Node name
- Material name
Find more details about those attributes, from the official Chaos site specificaly for Maya.
ID Type – Node Name:
This type, will ignore objects that share the same materials you have in your scene, and will assign a different color matte to each node (object) in your scene. So if you have 100 objects in your scene in Maya, you will get 100 differente color-mattes in a single crypto render pass.
This type, it’s suitable for maximum control over your compositing process, for masking purpose.
The downside, besides the tediousness of this process (inside After Effects), is that if you have too many color-mattes in your cryptomatte pass. And want to apply multiple effects to each of them in After Effects, the whole process can become quite slow and heavy. Of course, that’s depends on the power of your PC.
As you can see in the image below, everything has it’s own color:
Note: Even though some colors may look similar, they are not. When we use the cryptomatte effect in After Effects, we will be able to select each one individually, even if they appear similar.
ID Type – Material Name:
This type is best used when nodes-objects in your Maya scene share the same materials, and you want fewer mattes, as you don’t really need that extra level of control. Additionally, the compositing process will be much lighter and faster.
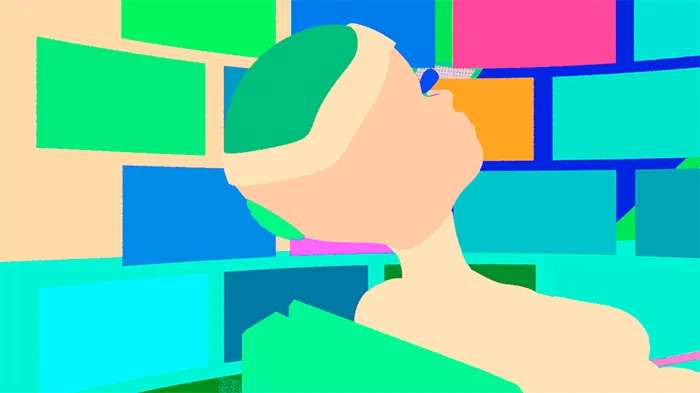
In the image below, all the small rectangular screens share the same material, while everything else has its own material. As you can expect, all the small screens will have the same color-matte (dark blue in my case), and all other objects will have their own color-matte (diferente colors):

Here are basically all the ways to create and assign a materials in Maya.
Set up the Correct Output Image Format:
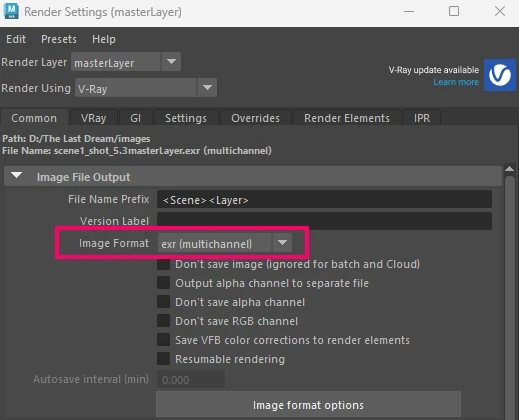
The correct output image format is the EXR (multichannel). It can be selected from the dropdown menu next to Image Format in Render Settings (Common tab). It’s the only image format (to my knowledge) than can hold all the nessasary information for that render pass.
EXR images, depenting on the resolution and the complexity of the pixels, can be very large files compare to other image formats such as, JPEG, PNG, etc.
In the beginning, I mentioned that in my recent short film, I decided to use render layers, and on those layers, I applied the Cryptomatte render pass. The reason behind this choice was primarily the file size.
It’s probably wise to render that kind of stuff separately with render layers in Maya, so your overall rendered image sequences remain a manageable size. The logic makes sence when rendering an animation (image sequence). If you are rendering a still image, file size isn’t as much of a concern.
Image Format Option (EXR):
To achieve the best quality from an EXR image, you can select No compression and go with 32 bits (full float).
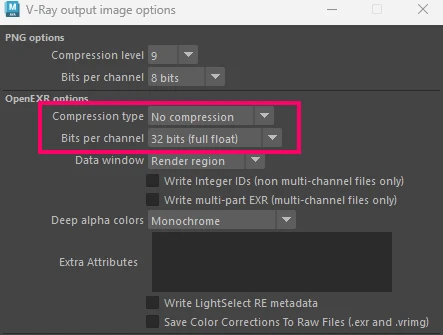
But again, keep in mind the file size. We often have to make compromises between quality and size. Although I found out that in my case, exporting a cryptomatte render pass, it doesn’t matter so much if I choose 32 or 16 bits, same goes with the compression type. Crunch them up, only if size doesn’t really matter in your case.
Export a Cryptomatte Render Pass:
Now that we have a better understanding of what a cryptomatte render pass is and how it can benefit our masking process in a composition stage, let’s render one.
For this rendering, for simplicity, we will not use render layers in Maya. Instead, we will render our cryptomatte pass together with everything else (beauty pass).
The steps:
- Open Render Settings and select V-Ray as the renderer
- Go to the Render Elements tab and add a Cryptomatte render pass.
- Set the appropriate ID Type for your Cryptomatte pass (node name, material name, etc.).
- In the Common tab, select EXR (Multichannel) as the image format.
- Adjust additional image format options if needed.
- For still images, disable “Animation” under the Common tab.
- Start the render using the V-Ray Frame Buffer.
Note: The V-Ray rendering settings for quality purposes are beyond the scope of this article.
If for some reason Maya crashes while rendering, consider this approach. Although is not perfect, it serves as a workaround for the issue.
Save a Cryptomatte Render Pass:
If you render an animation and have set up your Maya project correctly, all the render passes included cryptomatte pass will be saved in the images folder (inside your Maya project) after the rendering process is complete.
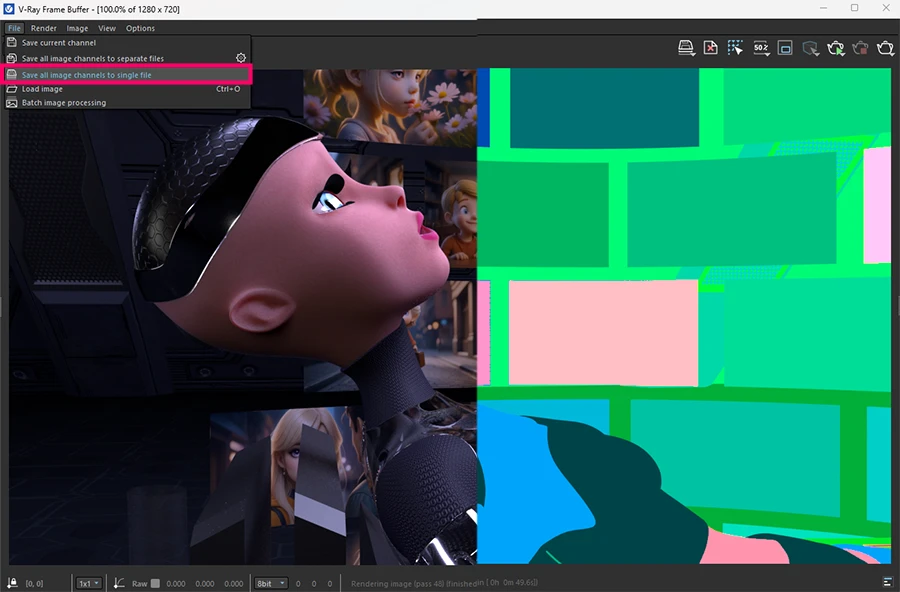
If you rendered a still image, for simplicity, go to V-Ray Frame Buffer, and click File – Save all image channels to single file. Then select the destination folder, and Maya will save a single EXR file contained both beauty and cryptomatte render pass.
In the image below, the beauty pass is on the left, and the cryptomatte pass is on the right, for comparison.
Note: There are two ways to export image(s) when working with EXR format (or any other image format). You can either save all images channels to seperate files, or save all image channels to single file (as we did). Both methods have their pros and cons. We will explore both approaches in depth in the future.
Now that we have our single EXR file containing both beauty and cryptomatte render pass, let’s jump to After Effects, and see how to use it properly.
Using Cryptomatte render pass in After Effetcs:
As mentioned earlier, cryptomatte in V-Ray for Maya is great for masking geometry in a 3D scene that has already been rendered. It provides an extremely clean approach and can obviously be used for both still images and exported animations.
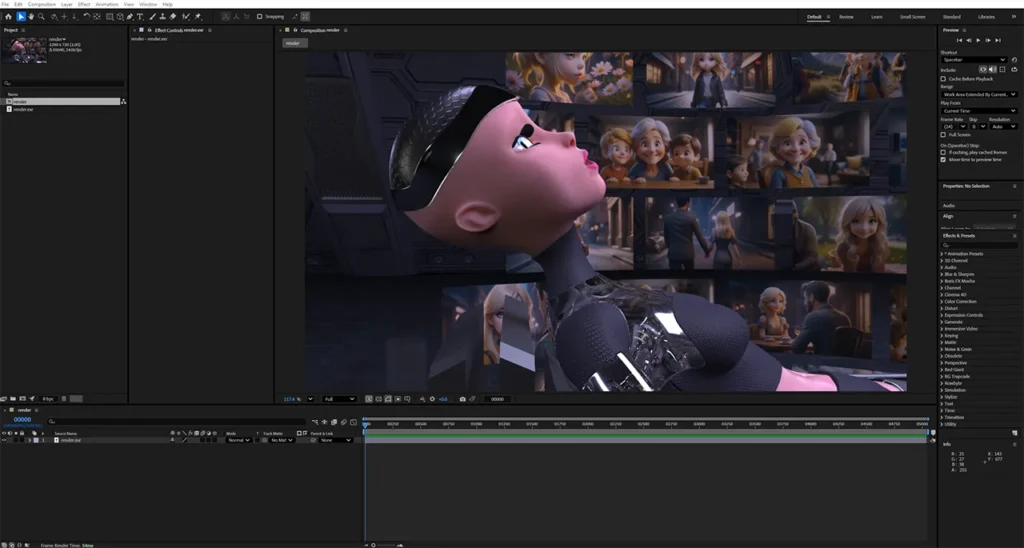
Open After Effects and import the EXR render file you just created. Create a new composition (ctrl+D), or simple drag and drop your EXR file onto the “Create a New Composition” icon under the Project window.
Note: If you exported a 32 bit EXR file, make sure you are working on a 32 bit project in After Effects, by changing the “Bit Depth” under the Project settings – Color Tab – Color Settings.
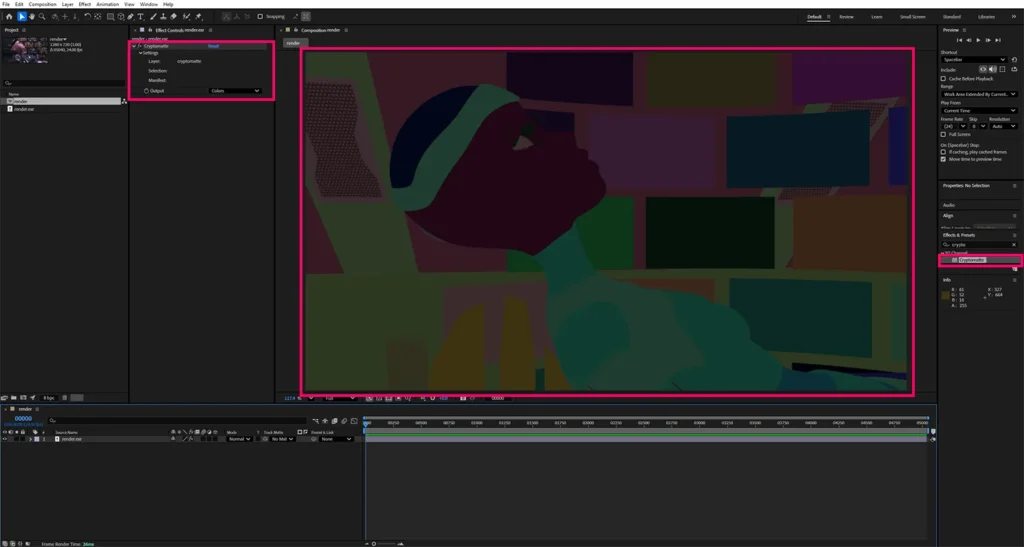
At this point we can clreary see the beauty render pass. To view the actual cryptomatte pass we rendered, we need to apply the cryptomatte effect in After Effects. Go to effects and search for or type “cryptomatte”. To apply the effect, simple drag and drop it onto your EXR layer. Now we are getting somewhere!
How Cryptomatte Effect Works in After Effects:
The way the cryptomatte effect works is quite simple. Each of the colors represents a separate matte/mask that we can use for various purposes.
For exampe, we can select all the colors of the character, to seperate the character from the background, and apply a blur effect to the background. We can also select specific parts of the character, such as her helmet and apply a glow effect. Additionally, we can select all or some of the small rectangular screens behind the character and apply an echo effect. There’s so much you can do with Cryptomatte. The examples above are just the tip of the iceberg.
How to Select Diselect a Color/Matte:
“To select a color, simply click anywhere in your composition view and pick a color. To select additional colors, hold down the Shift key and click again. If you want to remove a color from your selection, hold the Alt key and click on the specific color you want to deselect.”
Let’s just make a selection of the character.
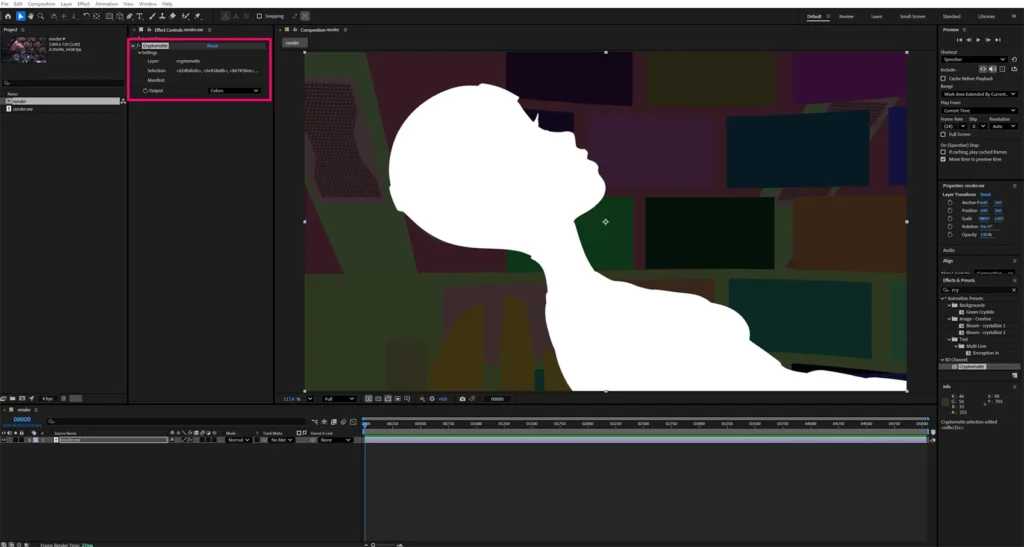
In the cryptomatte effect settings, you’ll see some random numbers and letters. These represent the mattes/colors. Each time you add another matte/color to your selection, After Effects will add another code there. However, this is mostly a background process, so you don’t need to worry about it.
The Output Settings for a Cryptomatte Effect:
The important settings are in the Output section, which provides a few options: Colors, Matted colors, Matted RGBA, Matte Only. The option you choose depends on the purpose you want to achieve.
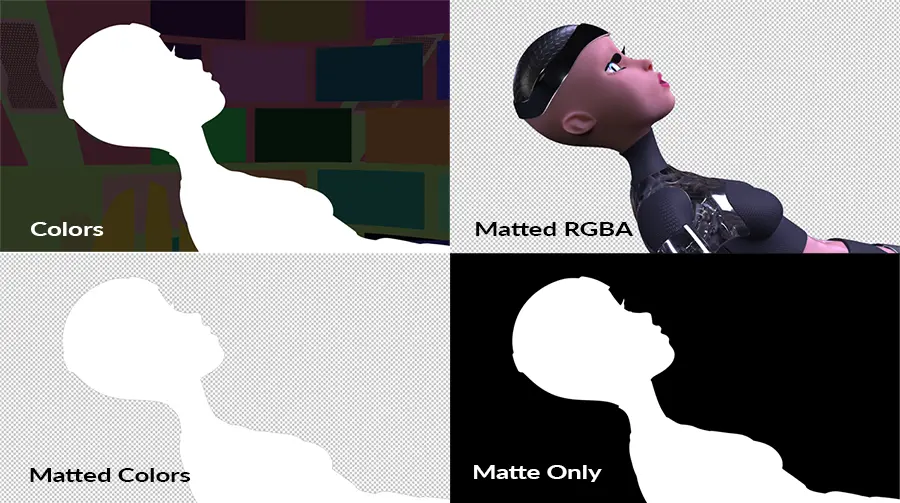
Colors: This option is mainly for reference, allowing us to select and deselect colors easily. It doesn’t have any other practical use.
Matted Colors: Basically we can use it to create transparency.
Matted RGBA: This is the option you will use most of the time. It isolates objects based on the matte/mask included in the cryptomatte pass from Maya. It’s suitable for all kinds of compositing, such as layering elements together, applying effects only to selected objects, and more.
Matte Only: This option produces a pure black/white mask. It can be used for track mattes technices.
Final Composition Using Cryptomatte Effect in Action:
The image below shows a comparison between the original render and the final composition in After Effects:
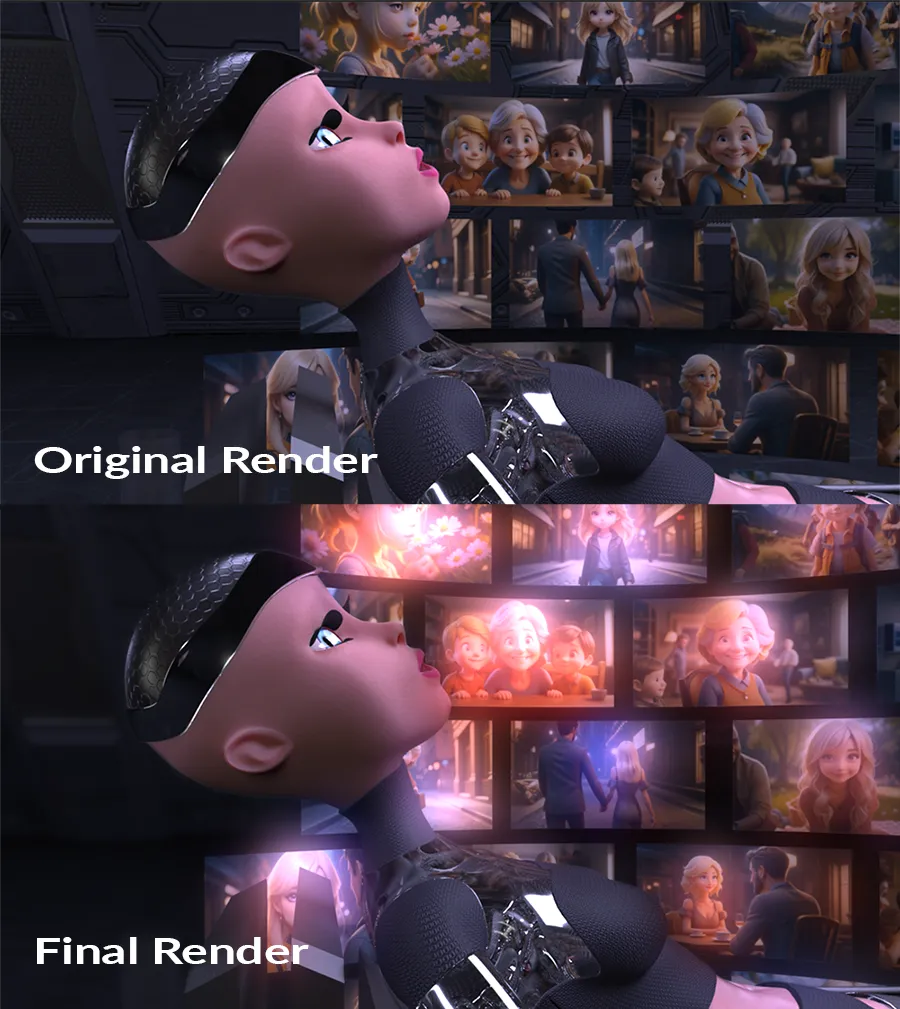
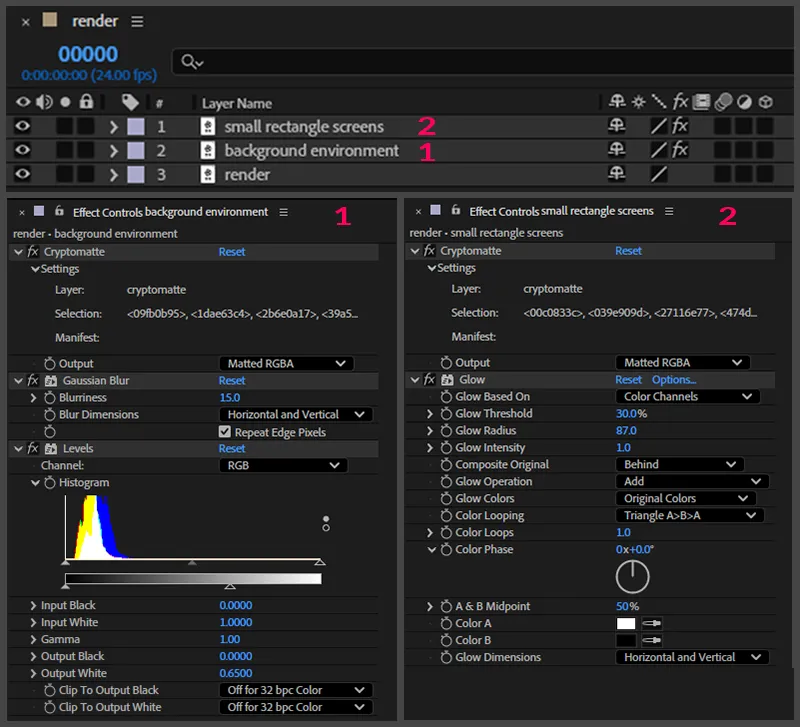
For the final composition we are going to duplicate our render layer (original EXR image) twise. So we end up with three instances of the render layer.
- Bottom layer: This layer will have no cryptomatte effect applied. It serves as our base layer.
- Middle layer: Apply a cryptomatte effect to isolate the background (selected all the mattes\colors of the background). You can then apply a gaussian blur effect, and also a color correction-level effect, for darkening.
- Top layer: Apply a cryptomatte effect to isolate all the screens (select all the mattes/colors for the small rectangular screens).
Keep in mind, that we can duplicate our original EXR render layer as many times as we want and apply a Cryptomatte effect to each one. In these additional duplicates, we can separate the whole character, the skin parts, glossy or metallic parts, etc.
Summary:
This article walked through the complete workflow of setting up and using a cryptomatte in V-Ray for Maya, from rendering to final compositing in After Effects.
It explained what Cryptomatte was, why it’s far more powerful than traditional matte/masking passes, and how it simplified complex masking tasks for both still images and animations. The post covered how to add and configure the Cryptomatte render element in Maya, choose the appropriate ID types, export the correct EXR format, and use the Cryptomatte effect in After Effects to isolate objects, and backgrounds with precision.
By the end, it demonstrated how Cryptomatte significantly improved flexibility, speed, and creative control during post-production, allowing artists to focus more on creativity and less on technical limitations.


