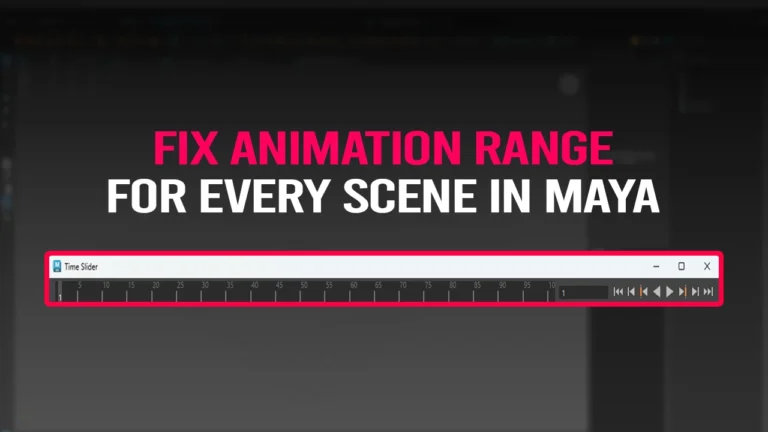
Have you ever changed the timeline range in Maya, only to discover that your settings reset every time you create a new scene?
By default, Maya may revert to its original time range when you start a new scene, even if you’ve previously changed the values through the Time Slider preferences.
In this short tutorial, I’ll show you how to permanently change the default time range in Maya, so every new scene automatically uses your preferred start and end frames.
It’s a very simple adjustment, but it can save you time and make your everyday Maya workflow much more convenient.
Feel free to watch the the below video.
Change the Time Range Settings in Maya (Only For the Current Scene)
You can access the time range settings either by clicking the relevant icons near the timeline or by navigating to:
Windows → Settings/Preferences → Preferences → Time Slider.

Here, you can change the start and end frames to whatever values you need.
For example, let’s say I want to change my current timeline range from 1–2000 to 1–500.
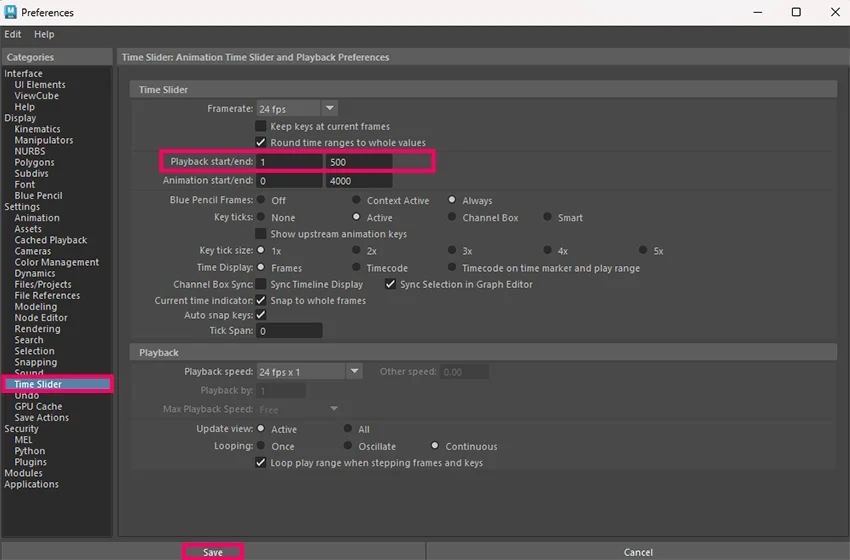
After changing the values and clicking Save, Maya will immediately update the Time Slider.
However, there’s one problem.
If I go to File → New Scene, Maya will revert to its previous default time range of 1–2000, or whatever that would may be in your case.
Note: In my case the animation time slider was 1-2000, you can have a different one.
This happens because changing the Time Slider preferences only affects the current session or scene settings, rather than the default settings used when creating a new scene.
If you’re looking for more ways to improve your everyday Maya workflow, check out my article on 10 General Tips and Tricks in Autodesk Maya.
So, how can we fix this permanently, for every new scene we create in Maya?
How to Permanently Change the Default Time Range in Maya
Fortunately, the solution is very simple.
Step 1: Open the New Scene Options
Instead of clicking directly on File → New Scene, click the small option box next to the New Scene command.
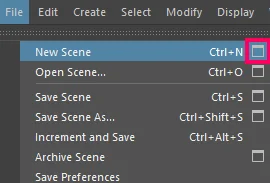
This will open the New Scene options window, where you can configure the default settings for newly created scenes.
Step 2: Change the Default Time Range
Inside this window, locate the time range settings.
Here, you can specify your preferred start and end frames.
For example, let’s say I want every new scene in Maya to start with a time range of 1–100 instead of the default 1–2000.
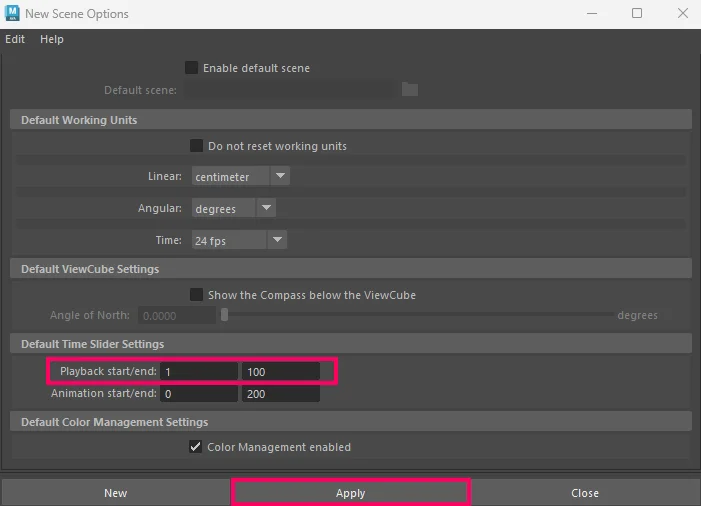
Simply change the corresponding values to your preferred range.
Step 3: Apply and Save Your Settings
Once you’ve entered your desired values, click Apply and close the window.
That’s it!
Your new default time range has now been configured.
Test Your New Maya Default Time Range
To make sure everything works correctly, go to:
File → New Scene
This time, Maya should automatically use the time range you specified in the New Scene options.
Note: You can repeat this process whenever you want to change your default timeline settings.
No more manually adjusting the Time Slider every time you start a new project!
When working with animations, setting the correct timeline range is particularly important. If you’re interested in creating seamless looping animations, take a look at my tutorial on how to create a turntable in Maya.
Final Thoughts
As you can see, permanently changing the default time range in Maya is a very simple process.
Although changing the Time Slider preferences might seem like the obvious solution, those settings won’t necessarily be preserved when creating a new scene.
By using the New Scene options, you can configure your preferred default time range and make Maya remember those settings for future scenes.
It’s a small workflow improvement, but one that can save you unnecessary adjustments, especially if you regularly work with animations or simulations that require longer frame ranges.
If you’re interested in more Maya tips and tricks, feel free to check out some of my other tutorials on the blog.
I hope you found this quick tip helpful!
If you have any questions, feel free to leave a comment below, and I’ll do my best to answer them.
Thank you for reading!