
Batch rename photos with Adobe Bridge is a great way to rename all photos in a folder with a few steps. It has also great flexibility as you could choose the name convention you want to use for your photos.
For those who don’t know that Adobe Bridge is, basically an explorer – viewer for files, but you could do so much with it. One of the things you could do, you guessed right, is to batch rename photos.
Bridge is a powerful creative asset manager that lets you preview, organize, edit and publish multiple creative assets quickly and easily.
Adobe
You could find more about Adobe Bridge here.
Why use the batch rename option with Bridge!
Well, it’s simple. The answer is quantity as you could imagine. If you are dealing with a few photos you don’t have to bother with batch rename stuff. But imagine if you want to change the name of a bunch of photos you have. Let’s say a hundred or even more, a thousand. It could be a very tedious process, more like a nightmare, right! That’s where the batch rename option with Adobe Bridge comes in place. To save your day.
Batch rename photos with an example:
In this example, I am going to demonstrate a simple approach to batch renaming.
So, open up Adobe Bridge and locate a folder with a lot of photos in it.
Now if you want to select specific photos you can do that by holding the ctrl key as you click on each image. If you want to select all of them, you could either select the first photo and go to the bottom and press the shift key and click on the last photo, or, just press ctrl + a, and all of your images in the particular folder will be selected.
Since you have selected photos you want to rename, just go to the main bar, tools – batch rename… The batch rename windows pop up.
Paraments:
Presets:
After you have chosen all of your paraments you could save all of the work you have done as preset in order to quickly use it in another batch rename situation. Quite handy.
Destination folder:
Pretty simple, right! Where the new photos will be saved.
Note: I highly recommend, when choosing the destination folder to choose “copy to other folder“.
Why? If you, for example, chose “rename in same folder” or “move to other folder” and something goes wrong, and you have no backups of your photos, it could be a problem. At least try to have some renames in your accounts in order to have some experience with the process before you chose something else but “copy to other folder”.
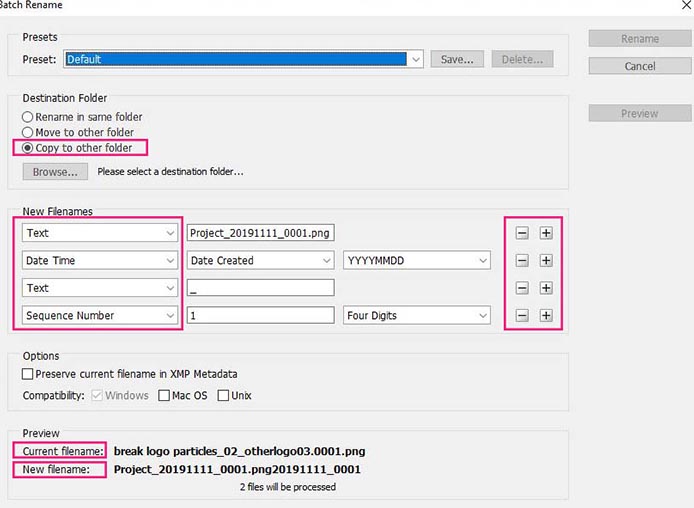
New filenames:
In this section, you can add extra elements of words for your new filename. It’s more like, what makes sense to you and your pipeline in order to choose the right elements for your new filename.
Preview:
The preview section, it shows how the name is currently displayed and how the new one would be displayed. It’s changing dynamically as you play with the “new filenames” section.
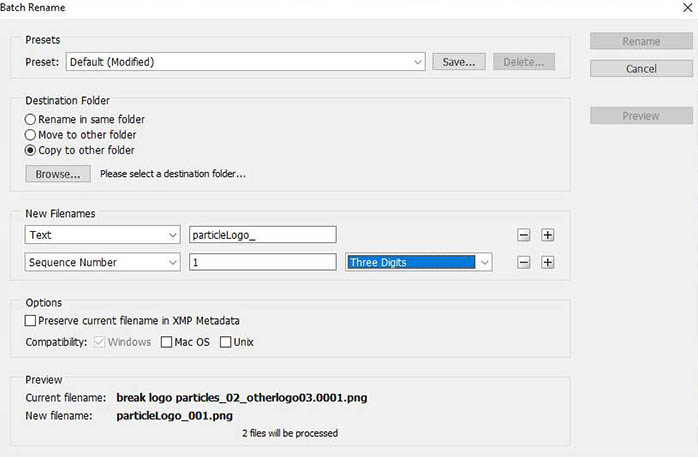
As I said, I was going to demonstrate a simple approach to batch renaming. My option for the batch rename has two paraments. A specific name I chose and a sequence number, separated by “_”
That’s all
As you can see the process is quite simple to follow through. Just keep in mind before messing up any name convention for your photo, to set the “copy to other folder” as an option in the destination folder.
If you have a large collection of photos and you want to rename them accordingly, Adobe Bridge is definitely one way to go.

2 Responses