Photoshop symmetry tool is a great way to unleash your creativity, speed up, and have accuracy in your work. The new feature of symmetry has a bunch of symmetry modes you can use to suit your needs.
It’s not a must tool in my opinion in the concept and philosophy of Photoshop and the things you are supposed to do with it, but it’s really nice to have it.
After so many years of not having a symmetry tool in Photoshop although some other image editing programs already has had it, I thought, it would never going to happen. I am glad I was wrong.
If you are new to Adobe Photoshop you could take a look at HOW AND WHY TO LEARN PHOTOSHOP
How to paint with symmetry in Photoshop:
How to use symmetry:
To paint with symmetry in Photoshop is an extremely easy process. The only thing you need to do is to enable the feature of symmetry inside Photoshop and you are ready to make great things with it.
We can use the symmetry feature with both brush and pencil tools. Of course, the erase tool works with symmetry as well.
The way to enable the symmetry is by selecting either one of those tools, hit the butterfly icon, and selecting one of the symmetry modes in the top bar of Photoshop (in the far right corner). Doing so, a path guide appears. Now we can start painting or sketching with symmetry in our document of Photoshop.

Note: The symmetry tool does not support all brushes in Photoshop
Path guides of symmetry tool:
Every time we choose a symmetry mode, automatically Photoshop creates a path in the path pallet which can be located under Windows – paths.
Let’s say for example we choose a vertical symmetry mode and draw something with it. Then, we choose another symmetry mode like a horizontal one or any other symmetry mode and again we draw something. If we want to draw with the first selected mode once again, which was the vertical symmetry mode, we could re-use the first path that already Photoshop has created in the path pallet for us, and not create from start another vertical symmetry path.
Re-use a symmetry path:
The way to re-use an already existing symmetry mode path is by going to path pallets and selecting the path that you want to be your symmetry guide. Right-click on it and choose to make symmetry path. The butterfly icon appears next to your selected path, which is an indication that is the active symmetry path on your particular document.
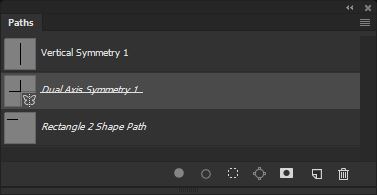
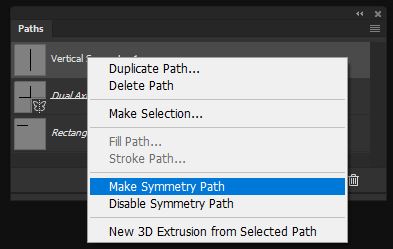

Note: symmetry paths always affect the entire canvas and not just the region it covers in your Photoshop document. We don’t have to extend or shrink it. Also, we could hide it without affecting the function of symmetry. Therefore, It’s for visual purposes only.
As we have covered how to use the symmetry tool, now it follows some theory about each mode. Some of them are pretty self-explanatory.
Different modes of Photoshop Symmetry Tool:
Here is a quick summary of how each of Photoshop ten Paint Symmetry options works:
- Vertical: Divides the canvas vertically and mirrors brush strokes from one side onto the other side.
- Horizontal: Divides the canvas horizontally and mirrors brush strokes from the top onto the bottom, or from the bottom onto the top.
- Dual Axis: Divides the canvas vertically and horizontally into four equal sections (top left, top right, bottom left, and bottom right). Painting in one section mirrors your brush strokes in the other three.
- Diagonal: Divides the canvas diagonally and mirrors brush strokes from one side onto the other.
- Wavy: Similar to Vertical but with a curved, wavy line instead of a straight line.
- Circle: Mirrors brush strokes painted inside a circle outside the circle, and vice versa.
- Spiral: Mirrors brush strokes painted along either side of a spiral path.
- Parallel Lines: Divides the canvas into three vertical sections using two parallel vertical lines. Brush strokes painted in the middle section are mirrored in the left and right sections.
- Radial: Divides the canvas into diagonal segments, or “slices”. Brush strokes painted in one segment are mirrored in the others.
- Mandala: Similar to Radial, but mirrors the brush strokes within each segment as well, creating twice as many brush strokes as Radial.
I found an interesting blog post that is more detailed in the matter of step-by-step process from photoshopessentials.com if you want to check it out.
Painting with symmetry modes inside Photoshop in action:
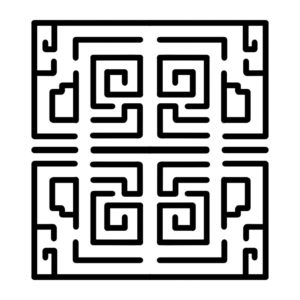
As we have grasped how we can use the symmetry tool in Photoshop and its different modes of it, it’s time for the fun part. To actually make something out of it. After playing a little bit with the symmetry tool, I have created some examples with some of the symmetry modes below.
Symmetry modes examples:



That’s all:
Photoshop symmetry tool is a great tool after all.
Besides the obvious use of each one of the symmetry modes, you could use your imagination and your creativity to shake things up.
The radial and mandala symmetry mode is really powerful, you should definitely try them out. It’s an easy way to make a really complex pattern really easy. Of course, you could mix all symmetry modes above to create a final masterpiece such as character, environment, nature, or whatever you are inspired of.
Feel free to check out paint symmetrical patterns from Adobe Official.




One Response