
Working with precomp in After Effects is a great way to nest layers and apply effects efficiently, and much more.
Precomps (pre-compositions) in Adobe After Effects are essentially nested compositions. In that way, we can organize comple projects, apply efficiently effects, and improve performance. For in-depth information about this topic read here.
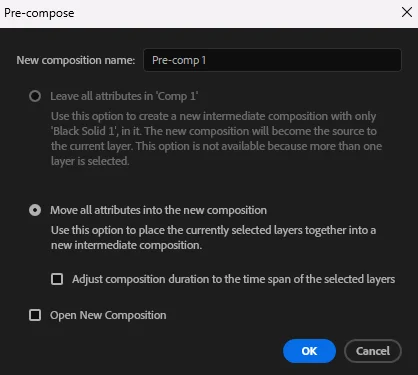
We can create a pre-compose from the main bar, Layer – Pre-compose, through shortcut (ctrl+shift+C), or right-click on selected layers and choose Pre-compose.
When creating a precomp with has to choose between two options:
- Move all attributes
- Leave all attributes
After we created a precomp we can edit it, adjust the duration of our precomp, stime stretching-freezing. We can also apply all kind of effects by just draging the effects into our precomp, the same way we would do if it was just a layer.
Working with precomps in After Effects is a great way, it’s give us a great flexibility.
In the above video, I created a precomp to apply a VR Plane to Sphere (effect) otherwise would be impossible to do so, without the precomp.
Additionaly, I could also reposition the precomp at once (included all layers) without the need to select all individual layers (as I did) and drag them to the center of my composition.
In the following video I created a precomp and apply a ramp effect in order to create the illusion of DOF on the shot.
Some other After Effects tutorial you may be interested:
- Integrate footage inside footage (Motion Tracking in After Effects)
- How to move an After Effects Project to Another Computer
- How to Relink Missing Files in After Effects
Precomps in After Effects is really a useful workflow you should definitely need to grasp. The more you use them the better and most efficient your will get working on your projects.