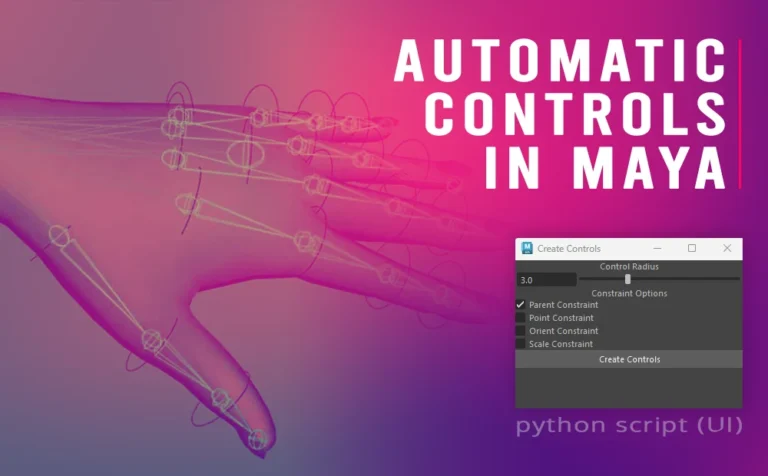
Create automatic FK controls for joints in Maya, an intuitive python script with UI to simplify your rig workflow. It’s completely free and you should definetly try it.
This script is an upgrate, that has a UI for easely change the type of constrains and also has a slider to adjust the size of the nurbs curves that will be generate for your joints controls.
The original script, did the same job, except it didin’t have UI to change constrains type and the size of nurbs curve. Although, we could change the above parameters through Script Editor in Maya.
So I figure out, it would be much easier and faster to deal with, if it would have a user interface (UI) with those parameteres. So I re-write the script with the help of chatGPT.
If you want to learn the basics of using Python in Maya.
Since this script is a just an upgrate from the previus one. And the only diference is that this one has a UI for easily access the constraint type and adjusting the radius size of your controls. Feel free to visit the previus article, in order to fully understand the whole process of using it.
Automatic FK Controls for Joints, How It’s Works:
Here is the Python script:
Create automatic FK contrls for all selected joints in Maya
import maya.cmds as cmds

def create_controls():
    """
    Create controls based on user settings.
    """
    # Get selected joints
    selected = cmds.ls(sl=True)
    if not selected:
        cmds.warning("No objects selected. Please select joints to create controls.")
        return

    # Get user options
    radius = cmds.floatSliderGrp(radius_slider, q=True, value=True)
    parent_constraint = cmds.checkBox(parent_checkbox, q=True, value=True)
    point_constraint = cmds.checkBox(point_checkbox, q=True, value=True)
    orient_constraint = cmds.checkBox(orient_checkbox, q=True, value=True)
    scale_constraint = cmds.checkBox(scale_checkbox, q=True, value=True)

    for s in selected:
        ctrl_name = s.replace("_jnt", "_ctrl")
        ctrl = cmds.circle(nr=(0, 1, 0), r=radius, n=ctrl_name)[0]
        group = cmds.group(ctrl, n=ctrl + "_auto")
        offset = cmds.group(group, n=ctrl + "_offset")
        cmds.parentConstraint(s, offset, mo=False)
        cmds.delete(cmds.parentConstraint(s, offset))

        if parent_constraint:
            cmds.parentConstraint(ctrl, s, mo=False)
        if point_constraint:
            cmds.pointConstraint(ctrl, s, mo=False)
        if orient_constraint:
            cmds.orientConstraint(ctrl, s, mo=False)
        if scale_constraint:
            cmds.scaleConstraint(ctrl, s, mo=False)

        cmds.select(clear=True)

def build_ui():
    """
    Build the UI for the script.
    """
    if cmds.window("createControlsUI", exists=True):
        cmds.deleteUI("createControlsUI")

    window = cmds.window("createControlsUI", title="Create Controls", widthHeight=(300, 200))
    layout = cmds.columnLayout(adjustableColumn=True)

    # Radius slider
    global radius_slider
    cmds.text(label="Control Radius")
    radius_slider = cmds.floatSliderGrp(field=True, minValue=0.1, maxValue=10.0, value=3.0, step=0.1)

    # Constraint checkboxes
    global parent_checkbox, point_checkbox, orient_checkbox, scale_checkbox
    cmds.text(label="Constraint Options")
    parent_checkbox = cmds.checkBox(label="Parent Constraint", value=True)
    point_checkbox = cmds.checkBox(label="Point Constraint", value=False)
    orient_checkbox = cmds.checkBox(label="Orient Constraint", value=False)
    scale_checkbox = cmds.checkBox(label="Scale Constraint", value=False)

    # Create Controls button
    cmds.button(label="Create Controls", command=lambda x: create_controls())

    cmds.showWindow(window)

# Run the UI
build_ui()
At the image below, you can see the User Interface (UI) of this python script:
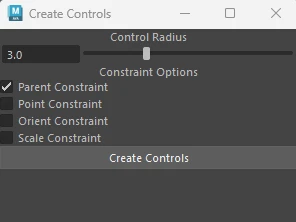
From this UI you can select or multiselect the constraint types and adjust the radius of the nurb circles you are going to generate.
This python script creates controls for all selected joints on your Maya scene and adds a constrain on each joint, which you specify.
Specificly, it creates four nodes for each selected joint:
- An empty offset node
- An empty auto node
- A nurb circle node
- A constrain type under a selected joint
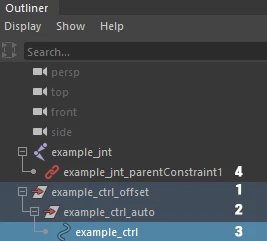
The two parent nodes above the nurb circle node controler (offset, auto), are for extra control, which you may need for your rigging setup.
Important: In order the script to work, your joints must have _jnt suffix. Additionaly the new generated controlers, will have _ctrl suffix. That’s pretty much is.
Lastly, if you find yourself usin this script a lot, feel free to put it on a shelf in Maya, for easy access.


