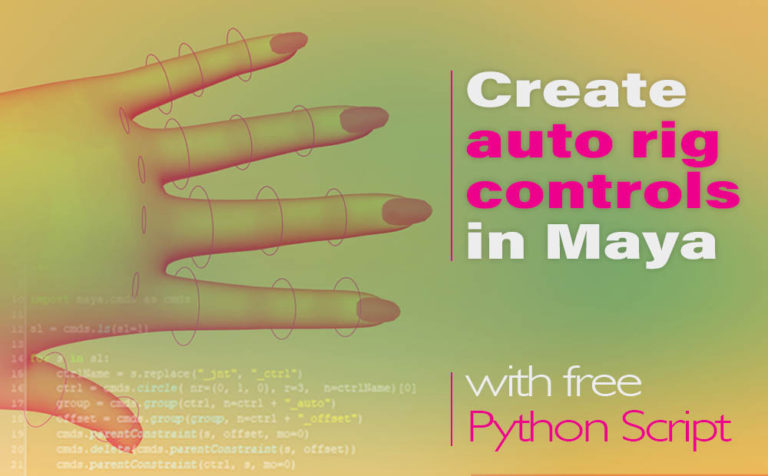
Create auto rig controls in Maya with this free Python script. This script creates automatic controllers for your selected joints in Maya. As you can imagine you can save a lot of time, creating the controllers for your joints in Maya by using this automatic script. It’s a complete time-saver script. Keep in mind, this script is working for the FK (forward kinematics) type of setup.
I found this Python script a couple years ago, and unfortunately, I can’t recall who is the author/creator of it, to give the proper credit for his / her amazing work.
Download the Python script of Auto Rig Controls in Maya.
In this article, we will see:
- how the script theoretically works
- an example of using it in Maya
But before you dive into what the script has to offer, let’s take a look at the Rigging process first.
Lastly, if you have been working on a facial GUI rig in Maya a lot, you may simplify the process by creating automatically the facial GUI controls through free mell script.
Related Rigging topics with scripts in Maya:
- Joint splitter mel script tool for Maya (time-saver for rigging)
- Python script for mirror cluster deformer in Autodesk Maya
If you are an experienced user you will probably be ok by just watching the video below. Although keep reading for more info.
Rigging in Maya:
In general, rigging is the process of making our characters or props have the ability to move – deform in a certain way. We accomplish it with different techniques, depending on the complexity we are trying to achieve.
The simplest stage of rigging is to have a skeleton ( joints in Maya) and control those joints with additional controllers. They hold all the animation information that will be created in the process/stage of animation.
So, it’s necessary for our joints in Maya to have their own controller in the process of Rig. Creating all those controllers could be a very time-consuming process. The python script for Auto Rig controls in Maya it’s tackling that specific issue.
Rigging is making our characters able to move. The process of rigging is we take that digital sculpture, and we start building the skeleton, the muscles, and we attach the skin to the character, and we also create a set of animation controls, which our animators use to push and pull the body around.
Wikipedia
That being said, let’s now dive into our script.
How auto rig controls in Maya script work:
Basically, the auto rig controls in Maya script create circle nurbs controllers for the selected joints, added two extra levels of groups (auto, and offset), and lastly added the necessary constraints on them.
If you manually created the controllers for your joints in Maya, the process would be something like this:
- created a joint
- created a circle nurbs
- adding extra levels of groups for hierarchy purposes
- created the constrain between the joint and the circle nurbs
With this python script, we eliminate all those steps, except of course the creation of the joint itself.
Auto rig python script code:
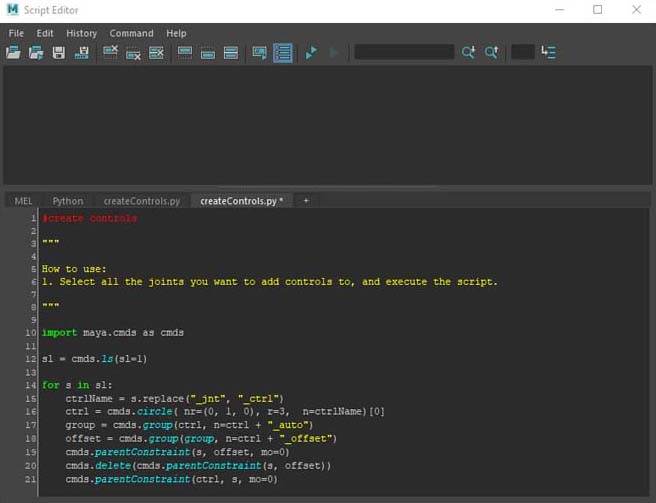
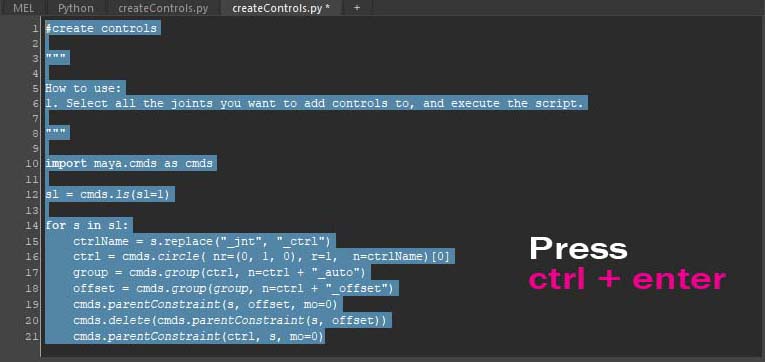
If you open the script in Maya script editor it looks like this:
#create controls

"""

How to use:
1. Select all the joints you want to add controls to, and execute the script.

"""

import maya.cmds as cmds

sl = cmds.ls(sl=1)

for s in sl:
    ctrlName = s.replace("_jnt", "_ctrl")
    ctrl = cmds.circle( nr=(0, 1, 0), r=3,  n=ctrlName)[0]
    group = cmds.group(ctrl, n=ctrl + "_auto")
    offset = cmds.group(group, n=ctrl + "_offset")
    cmds.parentConstraint(s, offset, mo=0)
    cmds.delete(cmds.parentConstraint(s, offset))
    cmds.parentConstraint(ctrl, s, mo=0)
If you have a few code skills, you would probably don’t need any instructions at all, and you can start using it and benefit from it, right away.
In case you haven’t, don’t worry. I am here to make it clear to you. So let’s start from the start.
The steps of running the script:
• As the script is already indicated you have to select one or all the joints you need to create controllers for them.
• All your joints in Maya have to be with the suffix “_jnt”. As I result the controllers which would be generated for your joints will have the “_ctrl” suffix.
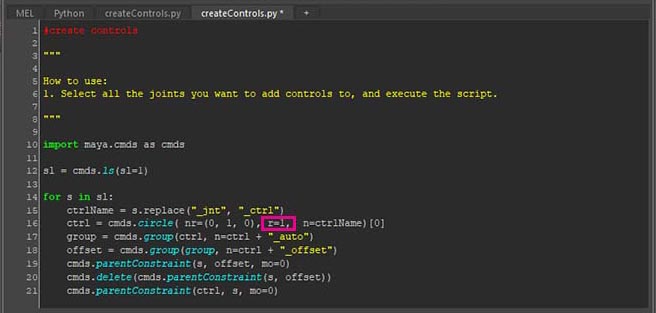
• You could adjust the radius of the circle nurbs before you create the controller. The way to do that is by changing the r=3 parament in the line of code. The number depends on the scale of your particular scene.
• By default the script creates a parent constraint (a link between a specific joint and the new controller that will be generated for that joint). You could change that.
If you want to create other constraints, let’s say for example a point or orient constrain, you have to replace the word of parentConstraint at the end line of code to pointConstrain or orientConstraint respectively. You could also add two kinds of constraints at the same time. And the way to do that is by adding an extra line of code in the already existing code, like the code below:
cmds.pointConstraint(ctrl, s, mo=0)
cmds.orientConstraint(ctrl, s, mo=0)
That’s all, you run the code in the script editor in Maya and the script automatically creates controllers for the selection of joints you made.
Now let’s see it in action in Maya with an example.
Auto rig controls in Maya with an example:
Let’s find out how the auto rig controls in Maya script will help us in our process of rigging.
We are going to demonstrate it by creating a simple FK (Forward Kinematic) type of rig for the arm of our character. Let’s jump to Maya.
After loading the scene of a businesswoman character, as you can see there is the skeleton – joints for the left arm, already created by me. We are going to create for all those joints additional nurbs controllers with our script.
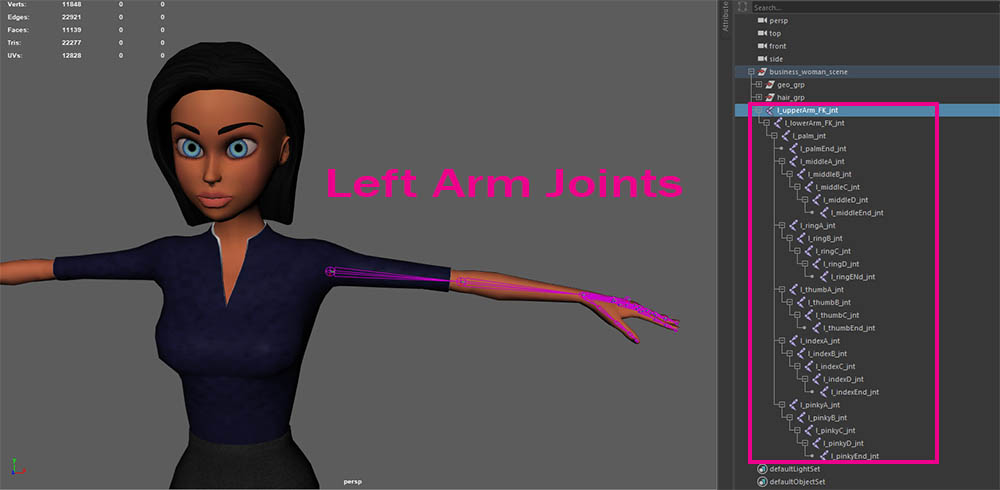
Properly rename all joints (Step 1):
As I said, in order for the script to work properly, all your joints in Maya have to be with the suffix “_jnt”.
Select all joints (Step 2):
Select all those joints either from the Maya viewport or from the outliner, so that in the next step, we can add controllers for all those joints.
Note: After your selection, feel free to unselect the end joints of the fingers. Those joints end with End_jnt. There is no need to include them in our rigging setup.
Open up the Script Editor (Step 3):
Not its time to locate our script. Open up the Script Editor by going to Windows – General Editors – Script Editor. Go to the script editor – file – open script, and located the script you download from the top of this article (createControls.py).
Make any adjustments to the script (Step 4):
At this point we can make any adjustments to the script, like changing the radius of the nurbs controller, changing the type of constraint, etc. In this particular project, we will just alter the radius parament, and alter it from 3 to 1. So r=1.
Run the auto rig script (Step 5):
If you haven’t already selected all the joints, now it’s time to do that. After that, highlighted all the text in your script editor and press ctrl + enter.
That was it. You may close the script editor.
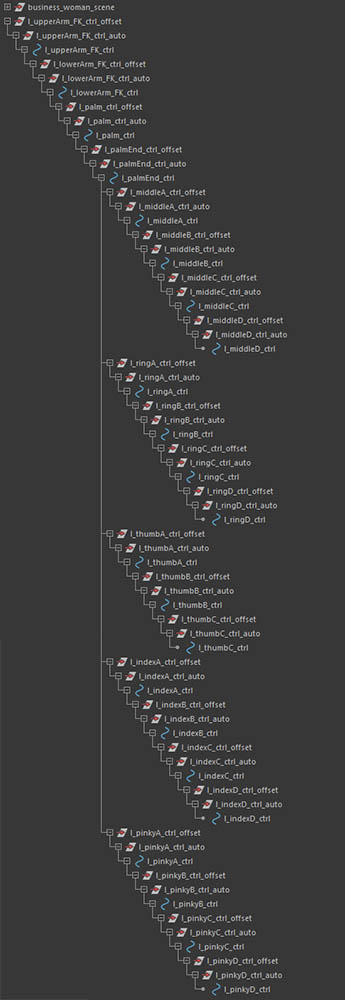
As you can see in the viewport and the outliner in Maya, there are all those new node controllers that have been created with the help of the auto rig controls in Maya script.

Now it’s just a simple parenting and hierarchy process. Meaning you have to parent each new controller node to the right parent node. After the parenting process you would have something like the image below:
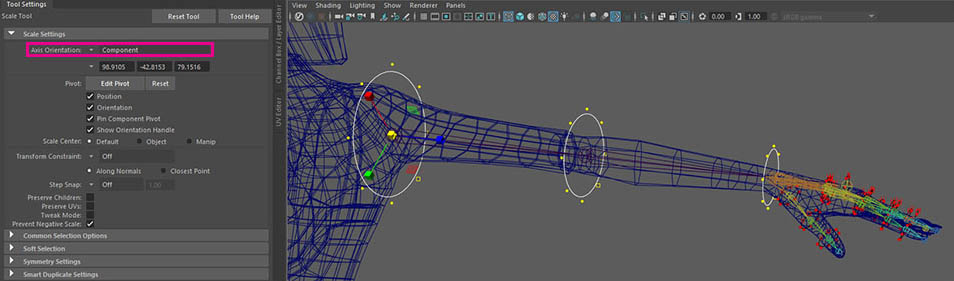
Fixing the radius of the new controllers in the viewport in Maya:
As you can see in your viewport, not all circle nurbs controllers have the right radius. We have to select each one of them in component mode and make the necessary adjustments. A better way is to adjust them by groups. For example, select the three controllers (upper_arm_ctrl, lower_arm_ctrl, and, palm_ctrl) go to component mode and select all those CVs and scale them accordingly with axis orientation: component. Then you can select all the other finger controllers and make the same process.
Summary:
What we accomplish in a matter of a few minutes or even less with auto rig controls in Maya script is quite awesome. If we did it in the transitional way it would probably have taken us around 10 minutes or even more, depending on how fast we are working. In this article, we covered only one side of the arm. Imagine how much time we would save if we did the whole FK rig for the whole body with this script.
As I already mentioned, this script in Maya works when working with the FK (forward kinematics) kind of setup and not for IK (invert kinematics), which is a totally different process.
Another thing I have forgotten to mention is, that you can use this script not only for character rig projects but also for any project you wish that the core of your particular rig is an FK setup system. It could be a rig of props, vehicles, fruits, etc.
Just with all scripts in Maya, either Mel or Python, if you use them frequently, it’s a good idea to put them on a shelf for easy access.
The model that has been used for this article is one of my 3D Character models: Business Woman Cartoon Rigged Low-poly 3D model. The FK setup on this model has been created with that script. If you want to check it out, here are two links.
- Business Woman cgtrader (platform)
- Business Woman turbosquid (platform)
I hope you guys found that script useful for your next character project. If you have any questions, don’t hesitate to ask.


7 Responses