
Python script for mirror cluster deformer in Maya, to save the day. Using this script you save time from creating the clusters and the paint weights of them for the opposite side. Did I mention the script is Free! Yeap, enjoy it.
The Author of the python script for mirror cluster deformer in Maya is ShaoLei.
You could download the script from here.
Another great tool for rigging purposes, this time a mel script is Joint splitter in Maya.
Use of cluster:
Use clusters when you want to affect different parts of geometry in different amounts during transformations. Cluster deformers let you control a set of points on the object (CVs, vertices, or lattice points) with varying amounts of influence.
The deformer applies transformations to the points in a way that lets you adjust the precise percentage that each point is affected. Read more about it here.
You could use clusters in a variety of things in Maya. From a simple and small deformation to full character face controls.
Running the “mirror cluster deformer in Maya” script:
The process of running the “mirror cluster deformer in Maya” script is quite straightforward as with every other python script. You open the script editor in Maya, and locate and load the script. Automatically the script will be executed.

As a result, a new window pops up with few options. That’s the actual script for the mirror cluster.
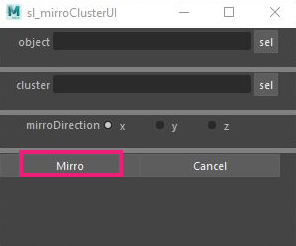
Object: Select the 3d object that has a cluster. Cluster: Select the cluster you want to copy and mirror. MirroDirection: Specify the axis and the mirror will take place. Finally, you press the Mirro button.
That’s pretty much it. Simple enough right!
Demonstration mirror cluster deformer script in Maya:
To demonstrate better the time we save, we will be working on a simple cartoon head concept I created.
You could download the cartoon head model from here.
It contains three formats (mb, obj, fbx)
I assume you already have opened the cartoon head scene or your own scene you want to practice on.
Our goal:
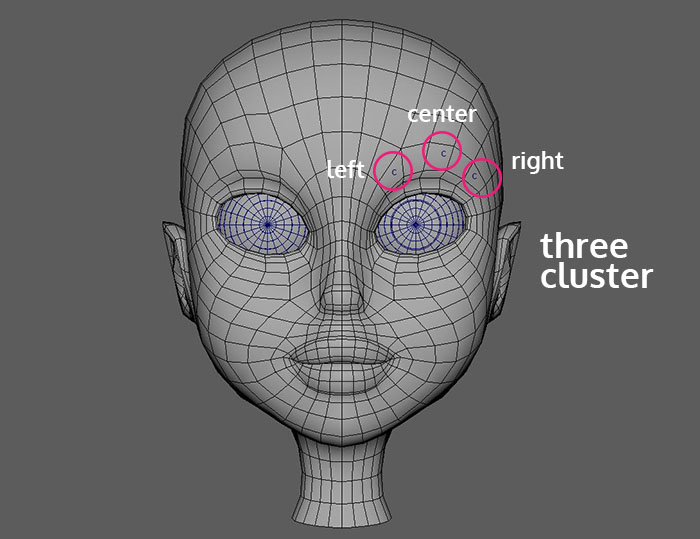
Our goal will be to create clusters for the eyebrows of our character. As you can imagine we will be doing only half of the work and the rest of it will be done with our little yet powerful script. Shall we start!
Note: If you are not familiar with the creation of clusters and paint weights on them I highly suggest taking a look at the documentation of clusters in Maya here. It pretty much covers all the basics you need to know about clusters. Of course, as you practice, your speed of doing the process with clusters will increase. Have fun with it 🙂
The process:
Even though our character doesn’t have actual eyebrows, we will use the head geometry to imitate the feeling. We want at least three controls for each eyebrow, in this case, three clusters for each eyebrow. So, create three clusters. One for the left part, one for the right part and one for the center of the eyebrow like the image below:
After you have created the three clusters for the left eyebrow you have to paint weight of each one of them in order to behave correctly. Since you already read all the basics about clusters it could be pretty easy to paint weight by yourself. Ok cool.
Now it’s time to use our mirror cluster script, to create the opposite cluster for the right side.
So, open the script editor in Maya. Locate and load the script and execute it.. Cool.
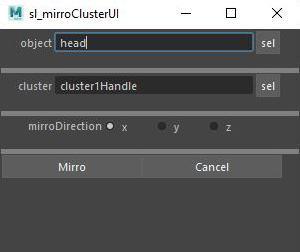
The pop-up window of the mirror cluster script appears. First, select the cartoon head geometry in the viewport and press “sel” for the object section. Second, select one cluster of the three you created earlier and press “sel” this time on the cluster section. In my case, the X-axis was the case. Finally, press Mirro so the script to create the cluster for the other right side. Do it for the other two clusters as well.
As a result, we have mirrored our clusters to the right side as well with paint weights match the left side. This means there is no need to re-paint weights again the right side clusters.
That’s all.
Put the script on a shelf for quick access:
If you use the script a lot in your workflow, it’s probably a good idea to make a button with it and put it in the shelf editor to make it easily accessible, every time you will need it.
The way you put it on a shelf in Maya is the same as putting any other script.
Open up the script editor. I assume you already loaded the mirror cluster script. Highlight the whole script by pressing ctrl + a and drag and drop it at any shelf tab you prefer. It seems to be more appropriate to put it either on the rigging or custom shelf tab. But it’s up to you.


Now every time you need the script it’s one click away.
Conclusion:
As you can imagine creating clusters and paint weights for them in Maya can be a tedious process, dependent on the number of clusters you working on. In our eyebrows concept, it wasn’t so much because the clusters were only three to deal with. But imagine if we decide to make the whole face controls with clusters for example (like lips, ears, nose, cheeks, etc.).
Wouldn’t it be better to work only with one side of the character instead of both sides! The time would be divided by two.
The mirror cluster script can be very helpful. If you find yourself relying on the script quite often, don’t forget to put it on the shelf editor in Maya for quicker access..


2 Responses