How to make a seamless texture in Photoshop, is quite a really simple technique when using the Offset “filter”.
A lot of times we want a seamless texture map, for various reasons, one of them is for 3D work, a more specifically for texture purpose. Although there are plenty of seamless textures we can download for free, a lot of times, none of them will work well for our particular project.
In that case, we can download a non-seamless texture map that we can turn into a seamless inside Photoshop.
And the way to do that is through the Offset filter. Basically what the Offset filter does is to repeat either on X, Y, or both axis our texture map.
In that way, we can clearly see what the result will be if we tile the same texture in a 3D application. And as we see what we are going to get after repeating our texture we can then with various Photoshop techniques make our non-seamless texture a seamless one.
What a seamless texture map means:
A seamless texture is a texture that we can tile as many times as we want and there will be no visible seems. Any texture in that category should be seamless on both axis (horizontal and vertical).
So if for example, we want to give it a few tiles inside a 3D software such as Maya, let’s say 4 on X (horizontal) and Y (vertical) it should be tiles correctly with no visible seams.
How to make seamless texture in Photoshop:
Open up your non-seamless image in Photoshop.
For our example, I am using the following brick texture from rawpixel.com artist on freepik.com.

Go to Filter – Other – Offset.
A new window appears.
In this window, there are two sliders (horizontal and vertical) axis. As we said, we want our texture to be seamless on both axis. So we need to “activate” both and see the repeated effect on both axis. We can set both values of those axis as we please. Lastly, make sure you have selected the Wrap Around option. After that click OK.
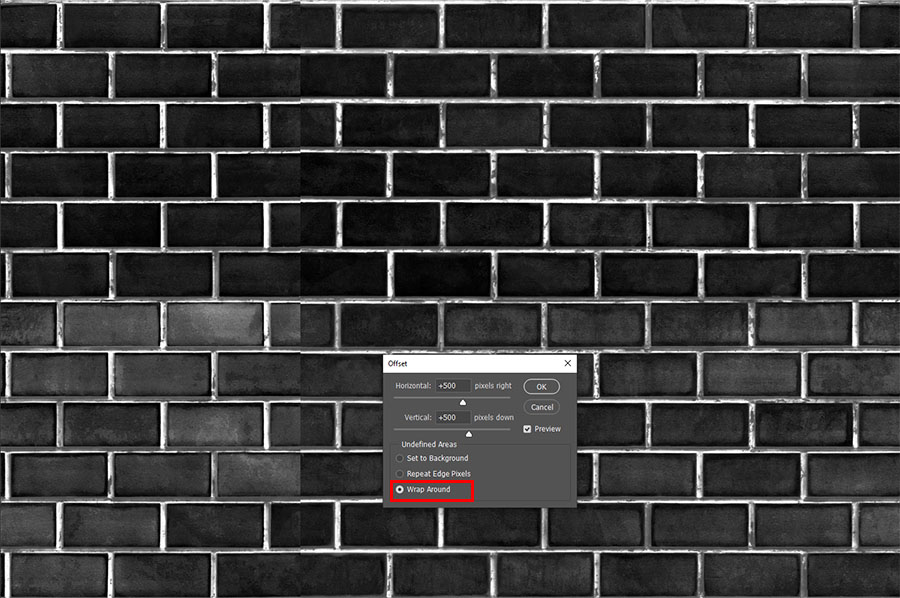
As we can clearly see there are some seams in our texture on both axis, that we are going to eliminate, so our texture will be seamless so we can properly use it.
For that matter, we can use any technique we feel more comfortable with to fix the seam issues in our texture map. I am using a combination of marque too, selection tool, clone stamp tool, and a few others.
Feel free to watch the video below for more info about the method I chose for that particular image:
After we fix our non-seamless texture map, select it and open up again the Offset filter, to check if everything is ok, and ready to export.
Note: We can check our progress through the Offset window every time and then.
Now we have our seamless texture map, we can use it in 3D applications by increasing the repeated apartment without issue.
You can also try a few free online platforms for that matter, even though their result probably won’t be perfect. Just search for something like, “seamless texture online”, “seamless texture generator”, etc. One online platform I have tested with decent results is IMGonline.com.ua.