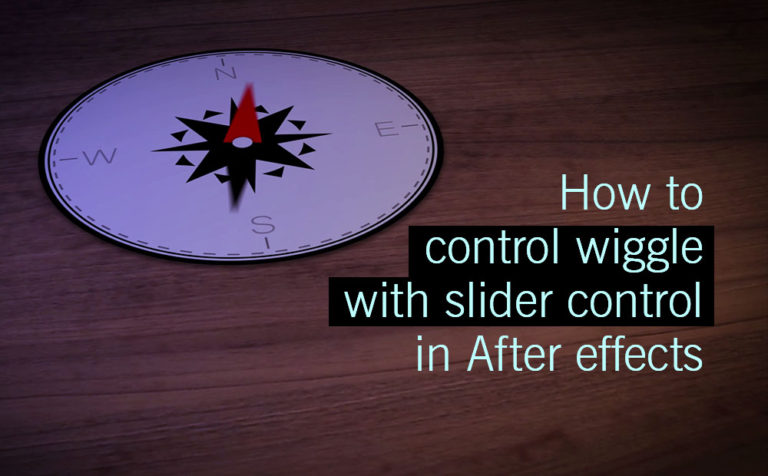
Control wiggle with slider in After Effects is a very easy process with so much potential although. You could adjust the two paraments that wiggle has (frequency, magnitude) with expression slider control. We can also use this technic to have more control over our wiggle effect.
If you like to know more about simple expressions in After Effects, here are some interesting articles you may want to take a look:
- How to Make a Simple Count Number – Infographic Element in After Effects
- Countdown in After Effects fundamental. Simple theory and practice
- Logo react to music/audio in After Effects (no plugin required)
To have an idea, we are going to create the following video:
Why we use wiggle:
Wiggle is an expression inside After Effects.
But don’t be an alarm in front of the word expression. I assume most people when they hear the word expression can be scary. I am in a way, one of those people as well. But I wouldn’t bring a scary topic to the spotlight if I didn’t feel confident about it. So, trust me. It’s as simple as it could be.
We use wiggle to automate the process and to have a variation in our concepts.
The simple approach to use it:
In normal circumstances when we want to set a wiggle expression for a parament, let’s say for example for the rotation, we just go to the rotation parament and alt-click on the stop-watch. After that, the expression field appears in the timeline section. Then we write the word “wiggle” along with two values inside the parenthesis, something like that:
wiggle(2,40)
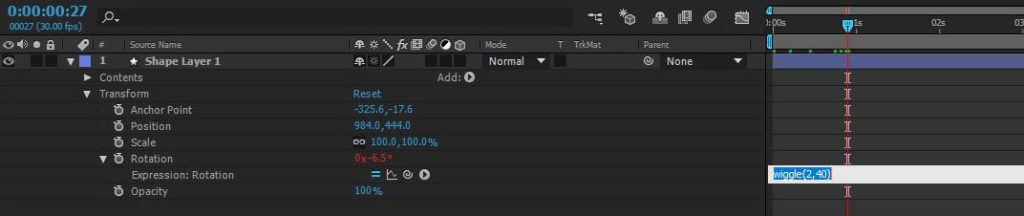
What the values mean!
The first one (2) is the frequency over time. The last one (40) is the magnitude, the power we set for our expression.
There is nothing wrong with this technic. Although, we do not have much control over the effect. If we play the animation, the whole thing starts and ends the same. Same frequency and magnitude for the end of time – infinity.
But what if we want for example to change one or both paraments over time (frequency, magnitude)! Well, for sure we can’t do it with the simple approach. We have to use the slider control approach.
Control wiggle with slider in after effects, approach:
Controlling the wiggle effect with slider expression controls over time is an efficient way to go if you ask me. In that case, you could have access to both paraments (frequency, magnitude) to control them separately through time.
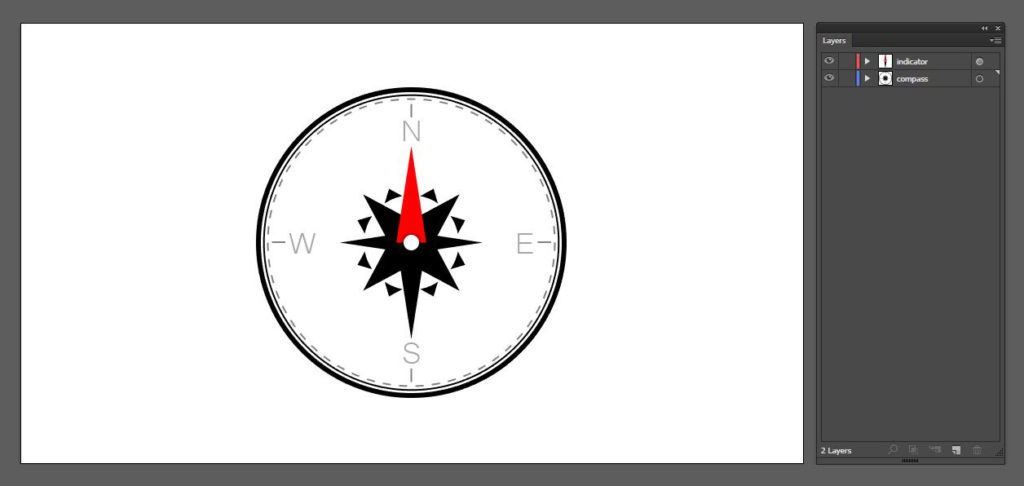
To demonstrate the advantage of using this method we will be working on a simple compass concept I have created in Illustrator.
If you want to follow along you could download the file from here. Or you can work on your own project, it’s up to you.
Our goal would be to make the indicator of our compass start in the rest position and within a couple of seconds to go crazy and rest in the end again.
Note: There are two layers in the Illustrator (indicator, compass). Of course, there is a reason for that. We only want to control the indicator of our compass in After Effects and the way to do that, is to have it in a separate layer inside Illustrator.
Shall we start! Cool.
Open up After Effects and import the compass illustrator file by going to File – Import – File… Or just double-click on the project panel to open up the same pop-up window to locate your file. Select the file, and most important choose Import as composition.

Double-click on the compass composition. As you can see, there is the two-layer we had in Illustrator now as layers in After Effects. We can manipulate them separately. Which gives us great control.
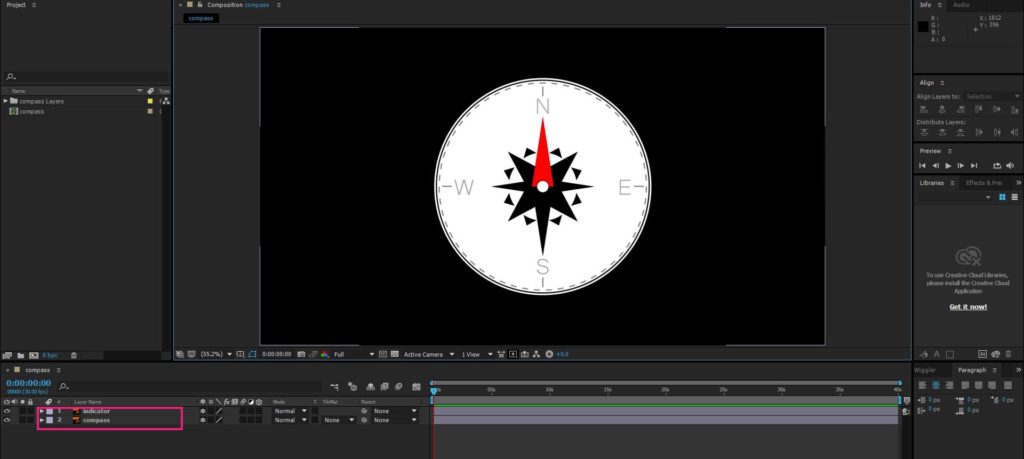
Note: If we choose to import the file as footage, the whole artwork would be merged. Of course, we didn’t want that.
Creating the slider control:
In order to create the slider control, we have to use a null object. To have it separately from the other layers.
So, go to Layer – New – Null object. Now we have it. Great. Rename it Indicator ctrl or whatever you feel like.
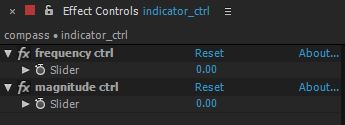
Select the Indicator ctrl and go to effects & presets and type slider control, it’s located under expression controls. Double-click on it twice to apply it to your null object. Each one will control one parament of the wiggle. One for frequency and one for magnitude. Rename the sliders accordingly.
Connect the sliders to the indicator layer:
Now it’s time to connect the sliders of the indicator ctrl intro the indicator layer rotation parament and create the wiggle expression.
So, select the indicator layer and expand it. Expand the transform once again and you will see all the paraments of this layer. Press alt-click on the stop-watch for the rotation parament. The expression field appears. Type wiggle().
Now instead to give it some value, like (2,40) you did in the simple approach, we are going to connect the sliders we already created for the indicator ctrl to drive the value for us dynamically.
Now select the indicator ctrl layer and expand both slider controls so we can connect them with the wiggle expression. Without selecting anything just go to the wiggle expression and click in the middle of the parenthesis. Grab the expression pick whip tool, which almost looks like”@” under the rotation attribute, and drag it to the first slider(frequency). The expression has been updated to something like this:
wiggle(thisComp.layer(“indicator_ctrl”).effect(“frequency ctrl”)(“Slider”))
Go between the last two parentheses and put a “,” and repeat again the same process with the pick whip tool, but this time connect it to the other slider (magnitude). The whole wiggle expression should look like this:
wiggle(thisComp.layer(“indicator_ctrl”).effect(“frequency ctrl”)(“Slider”),thisComp.layer(“indicator_ctrl”).effect(“magnitude ctrl”)(“Slider”))
Great the connection has been done. Cool 🙂
Set the animation of our compass:
If you play the animation nothing happens because both sliders have zero value at this time.
Now it’s time to set a couple of keyframes in order to have the effect we are looking for. Which is the indicator from the rest position to go crazy and rest again in the end.
So, select the indicator_ctrl and go to the Effect Controls panel. Expand both sliders. Make sure you are in the 0 frame in your timeline. Click on both stop-watches of the sliders to set the first key. Go three seconds later in your timeline and set the value of 3 for frequency and 180 for magnitude. Go three more seconds later and zero out the previous values,
Play your animation. As you can see, the indicator starts slowly and increase speed and then start to rest again.
To smooth the transition from one keyframe to another we will apply easy ease to all of our keys. Select all keys in the timeline for the rotation parament and press F9. Great.

Note: I have added some other elements in the final video, such as a wood table, camera, vignette some lights, and a bit of animation to make it more interesting.
Conclusion:
As you already see, the control wiggle with the slider in After Effects approach is quite easy and powerful. You can use this technique to accomplish very cool things for animation purposes.
What we did:
- Imported our graphic compass as composition inside After Effects
- created a null object and added on it two slider expression controls
- made the connection between our indicator layer and the null object
- animated the slider controls
If you have any questions at all, feel free to leave a message. I would be glad to help you out.


4 Responses