Create rounded corner icons in Photoshop in a dynamic way. The dynamic part is for adjusting the roundness of the icons with ease.
In this article, we are going to see, how we can create dynamic rounded corner icons, which we can adjust the roundness accordingly to our needs at any moment. And the way to do that is by creating a clipping mask inside Photoshop.
As a bonus tip, at the end of this post, we are going to take a look at how we can benefit while working with rounded corner icons in a multi-artboard workflow in Photoshop.
We will be working on inspiremeblog logo.
How to create rounded corner icons in Photoshop:
As you clearly see, it hasn’t rounded corners at the moment.
Step 1:
Open your rectangle logo in Photoshop
Step 2:
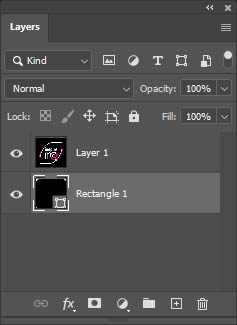
Create a new rectangle of the same size as your logo with the rectangle tool. The color of your new rectangle doesn’t matter, as long as it fully covers your logo. Selected your new rectangle shape, go to Windows – Properties, and set the round amount around 150px for all corners.
Step 3: Place your new rectangle shape below your logo.
Step 4:
Select your logo layer and go to Layer – Create Clipping Mask (alt+ctrl+G for a shortcut).
Step 5:
The last thing is the dynamic part. If you want to re-adjust the roundness of your icon, you just have to select your rectangle shape layer and open up the properties window and make the necessary changes as many times as you want.
Bonus tip, working with multi artboards:
In our case example, we just created a rounded corner icon for one resolution (1024x1024px). If you wanted to create other resolutions as well, such as 512×512, 256×256, 128×128, etc. we could have created them in separate Photoshop documents.
We can also create them inside the same Photoshop documents, that we have been working on for our first resolution (1024x1024px). And the way to do that is with multi artboards inside Photoshop.
If you are not familiar with how to create multi-artboards in Photoshop, feel free to take a look at a previous post: How to create multi artboards in Photoshop
I just wanted to show you that we can work in a single Photoshop document for all our resolution round icons and come up with something like this:
Steps:
- after created one resolution for your icon, and you have it on its artboard, create as many artboards as you need for the other resolutions.
- duplicate the content (two layers) of the first resolution as many times as your artboards are. Place then on the right artboard.
- while you scale them down, in order to fit into your specific artboard, you also have to re-adjust the roundness of your corner icon from the properties panel.


5 Responses