Export separate light render pass in Maya with V-ray renderer, in that way we have much more control over the lighting on our scene in Maya, during the post-production process to make all the extra adjustments we need, for fine-tuning our final output.
Lighting is an essential part of any 3D scene. To put it in other words, lighting is what makes or breaks the overall look of a scene project. So we need under our belt any additional tool that Maya and V-ray can bring to the table.
Having that flexibility of using a separate light render pass in Photoshop for our final shot, gives us a great deal of freedom, like controlling the intensity of a specific light, the color of the light, and some other more artistic results which can be achieved from playing with the blending mode of that specific light render pass layer in Photoshop.
And the way to do that is by adding a Light Select render pass from the V-ray Render Elements panel.
We can have access to adding Light Select render pass from Render Settings – Render Elements(tab) – Left column, like the image below:
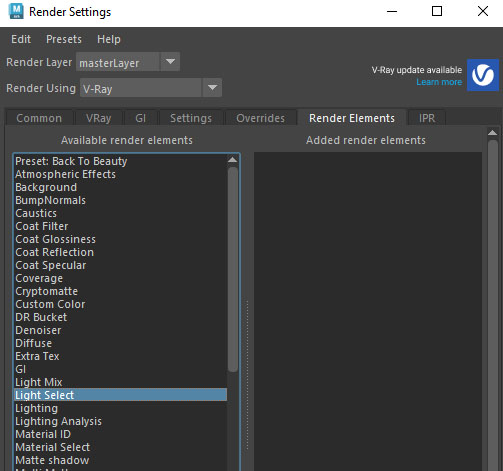
Note: We can have more than one light render pass in Maya – Vray. For example, we can have one light render pass for KeyLight, one for FillLight, and one for backlight, or even more, if we need them.
In my humble opinion, this is definitely the professional and productive way to go, when dealing with V-ray in Maya for lighting purposes. It’s absolutely mandatory to take advantage of it, for better control of the lighting.
What Light Select render pass does:
But before we dive into the Light Select render pass, I suppose we should probably establish, what a render pass or render elements are.
Render Elements are a way to break out renders into their component parts such as diffuse color, reflections, shadows, mattes, etc. This gives fine control over the final image when using compositing or image editing applications to re-assemble the component elements. Render elements are also sometimes known as render passes.
“chaos“
If you are more curious about the render passes, feel free to learn more about them from here.
Related to render pass and baked, feel free to take a look at a previous article about How to bake Ambient Occlusion texture map in Maya – Vray.
Light Select render pass:
As you already guessed, it’s basically a render pass for the purpose of lighting. It basically represents the lighting contribution of a selected light in the scene. In that render pass you can assign a light from your scene and through some paraments, the most important, the type of light, and you are pretty much done, setting up your Light Select render pass.
Feel free to dive deeper into Light Select render pass in V-ray from here.
Using light render pass in Maya:
Here is the scene we will work on:

As you can clearly see, there are two lights on the scene, a dome light (fill light) and a sphere light (key light). We are going to add for both of them a Light Select render pass, in order to have more control over the post-production process later on in Photoshop.
Steps:
- Open up the Render Settings for the Vray renderer
- Go to the Render Elements tab
- Left double-click on the Light Select render pass from the left collum, for the first light
- Add another one (Light Select) render pass for the second light. Do it as many times as the number of lights you have
- Go in the outliner and drag your first light with the middle mouse and drag and drop it into the vrayRE_Light_select node.
- Repeat the same process for your second light in the second vrayRE_Light_select node
- Select the first vrayRe_Light_select from the Outliner and open up the Attribute Editor. Under the “Extra Vray Attributes” set the Type mode to full, in case, it’s in another mode. Repeat the same process for your second vrayRe_Light_select.
- Lastly, in the “Extra Vray Attributes” in the same tab as before, change the Filename suffix and make it more recognizable, for both Light Select render pass. For example, into something like KeyLight, FillLight, BackLight, etc.
Note: Feel free to rename the vrayRE_Light_select, in order to be more recognizable.
Now, if you render your scene through the V-ray Frame Buffer, and switch between the render passes you can see the two Light Select render passes to be rendering as well, so you can use them in post-production later in Photoshop.

Export all render passes from Maya:
So we want to export all render passes for Maya as image files. In order to do that, after the rendering of our scene has been completed, go into the V-ray frame buffer – File – Save all image channels to separate files. After that, select a destination folder to save all those render passes, and you are good to go.

Finally, you can bring all those render passes in Photoshop and make the fine-tuned.
If you have an animation to export from Maya with V-ray renderer, instead of a still image the method of export is different. We will cover this method in a later article.
As you can see, light render pass in Maya is an easy technique you can achieve and take advantage of the control of lighting in the post-production process, that it brings.




3 Responses