
Rendering shadows on a transparent background is a must-skill when using Vray in Maya for a lot of reasons, and it’s a very simple method to accomplish.
A transparent background or an alpha channel basically, is an essential render element in the 3D rendering process. It allows us to integrate our 3D models into real images or footage (videos), without the need for masking or removing background, which most of the time is a very tedious and time-consuming process.
If we don’t make it right, and we render our 3D model just with a transparent background our 3D model will not have shadows and it will look weird. As we already know, shadows make a great impact from a realistic point of view. That’s why we have to keep them at all costs when we render our 3D model with a transparent background in order to use it later on.
In this article, we will demonstrate the method of rendering shadows on a transparent background with a simple 3D model sphere, in order to simplify it as much as possible.
Some interesting articles about Maya-Vray:
- Render an ambient occlusion (Dirt) render pass in Maya – Vray
- Render a Z-depth render pass in Maya – Vray
- How to bake Ambient Occlusion texture map in Maya – Vray
- Export separate light render pass in Maya with V-Ray renderer
Rendering shadows on a transparent background, setting up your scene:
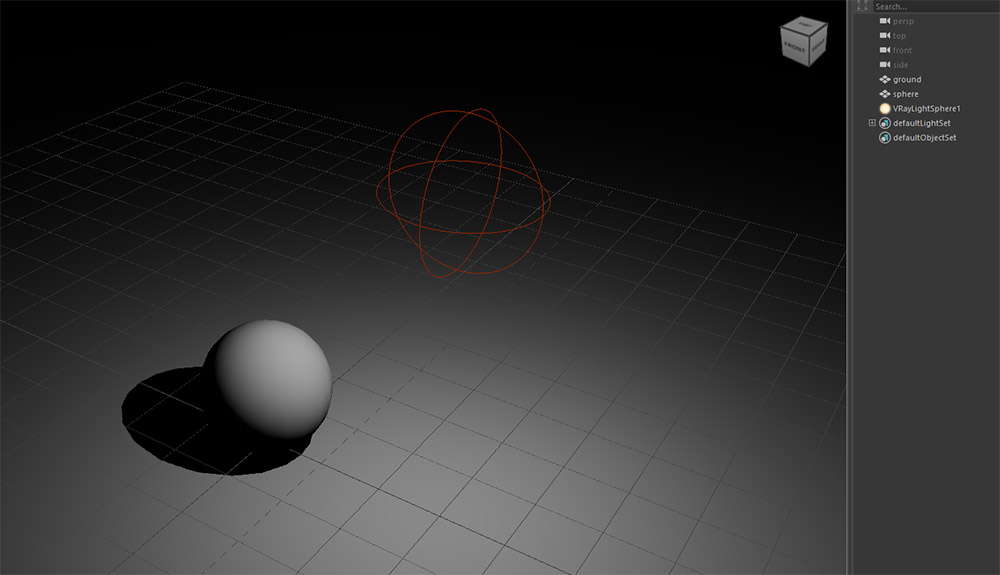
Our scene is a simple one. It only has a ground (plane geometry), a sphere and a V-ray sphere light. Of course, we have chosen V-ray renderer inside Maya for the rendering process.
In order to render shadows with a transparent background we need to follow a few simple steps:
Rendering shadows on a transparent background (step by step):
1 Step (assign a VRay Mtl Wrapper Material):
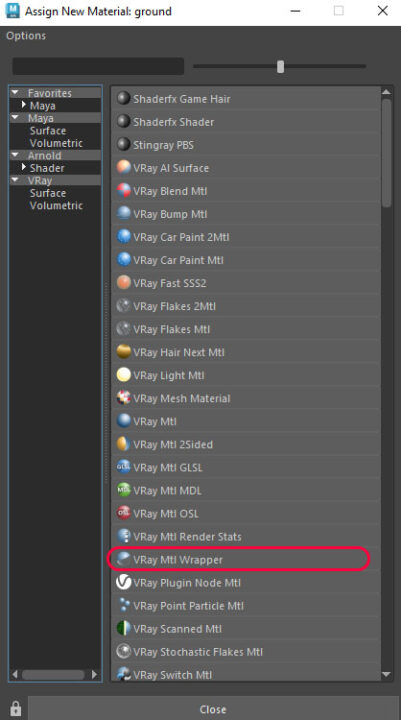
Select the ground (plane) geometry and assign a new V-ray (VRay Mtl Wrapper) material.
To do so, after selecting the ground geometry go to Rendering (module) – Lighting/Shading – Assign New Material. A new pop-up window appears. Go to the VRay option from the left column and find the Vray Mtl Wrapper material and select it.
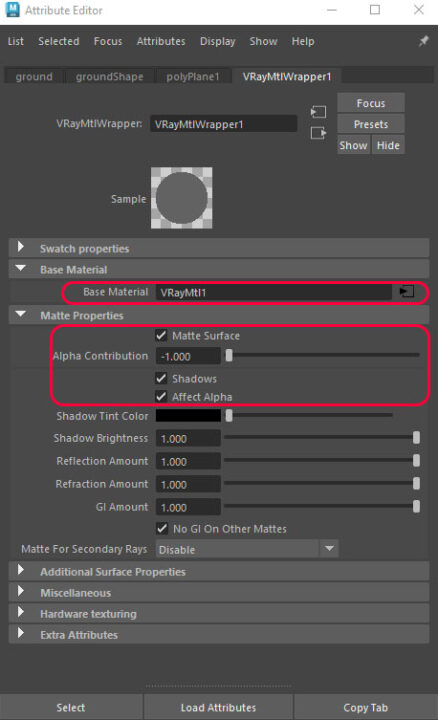
2 Step (assign a VRay Mtl Material into the base material):
After the selection of the new material, the Attribute Editor opens with this specific tab. Go to Base Material section and click on the little checkerboard on the right.
From the new pop-up window, select the VRay Mtl material.
3 Step (adjust some parameters of the Vray Mtl Wrapper material VRay Mtl Material):
Go again to the VRay Mtl Wrapper material from the Attribute Editor and check the Matte Surface. Also, check the Shadows and Affect Alpha. Lastly, set the slider of the Alpha Contribution to negative 1.
That was it.
Now if we render our scene we can get the shadows of the sphere on a transparent background, as you can see in the image below:
Since everything is as we expected, we can proceed to our final rendering and use it as we please. And the way to do that is by rendering a still frame or a sequence of frames (video) as a PNG, TIFF, or Targa file format and then import that frame(s) into a composition software such as Photoshop or After Effects for the final composition with the real image or footage.


