
Save-load selection in Photoshop is an extremely useful command, in so many situations I can think of. Basically, It’s a built-in command which can save us a lot of time. When we are using the same selection areas of an image for further edit manipulations.
In order to edit-manipulate a picture with precision in Photoshop, a lot of times, we have to make a selection. With all the great selection of tools that Photoshop has to offer (lasso tool, marquee tools, pen tool, etc.).
That doesn’t sound bad at first. But imagine, if we make multiple editing touches in that specific area. On top of that, realistically when we working on a picture we tend to make a bunch of other selections and work on them multiple times as well. Every time we want to visit that specific selection area and want to work again on that, we have to make the selection once again. As you can imagine, it’s a waste of time. There is a better way, and more efficient.
Save selection, is the answer.
Feel free to take a look at a fast forward video, of what we are going to accomplish in this post:
Some other interesting topics about Photoshop, that can make your life easier:
- Smart objects in Photoshop – Creating a Mockup
- How to export multiple layers from Photoshop
- Export multiple images in Photoshop (batch export – image processor)
- Free Adobe Photoshop plugin (flaming pear – package of effects)
How save-load selection works in Photoshop:
As we already said, we can make a selection pretty much with all the selection tools that Photoshop has. From the simple marquee tool to the more complex pen tool. You will wonder, which one is the best! If it’s not the first time you use Photoshop, you know that there is no right answer to that question. It always depends on the desired level of accuracy you are trying to achieve for your new selection area.
When we save a selection, Photoshop will save the selection we created as an alpha channel. We can make a ton of selections and have them as alpha channels in the Channels palette.
Photoshop offers a convenient and very simple way in order to save and load a selection. Let’s take a look at the steps we need in order to save a selection.
Steps:
- Create the selection with any of the selection tools that Photoshop has (lasso tool, polygonal lasso tool, pen tool, etc.).
- Once you complete your selection, go to Select (menu) – Save selection.
- A new popup window with a few options appears.
- Define the right document and the right channel.
- And lastly, give the selection a described name, for future reference.
- Hit ok for saving.
That was easy right! Now that we have a selection or bunch of them, how do we have access to them! How can we reuse saved selections, in other words, how can we load them!
Well, we can have access to the selections we created from two locations approaches.
- from the load selection window, Selection (menu) – load selection.
- or by going to the channel palette, and by hovering over the right selection we want to use, and pressing ctrl + left click on the thumbnail. In that way, the specific selection will automatically load in Photoshop.
Now we have a better understanding of how save and load selection works in Photoshop, let’s see it in action.
Save selection in action:
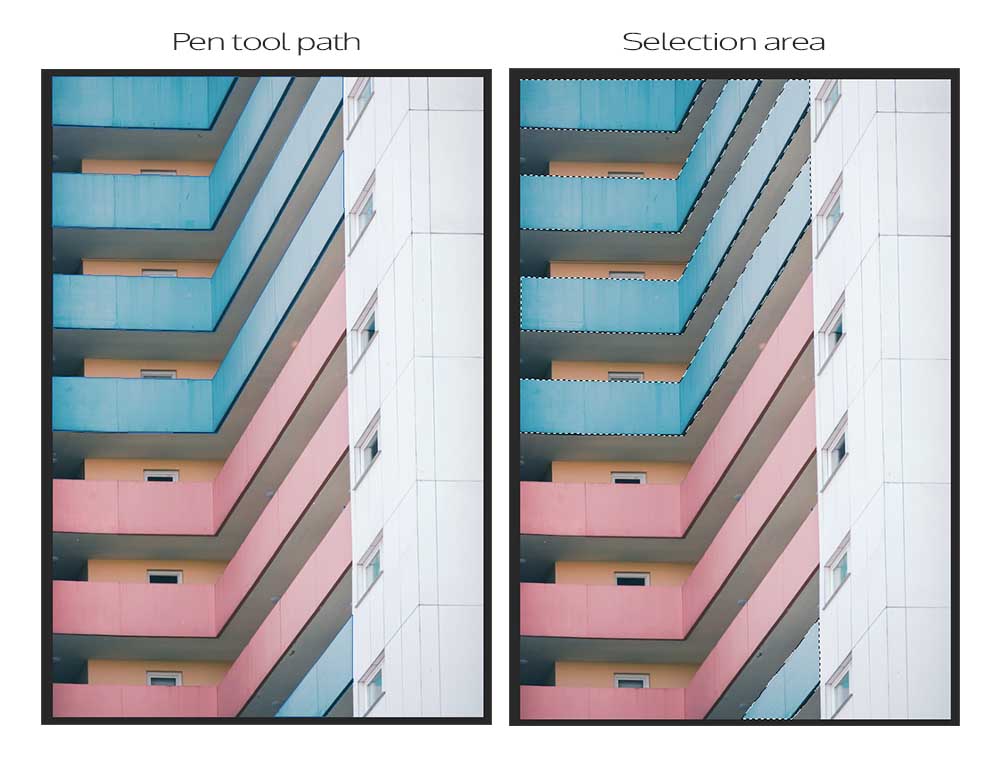
We will be working on the following picture, from the artist Pascal Bullan at Unsplash.

Let’s say we want to make some adjustments. For example, we want to change the color of the balconies (blue and pink), and also, the lite orange of the walls. In order to efficiently do that we will use the save-load command.
Let’s start with the blue balconies. In my case, since I want to be as precise as I can be, I am going to use the Pen tool in Photoshop for my selection.
After making the selection to include all the blue balconies, go to the Path palette, right-click on the specific working path, and choose to make selection. A popup window appears, click ok.
Since now we have a selection (all blue balconies) in place, go to Selection – Save selection. In the new save selection popup window, define the right document and channel, and after giving it a proper name, hit ok. I named it Blue Balconies.
Repeat the process:
Repeat the same process, for the pink balconies, by making a selection with the Pen tool and then converting it into a selection, and finally saving the selection. Lastly, the same process is for the lite orange walls.
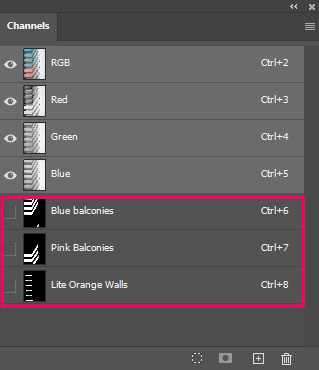
After making all three selections and saving them, the Channels palette will look like this.
Now we have all three selections, we can start using them in order to change the colors on them. When I say using them I mean loading them separately and making the necessary color changes, one by one. In my case, I will use for each one of them the Hue saturation from Image – adjustment, and play with the hue slider.
You can see the final result below.

If for any reason we want to re-adjust anything on those selections, we can re-use them as many times as we want it.
Conclusion:
We can create and use selections in Photoshop and make our life easier pretty easily with the save selection command. For every new selection we create, Photoshop handles it as an alpha channel, which can be also found in the channel palette.
If we want to adjust a saved selection we could do that from the save selection popup window. By choosing an already channel, from the drop-down menu. This window gives us a few options for that matter. We can add, subtract or intersect a selection.
Thanks for reading, see you next time.


One Response