
Generate random particle instancer in Maya with a few steps. It’s a really powerful technique and pretty simple. All you have to do is to write a simple expression and connect a parament to it.
Dynamics in Maya are quite interesting and easy to produce in a way. One of the easier techniques you can create is to generate particle instances. It’s very powerful.
We are going to generate particle instancer and move one step further, to make it random. The randomness could be anything. It could be the size of the same geometry, a different geometry, a different shader, etc.
Another cool particle effect in Maya, if you want to check out, How to create particle disintegration intro logo animation effect inside Maya.
You could also watch the whole steps in the video below:
Although, for a better understanding of the steps, keep reading.
What is a particle instancer:
Before diving into random particle instancer in Maya you kind of have to know what particle instancer does, right!
Partilce instancer does switch particles with a geometry of your choice. So, instead, of an emitter to generate particles, it will generate a specific geometry you are connected to. Simple right! Hopefully, the below preview will clear things up.

Note: The 3D low-poly model of the heart is from VARRRG on TurboSquid. He is very talented and he has a huge and great collection of 3d models. Worth spending time in his gallery if you ask me.
So, instead of having a particle point, spheres, sprites, clouds, etc., we are having a specific geometry, a low-poly heart.
Now we are familiar with what a particle instancer is, let’s jump and create an example with random particle instancer.
Generate random particle instancer in Maya:
As we already said, the reason we generate random particle instance is that it gives us variation. Such as size, other geometry, color, etc. Most of the time it could be quite dull if we haven’t that variation. Of course, there is a time when we don’t want a variation at all.
We are going to work on the same 3D model of the heart from above.
The concept we are going to work on is a falling hears with a variation in color and size. It’s going to be cool 🙂
Steps in summary:
- import the heart geometry and create a plane in which the hearts will be falling
- assign material
- create an emit from an object
- create instancer
- variation and connection
- a simple expression and connection
- render the scene (optional)
Steps with an example:
If you want to work in the same geometry as I do, you could download the heart geometry from here in many formats. Although, if you don’t have a TurboSquid account and you are in a rush you could download just an FBX file from here. Of course, you could also work on your own geometry, it doesn’t really matter. In either case, you are going to learn a universal technique.
Import geometry / create a plane:
First of all, we want to import our heart geometry into our new brand scene. Go to File – import and locate the heart geometry or one of yours to import it. After you imported it, hide it for a second.
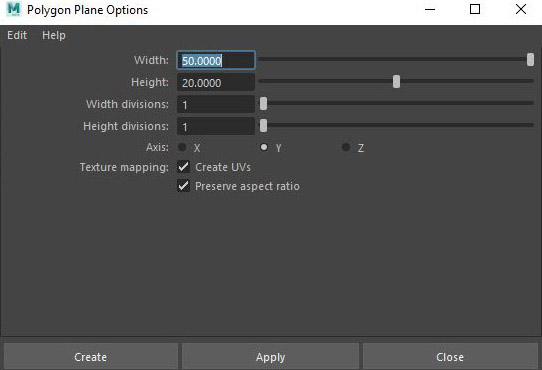
Now, we want to create a polygon plane in which the particles will be falling from it. So, go to create – polygon primitives – plane options. Make the width 50 and the height 20. Also, make the division for width and height to be 1 and hit create. We don’t really need any additional geometry in this particular scene.
Assing a material:
As you rightly guessed, we are going to assign a material to our heart geometry. We will keep it really simple. In the final step of rendering, we will just use the Maya software renderer. So the material we will use for the heart will be a simple Blinn material.
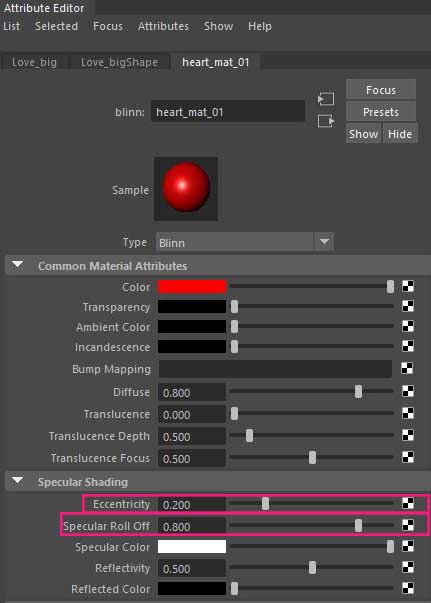
Therefore, unhide the heart geometry in your scene, and select it. Go to Rendering module – Lighting/Shading – Assing New Material. The assign new material window appears. Search for Blinn material and select it. Open up the attribute editor and play with it to make some adjustments to your new material. You could see my tweaks in the image below:
Create an emit from an object:
So far we have our heart geometry with a material on it and our plane in which the particles will be falling from it.
We are going to add an emitter to our plane.
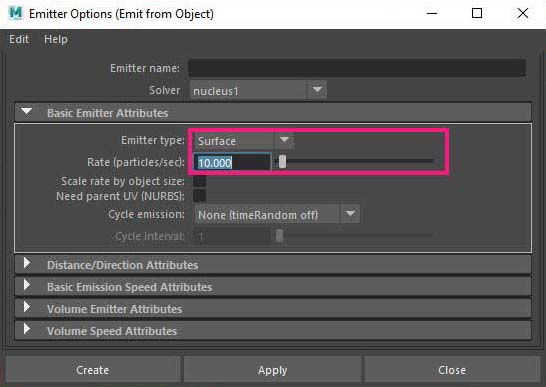
Select the plane geometry and go to FX module – Emit from Object (option). In the basic emitter attributes change the emitter type to surface and set the rate (particles/sec) around 10. Hit create to close the window.
At this point, if you play the animation you will notice the plane geometry as it was expected to emit particles. Which is cool of course. In the following step, we will change that.
Create instancer:
As we already said, partilce instancer does switch particles with geometry of your choice. So we are going to switch the default particles which the plane does emit with the heart geometry we have in our scene.
In order to do that, you first select the heart geometry and then the particle node and go to FX module – nParticles – Instancer.
If you play the animation, the default particles do disappear and the emitter generates our heart geometry. Cool right!
Variation and connection:
Now, as you can see there is no variation at all, in our scene. The heart particles are the same in size and color as well. We are going to fix it.
Size variation:
In order to have a variation of the size in our scene, we have to create a few at least different sizes of the same heart geometry we already have.
So, go to the Outliner and select the heart geometry. Duplicate it at least two times. Select the first duplication and make it the half-size in all axis from the original. Then select the second duplication and make it the half-size of the first duplication. If you like you could rename all three heart geometries like heart_big, heart_mid, heart_small, for organization purpose.
Color variation:
We took care of the size variation. Now we also need to take care of the color variation. And the way to do that is by applying a new material for both new duplications we did for size variation. Select the first duplication and again assign a new Blinn material and choose a different color or at least a hue from the original one. Make the same process for the second duplications as well. I assume you are already familiar with the process of applying materials, as we cover it earlier.
At this point, we have two additional heart geometries in different sizes and different materials applied to them in our scene.
A simple expression and connection:
At this point, if we try to connect the two additional heart geometry we create with the instancer node, it will not work. We have to make some things first. We have to add a new attribute in our particle node, to write a simple expression and to connect it with a parament of instancer.
Add new attribute:
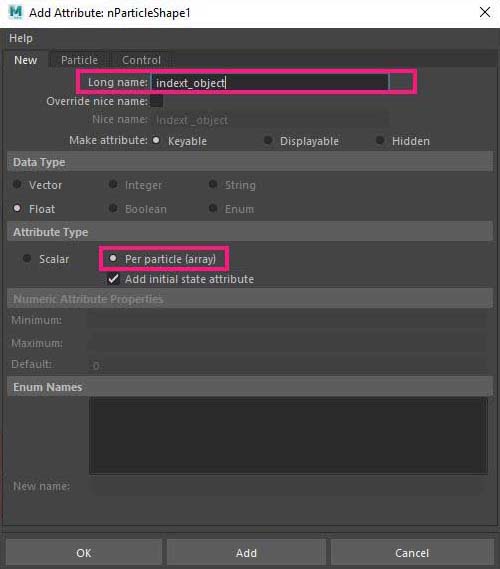
Select the nParticle node from the Outliner and open up the attribute editor. Go to Add Dynamic Attributes section and click on the General button. It will open the Add attribute window. Set up a name for the new attribute “indext_object” and also in the Attribute type choose Per particle (array). Hit ok.

Write an expression:
Go to Per Particle (Array) Attributes, which is above Add Dynamic Attributes. and you will see the new attribute we just created. Right-click and select create expression. The expression editor opens. In the Expression field down write:
nParticleShape1.indext_object = rand(0,3);
The above line means, that the generation of our heart particle will be random between three geometries. The word rand is for random. If for example, we choose to make 10 variations of our heart, the line of expression would be: nParticleShape1.indext_object = rand(0,10);
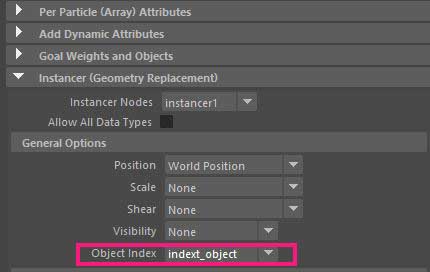
Connect parament:
Now we have taken care of the randomness of the expression we have to connect this parament to the particle instancer. Go to instancer (Geometry Replacement) in the particle node and in the General options, for the object index choose the new attribute you created “indext_object”.
Now if we try to connect the two additional heart geometry we create with the instancer node, it will work. So select the two additional heart geometries and the instancer node in the Outliner and as you already have opened the attribute editor, hit the add selection button, to add them to the list.
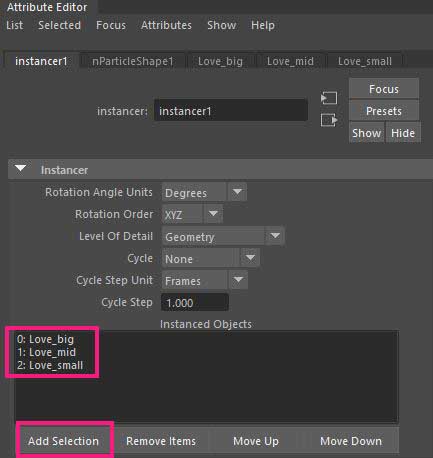
Play the animation. The hearts are falling and there is a variation in size and colors in our scene.
You have made it. Now you have the knowledge of how the random particle instancer in Maya works.
Render the scene (optional):
The final step is optional.
Most of us use a different renderer such as, v-ray, Arnold, RenderMan, Mental ray, etc. and it’s not in the scope of this post to demonstrate the method of rendering our particle instancer on each renderer. We will just use the simplest renderer which comes with Maya by default the “Maya software” renderer to render out our particle.
So, let’s do that.
Create a camera:
In every 3d application, we can render in two ways. Either from a camera or from an existing orthographic view. In this particular concept, you are going to render through a camera.
Therefore, go to Create – cameras – camera to create a new brand camera that will be used to render our random particle instancer scene. Play the animation for a couple seconds in order to have the instancer particle falling in your scene so you can position the camera properly for a better angle.
Render settings:
Now we have the camera in position, we have to make some adjustments in the Maya software settings.
Open up Render settings by going to windows – rendering editors – render settings. In the common tab choose Maya Software for render use. In the image format under file, output choose PNG format. Also, choose name#.ext for the frame/animation ext:. Set the frame range to 1 – 300, or any length you want. Choose the camera you created for the renderable camera. Also, set the resolution for your final render. I set mine at 1280×720 (HD). In the Maya software tab, go to anti-aliasing quality and set the quality to production quality for better results.
Final render:
Close the Render Settings and go to “Render – Batch render, to start your rendering process. It will take some time before it’s actually starting to render the scene.
Note: If you haven’t set a project from the beginning of this post, the output of your animation will be restored probably on “yourPC/documents/maya /projects/default/images”.
That’s all:
Random particle instancer in Maya, is a very interesting technique and if you combine randomness with it it could very powerful.
Kudos, you made it. You finally render out your random particle instancer scene. Give yourself some time to relax or some kind of reward, after all, you deserve it.


