How to take 4K screenshot on FullHD monitor Windows with an Nvidia graphic card! The answer is with dynamic super resolution option in the Nvidia control panel.
Sometimes you will need to take a bigger screenshot from your monitor in Windows. It doesn’t really matter the reason, but trust me, at some point you will have to.
In the same spirit, you may also find interesting, the following article: How to enlarge a picture without losing any quality at all
By default when you take a screenshot it’s based on the display resolution you have set for your monitor. Since the mainstream monitor display resolution nowadays is a FullHD (1920×1080), the screenshot you take is on that resolution. If you need to take a more detailed snapshot, which means a bigger resolution from your display resolution, let’s say a 4K (3840x2160px) the approach is quite simple and pretty fast and it’s called dynamic super resolution. The only requirement is for you to have an Nvidia Graphic Card.
What dynamic super resolution (DSR) does?
Simple put, it renders a game at a higher, more detailed resolution and intelligently shrinks the result back down to the resolution of your monitor, giving you 4K, 3840×2160 quality grahpics on any scree.
Nvidia
Note: If you have an AMD graphic card instead of Nvidia, there is a similar feature for the same purpose, which is called Virtual Super Resolution
Enable dynamic super-resolution:
You may want to read more about the technology of dynamic super-resolution from Nvidia.
Follow the following steps to enable Dynamic Super Resolution on your Nvidia graphic card, so you can take snapshots at 4K resolution even though your monitor display resolution is only FullHD.
Steps in summary:
- Open up Nvidia control panel.
- Go to Manage 3D settings and enable DSR
- Go and change resolution to 4K
1. Open up Nvidia control panel:
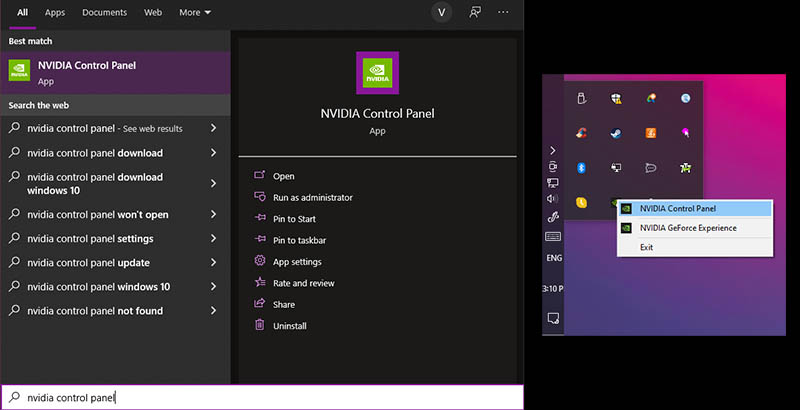
You can search for the Nvidia control panel app from the Start menu on Windows, or you can right-click the Nvidia Settings icon in the system tray.

2. Manage 3D settings and enable DSR:
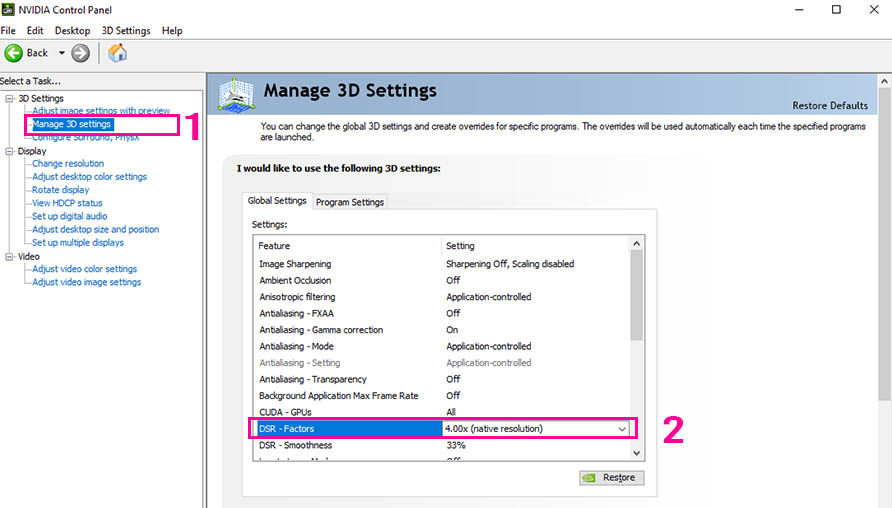
Now we have opened the Nvidia control panel, navigate to the Manage 3D settings in the left bar. After that, scroll down to locate the DSR factors and click on the drop-down many and choose the 4.00x.

3. Change the resolution to 4K:
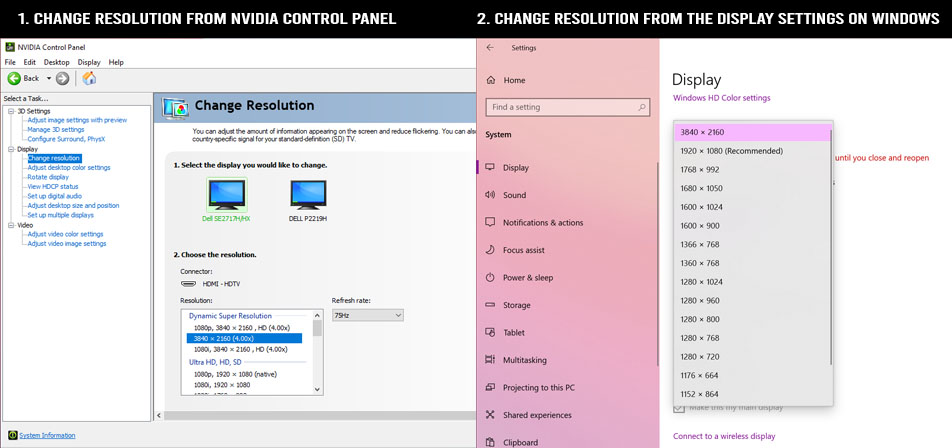
Changing the resolution of our display monitor to a 4K, it can be done in two ways:
- change resolution from Nvidia control panel
- change resolution from the display settings on Windows
You can see both ways in the image below.

After you set the resolution to 4K, you can take 4K screenshots as many times as you want using any screenshot software such as Snagit.
Conclusion:
Even though taking snapshots at a 4K resolution when we actually use a FullHD monitor is great. But very soon you realize that text elements appear blurry and very small, which is of course understandable, considering we are not using a real 4K resolution monitor.
The great thing about this approach is you don’t have to live with that all the time. You can turn on and off the dynamic super-resolution option in the Nvidia control panel as many times as you want. The rule of thumb could be, to turn it on only at the times you need it and after you have taken all the snapshots you want you can then turn it off, as simple as that.


One Response