In this article, we are planning to create a logo react to music in After Effects. Along the way, we will make a background, a simple yet beautiful image to also react to the same music. No plugin is required whatsoever. The few things we going to need are the built-in tools and to write two expressions. I hope you guys are not scared when you hear the word expression. Trust me, it’s extremely easy.
With this simple technique, you can create your own YouTube video clip of a song.
So, our goal is to create the following video:
As you can see the logo reacts by scaling up and down with the beat of our music. And our background also reacts with the music beat in a different way. When the beat is high the background image gets blurry and brighter. As the beat is lower and lower, both effects have a much lower intensity and finally, the effects disappear.
The keyframe animation of both logo and background has been generated automatically. It has not been created frame by frame by manually adding keyframes.
For this six-second clip with 24 FPS (frame per second), someone could say, it’s doable with the traditional approach (adding manual keyframes). And yes, it is. But it’s time-consuming. Imagine for example if we had a 3-minute song, a standard YouTube music video. The time we had to spend with the traditional approach would be endless, right!
Table of Contents
ToggleTo start we only need two things. Our logo and our music track. Let’s jump to After Effects and recreate the above video. Load both files in the Project panel and let’s get started.
Feel free to watch the video below, but for more info keep reading:
Convert audio to keyframes:
As I said, we will automatically create our music track keyframes. So later on we can connect our logo and our background image with those keyframes.
Select your music/audio and drag and drop it into the icon (create a new composition). In this way, the composition that will be created will have the exact time range of your music clip. In my case, is six seconds long.

Select your music/audio in the composition-layer area and go to Animation – keyframe Assistant – Convert Audio to keyframes. A new Layer (Audio Amplitude) has been added.

This layer is a conversion from our music track to frame-by-frame animation, that we can use. As you can see, there are three channels that all have animation keyframes on them. In our specific example, we only need Both channels, which are at the end of the list. Feel free to delete the Left-Right channel.
It’s time to hook up our logo to our music.
Logo react to music:
Drag and drop your logo above Audio Amplitude in the layer stack. At this point, it doesn’t really matter the scale of your logo, so leave it as it is. We will address it later on.
Connect logo to music:
Expand both your logo and the Audio Amplitude layers until you see the scale and Both Channels attributes accordingly. Press alt + left-click in the stop-watch icon in the scale attribute of your logo layer. Select the pick whip icon and drag it to the slider attribute of Both Channels (Audio Amplitude).
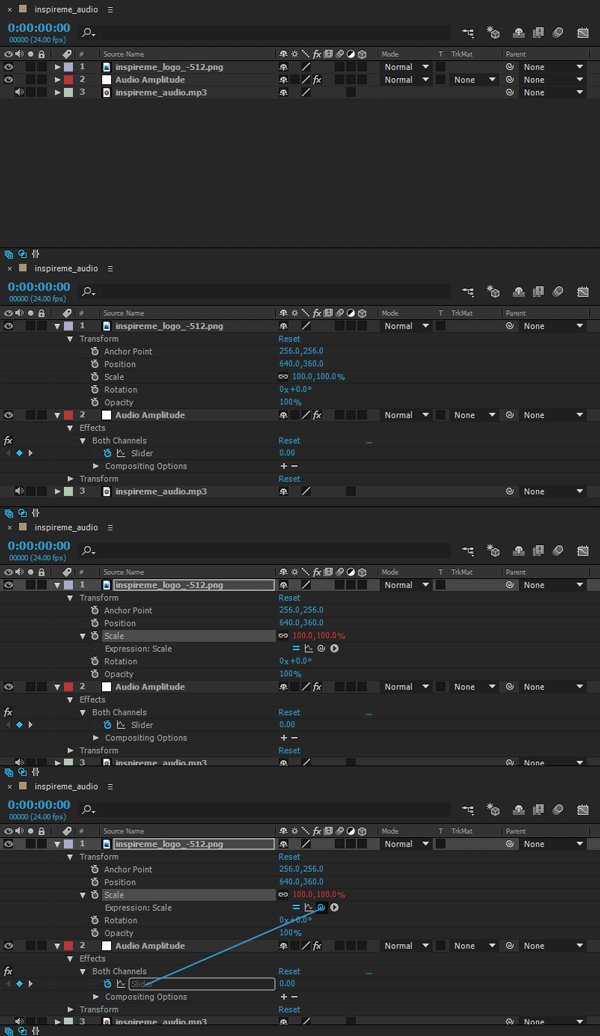
If you play the animation inside After Effects, you will notice that the logo reacts to our music. There is only a small issue, our logo is too small. We are going to address this issue in the next step.
Set up correctly the scale of our logo (expression):
So far our logo reacts with our music on a scale from 0 to 100. And in this case, our logo is too small, right! We want to add some additional scale on top of that.
Since we connected our scale attribute (logo) with the expression, the way to add extra scale is to edit our expression. We will add the extra percentage of scale by adding “+[value,value]” at the end of our expression.
Our expression at this point is:
temp = thisComp.layer("Audio Amplitude").effect("Both Channels")("Slider");
[temp, temp]
Let’s say we want to add an extra 40% scale to our logo. So the expression would be:
temp = thisComp.layer("Audio Amplitude").effect("Both Channels")("Slider");
[temp, temp]+[40,40]
When adding + [40,40] our logo scale starts with a 40% scale on top of the additional music/audio keyframes.
Let’s play the animation to see the results so far:
Ease expression:
Our logo reacts to music all the time, from lower beats to the highest ones. In most cases, this is something we want to avoid. A great way to avoid it is to set a specific spectrum range in which our logo is going to react. And the way to do that is through ease expression.
Ease expression theory:
The ease expression in After Effects is the following:
ease(value,number,number,number,number)- the first number determines what’s the minimum beat range to react
- the second number determines what’s the maximum beat range to react
- third number determines what’s the power of percentage minimum beat range
- fourth number determines what’s the power of percentage maximum beat range
Ease expression in action:
Let’s apply the ease expression to our music.
Expand the Audio Amplitude layer, until you see Both Channels – Slider attribute. Press alt + left-click on the stop-watch to go to expression mode and put the following expression:
ease(value,10,30,0,15)Which means:
Our logo will not react in the beats under 10 units. It will react in the units range from 10 to 30. Also, the percentage of the maximum beat will be *15% and not 100%.
Note: If you need more percentage power for the maximum beat feel free to increase the last number. In my case 15 is enough.
Once again, play the animation to see the logo reaction:
As you can clearly see at the start and at the end of the video there is barely a movement of our logo due to ease expression.
Finally, let’s create a background, which will also react to our music in After Effects.
Background react to music:
As you have already seen in the video from the start, there is a two-way reaction in the background.
- Brightness & Contrast effect:
- Gaussian Blur effect:
When the beat is high the background image gets blurry and brighter. As the beat is lower and lower, both effects have a much lower intensity and finally, the effect disappears.
Both effects have been connected to the same Audio Amplitude layer that our logo has been connected to as well.
We are going to use a beautiful image “Pink sunset at Visevnik” at dreamypixel. Unfortunately, I couldn’t find out who is the photographer to properly give the credits.
Load your background image into the Project panel of After Effects and drag and drop it at the bottom of the layer stack, so it will be beneath the logo layer.
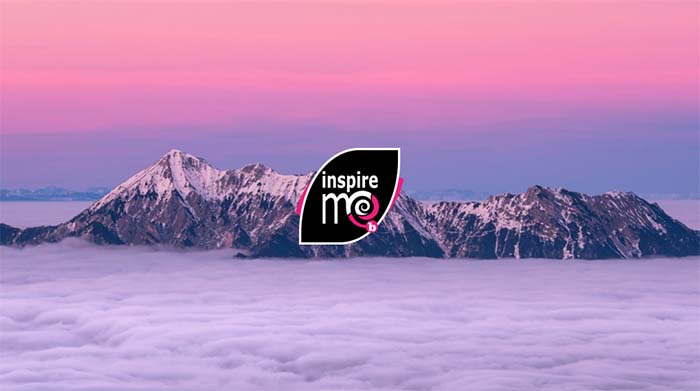
Connecting background effects to react with music:
Before connection, we have to put both effects in our background image, right! So select the background image and go to Effects & Presets and add both effects Brightness & Contrast effect and Gaussian Blur effect.
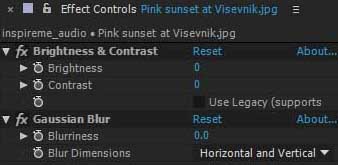
Repeat the same process as we did when connected our logo with the Audio Amplitude layer. For more details see the next paragraph.
Expand the Audio Amplitude layers until you see Both Channels attributes. Also, expand the background image until you see both new effects we have just added and expand them as well. Press alt + left-click in the stop-watch icon in the brightness attribute and then select the pick whip icon and drag it to the slider attribute of Both Channels (Audio Amplitude). Repeat the same process for the second effect (Blurriness).
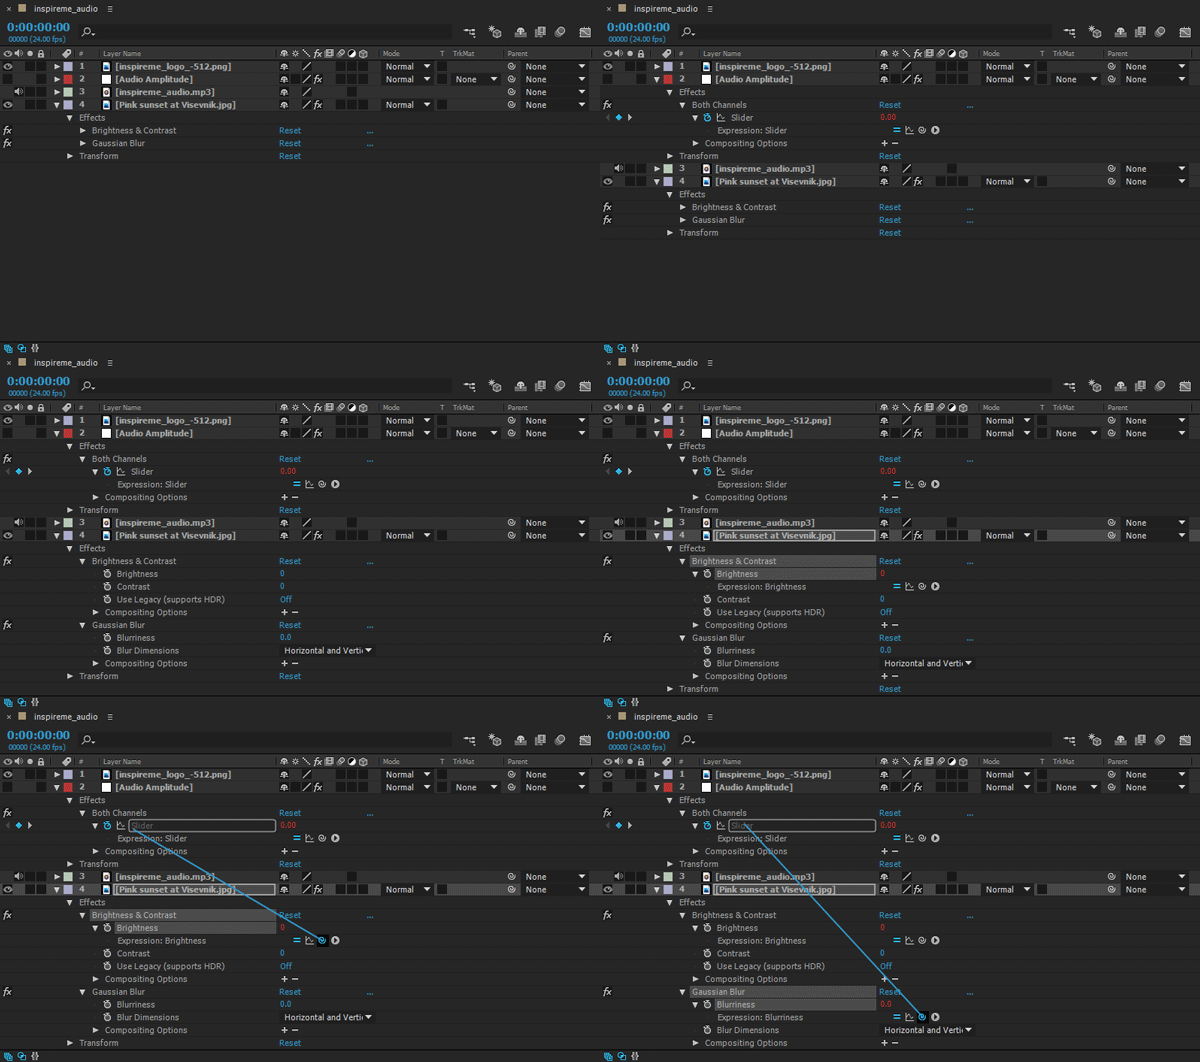
At this point we have the following animation:
Both effects in our background image react with our music. But what if we want to adjust the strength of our effects! We will address it in the following section.
Adjusting the Brightness effect strength:
At this point, we don’t really have much control over the strength of our effects. They have just been automatically controlled through our ease expression (Audio Amplitude), right!
The truth is, we can have more control over them, through simple expression.
Let’s say we want the Brightness effect in our background image to be more intense for example, through the beat of our music. Specifically six times more.
Select your background image and expand it until you locate the Brightness & Contrast effect. At this point, our expression for this attribute looks like this:
thisComp.layer("Audio Amplitude").effect("Both Channels")("Slider")The only thing you have to do in the expression section is to add the multiply symbol and a number following it. What this means, is to multiply the number of the current value which already has the brightness effect through animation with the number you will give it (6). So your new expression will look like this:
thisComp.layer("Audio Amplitude").effect("Both Channels")("Slider") *6Note: You can also lower an effect by adding the symbol of division “/”
If you play the animation, you can see now that the Brightness effect is six times stronger than before.
Summary:
In this article, we manage to create a logo that reacts to music in After Effects with no extra plugin. Furthermore, we make our background image also react with the same music.
And the way we did that is by:
- converted our music to keyframes
- linked our logo and background, with the layer that holds all those keyframes
- and created some simple expressions
The same method can be used for all kinds of elements and attributes inside After Effects that can be driven by music/audio keyframes. Such as text, lights, etc.
That was it, I hope you guys had fun.



7 Responses