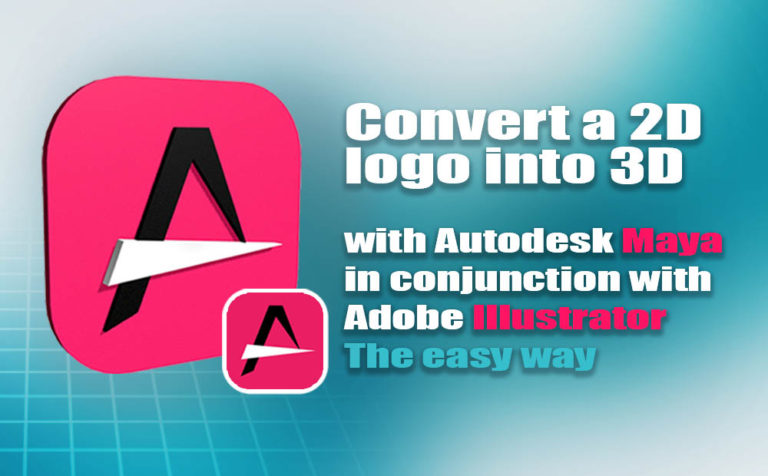
Convert to 3d logo in Maya in conjunction with Adobe Illustrator. If you are interested to create a 3D logo inside a 3D application such as Autodesk Maya. But you don’t want to recreate the whole logo inside the 3D application from scratch, right! Especially when you have already designed the logo in a 2D application like Adobe Illustrator.
You are probably searching for an easy way around it, right! Who can blame you after all! Time is money. We always seeking faster ways of doing things and being more productive.
Therefore, I will try to describe the process of using Adobe Illustrator in conjunction with Autodesk Maya to convert a 2D logo into 3D with Maya.
Therefore, I will try to describe the process of using Adobe Illustrator to convert to 3D logo in Maya.
Now, in case you have used Corel Draw or any other vector software for creating the 2D logo version of yours, you could import the logo project inside Illustrator to follow the process below. If you don’t have Illustrator on your system at all, you could download the free trial version from here.
Note: If you are new to Autodesk Maya, I am running on my YouTube channel a series of General tips and tricks in Autodesk Maya. Feel free to check it out.
Table of Contents
ToggleThe easy way, convert to 3d logo in Maya:
The easy way is through the “Adobe Illustrator Object” tool inside Maya.
What it does, basically takes the curves vector path from the Illustrator files and converts them into recognizable curves notes inside Maya. In simple words, is reading curves from one software (Illustrator) to the other (Maya).
Benefits:
- precisely
- fast
Precisely: if you trying to turn a 2D logo into 3D logo inside a 3D package such as Maya by recreating the logo from scratch, you have to be very careful about measurements, considering you want to be exactly like the 2D logo. However, with this method, you don’t need to worry about measurements at all. All vector curves are imported in Maya as it is from the Illustrator file.
Fast: just with one click and you are good to go. The whole file from Illustrator is transferred into Maya as curves. To be honest, it’s not actually only one click, but it is a pretty simple straightforward process 🙂
We will practice with the icon logo below, which is for a new Android Wallpaper App I am working on. By the way, I am planning to release in the following month.

If you prefer you can watch the following Youtube video. Although, it has not contained any explanation or other kinds of notes. For that matter keep reading this post.
Preparation file:
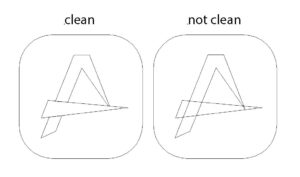
Before we dive in into the process, I want to point out one thing you have to do in order to have a nice file (Illustrator) to work on inside Maya. You have to clean up your file of the 2D logo, it’s essential.
What I mean by cleaning up the file, is that you make sure that your curves path inside Illustrator is not intersecting with each other. You could find more helpful the image below.
In general, every Graphic Designer who is professional is working in that way. It makes a lot easier the whole process of printing in various formats, such as paper, vinyl, laser, etc.
Part A – The process of modeling the logo:
We have to do one more thing before we jump into Maya and convert to 3D logo.
But first of all, duplicate your vector logo file. Is critical, trust me.
Open your logo file in Illustrator. And “save as” the file as Illustrator 8 version. If you save the logo file in an early version of Illustrator, when you import the file into Maya it won’t work.
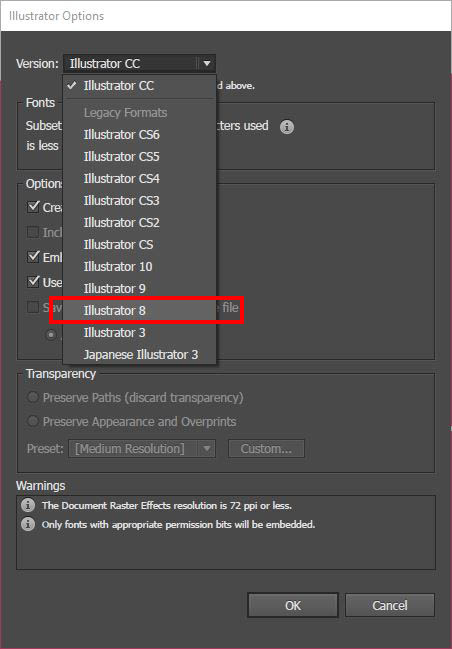

The reason we duplicate the vector logo file was the warning image above.
Jump into Maya. Yeh 🙂
So, start a new scene file by File > new scene
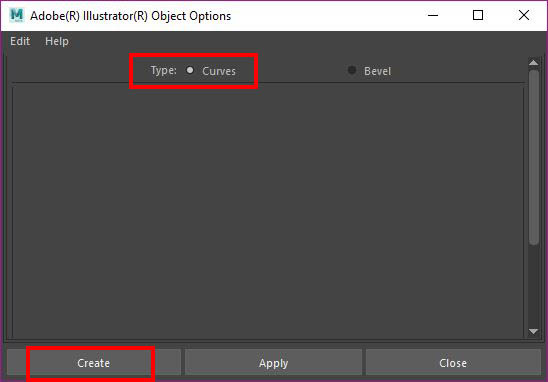
Go to Create > Adobe(R) Illustrator (R) Object.. and press the box to open the pop-up window with two options (curves – bevel). Choose curves and click create. Another window pop-up, this time the explorer window, so you can choose your logo file. Locate your logo file and press open.
Oftentimes, when you import Illustrator files into Maya, they are not aligned in the center of the coordinates. It probably has to do with the Illustrator artboard.
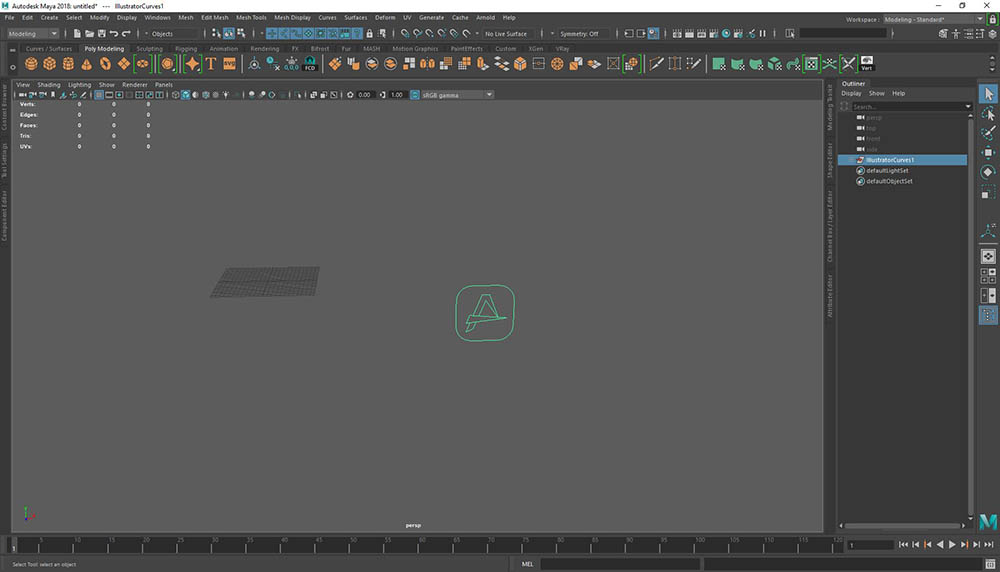
In any case, if that happens to you, you could just select all the curves in the Maya viewport or via the Outline panel and group them together by edit > group or shortcut (ctrl + g) and go to modify > center pivot. And then, align the group in the center of the scene by using any aligning tool.
You may be wondering why we do that! Well, it’s always good practice to work in the center on the scene, for many reasons, such as modeling process, symmetrical modeling, sense of center, etc.
After you set the group in the center of the scene, ungroup it, and delete history – center pivot – freeze transformations
where to find those:
- Edit > delete by type > history
- modify > center pivot
- modify > freeze transformations
Little script:
You could use the following script below, to run all the above comments at once:
CenterPivot;
DeleteHistory;
FreezeTransformations;
You can run it via script editor in MEL language. To be more convenient you could make a button with it and put it in the shelf editor to make it easily accessible, every time you will need it. And trust me, it’s a must little script you want to have, in order to save time.
So, all curves are in the center of the scene.
Generate surface out of curves:
Now, select one by one each of the curves of your logo and go to (modeling module) surface > planar. Do it for all of them. You came up with something like that.
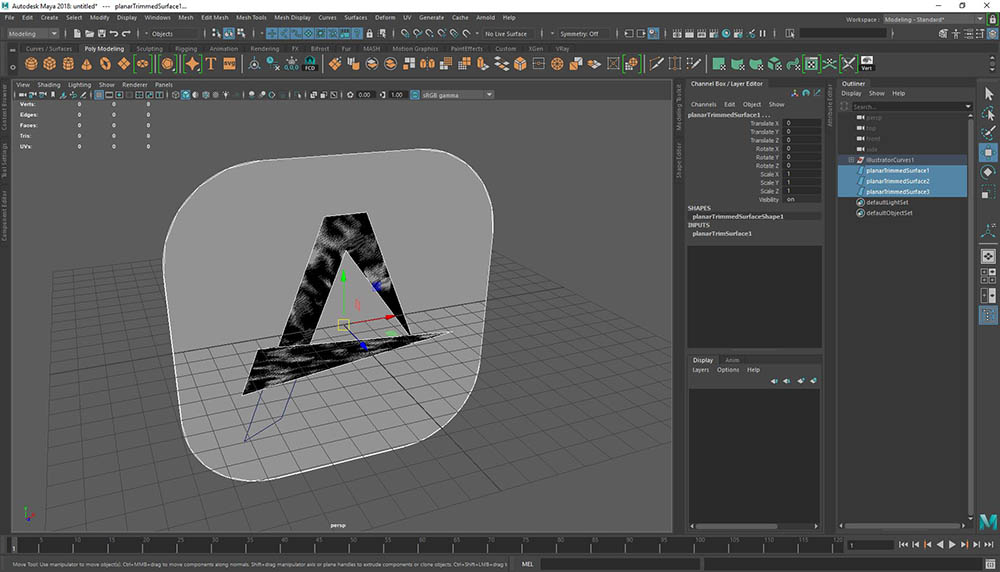
Before we did that, we had only curves in our scene, now we converted those curves into nurbs geometry.
In case you have a black color geometry like I have in my scene, don’t panic. They are just normal’s that they have to be reversed.
To fix it. Again, go to (modeling module) surface > reverse direction. Do it for each individual piece of your logo that appears black.
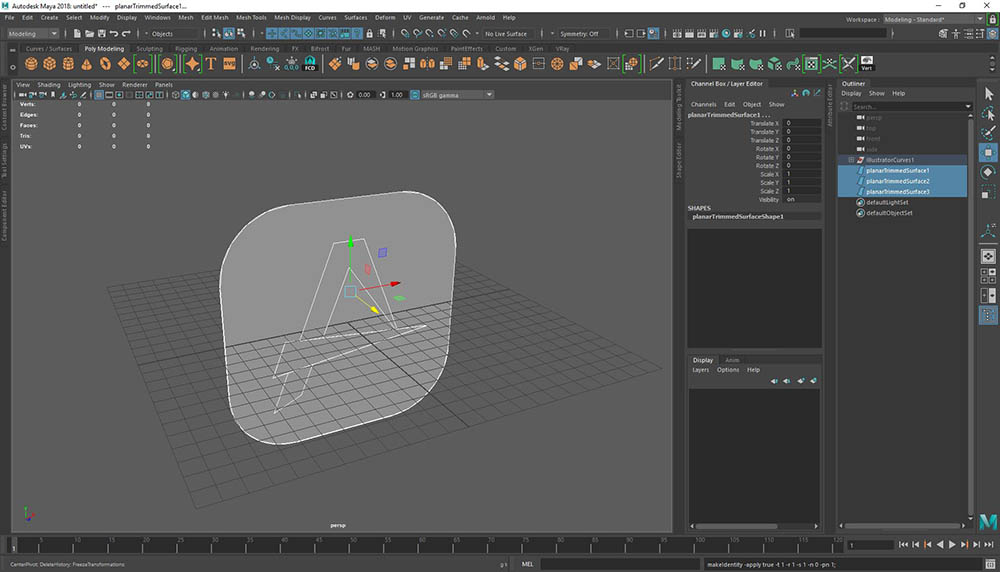
Now, it’s the way it’s supposed to look like, right! Well almost. We have to add the third dimension in order for the modeling process to be complete.
Adding the third dimension:
But before we do that, we need at this point to convert the exciting geometry which at that point is nurbs geometry into polygon geometry.
We do that with a few clicks:
Select all the new NURBS geometry from the outliner panel, don’t select any curves, and go to modify > convert > NURBS to polygons.
Note: you can make this step, either with all nurbs geometry selected or one by one at a time.
A pop-up window appears.
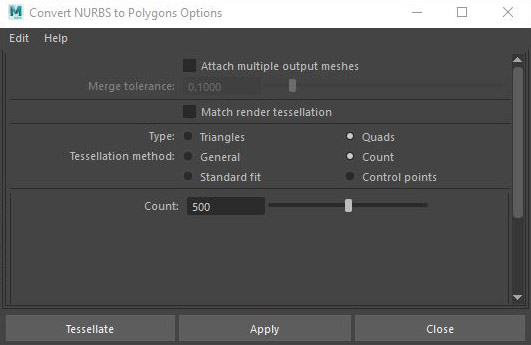
There are a bunch of settings to play with. But in order to wrap it up, you can see my settings for that particular logo. If you are not satisfied with what you are getting in the next step, you can come back here and make some adjustments (by undoing).
*the count: is basically how many details your polygonal logo will have after the conversion. In my case was ok, the above number.
Now we have polygon geometry instead of nurbs we have previously.
Add the actual three dimension:
Select each one at a time the polygon geometry which previously converted, and go to edit mesh > extrude to generate new polygons. Drag the front axes of the new polygons outside in order to create new ones. In my case, the value of the extrusion was 1. It really depends on the scale of your scene.
Note: If you make the extrusion in a positive space you are ok, but if you made it in the negative space you will have to reverse normal’s, once again as we did early when we have nurbs geometry.
As a result, in case you getting black color geometry, go to (modeling module) mesh display > reverse
So, at this point you are having something similar to this:
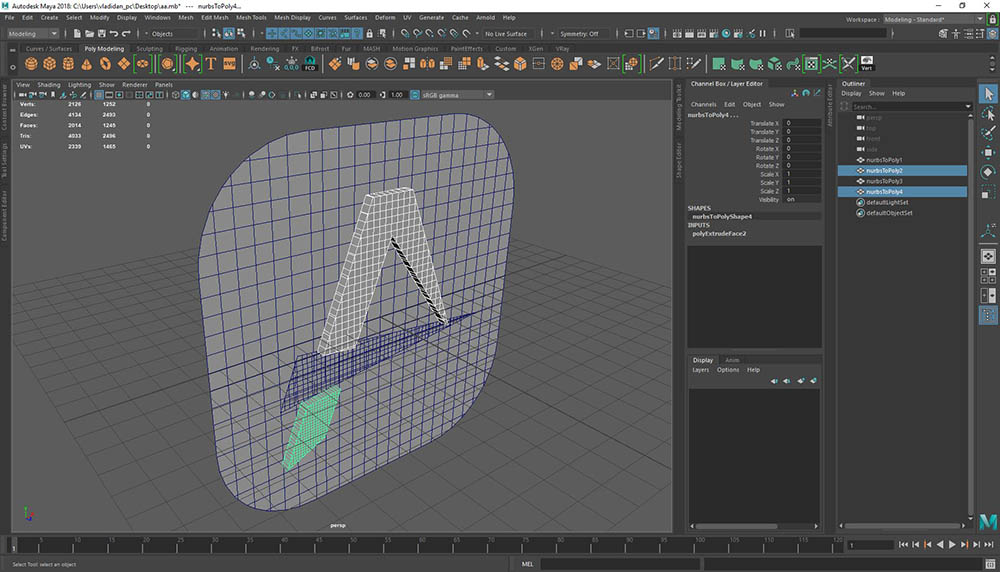
Keep going and repeat the same process for the others parts of your logo as well.
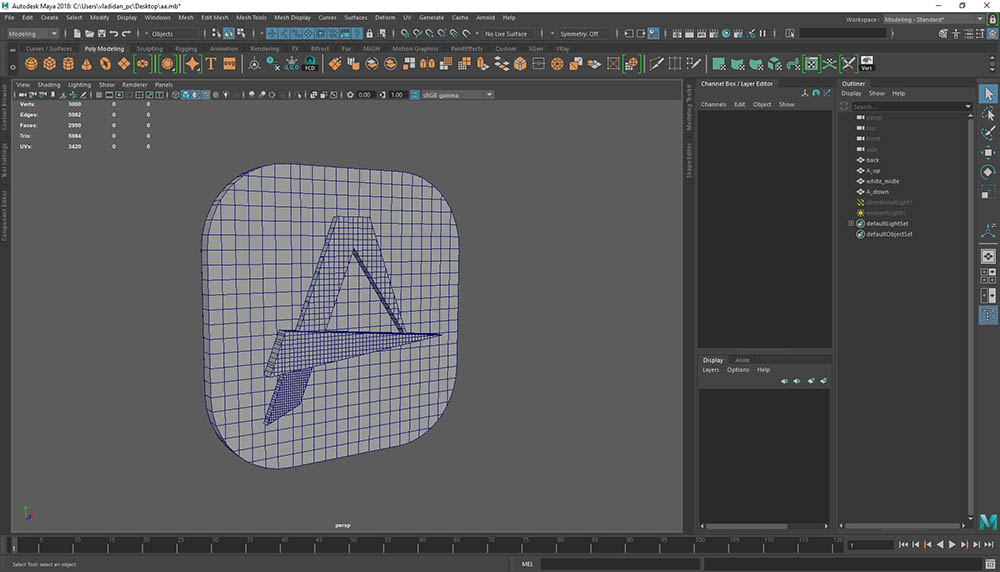
Clean the scene: Delete all others notes from the outliner, except the new polygon geometry. It’s always a good idea to clean the scene, for organized purposes.
You made it, kudos 🙂 The process of modeling has ended.
Part A has ended:
If you are familiar with Maya at a basic level you can skip the following part. You already made it. You have a 3D version of your logo. The second part is about basic materials – lighting and rendering the final image of your logo.
Part B – Materials and rendering:
Materials
Now, we have completed the first part of modeling our logo, it’s time to give it some material-color and render it as a final piece.
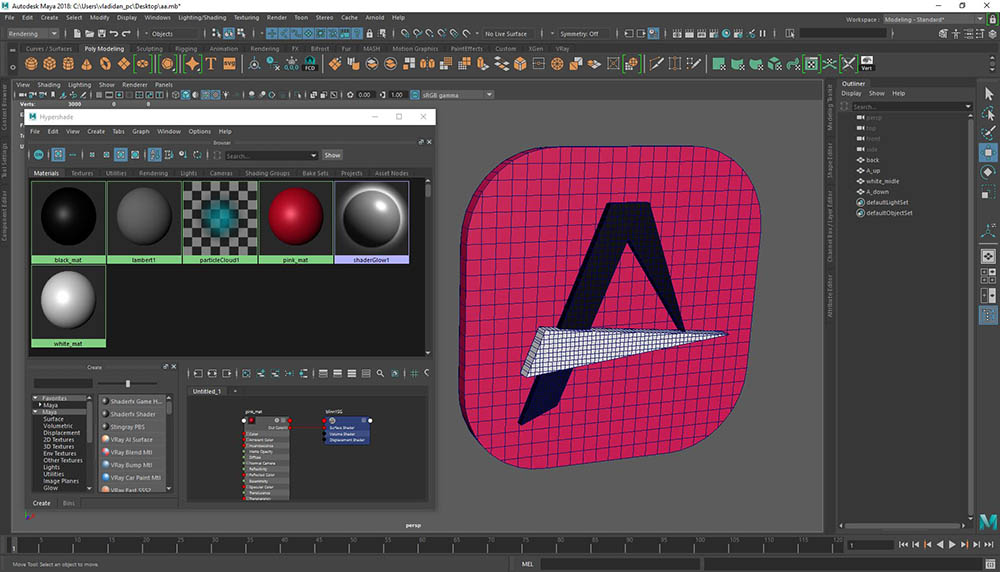
So, in order to give it colors we have to assign to each polygon piece of our logo a material. And we can do that in several ways. One of them is to open the hypershade by going: windows > rendering editors > hypershade and make all three materials in my case inside this editor.
Another way that I will be using in this post is to each time selected a polygon geometry and apply a material to it.
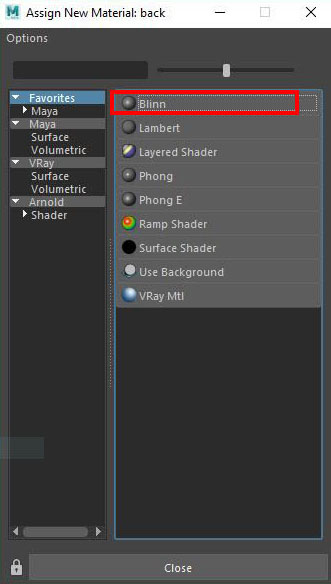
So, select a geometry piece of your logo and go to (rendering module) lighting/shading > assign a new material. A new pop-up window appears. Select the blinn material and open the attribute editor by windows > general editors > attribute editor.
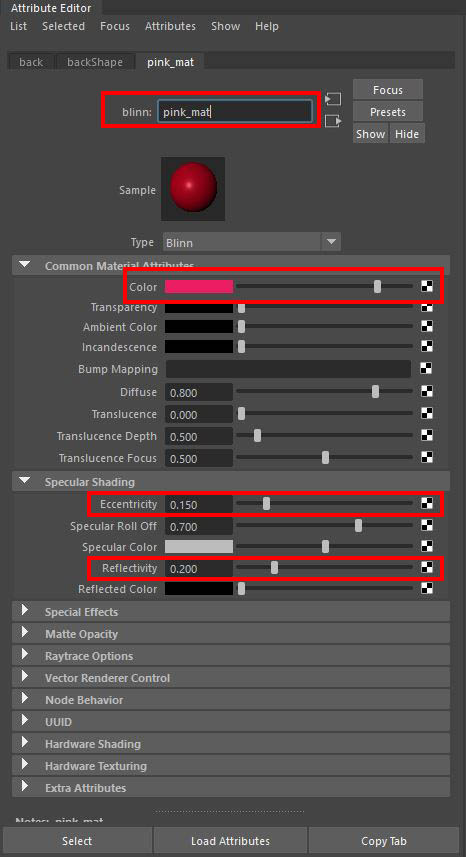
In the Attribute, Editor go in the material tab (usually is in the far right side) and set the color of your choice and adjust some other parameters like reflectivity. Is a good practice to name every new material, again for organizing purposes, which in the process you will find quite useful in the long turn.
Now that you have made and assigned a new material for one of the pieces of your logo, it’s quite easy to do the same for the other parts as well. Just follow the same process and you will be fine.
So, my scene looks like this at this point. No extra notes on the scene, clean outliner, and hypershade. Therefore the material process has ended.
Note: you could use other material as well instead of blinn of course.
Lighting:
As we already finish the modeling and materials process, there are left two more steps. Lighting and rendering the final piece. So, It’s time for some lighting.
No worries though, I will keep it extremely basic as it is already a big pose to read anyway 🙂
Creating the lights:
Go to create > lights >ambient light. Now we have our first light in the scene. Don’t change anything of its properties in the attribute editor for this light.
Create another one, this time a directional light. Play around with the angle of the light, so it can illuminate your logo properly. Go into the Attribute Editor while you have selected the directional light and make some changes. Like, playing with the intensity of the light, and the color. Also, make sure you have checked the Use Depth Map Shadows under the Shadows > Depth Map Shadow Attributes in the attribute editor. Otherways you will not have shadows in your scene.
That’s it. You have created lights so your logo can be illuminated by those.
Rendering:
Again, I know it’s a big post, but I promise is the final step 🙂
I am going to use Maya Software renderer, which is the default renderer inside Maya. It’s quite easy to use compared to other renderers like V-ray, mental ray, etc.
Note: The software renderer it’s not a photo-realistic renderer, which means you can’t achieve realistic looks.
For this post, the Maya software renderer is more than enough.
So, back to business:
You can render a scene, in two ways of speaking. Either from a camera or directly in perspective view, I recommend you to use a camera. In any case, make your logo to be the focused object in your scene.
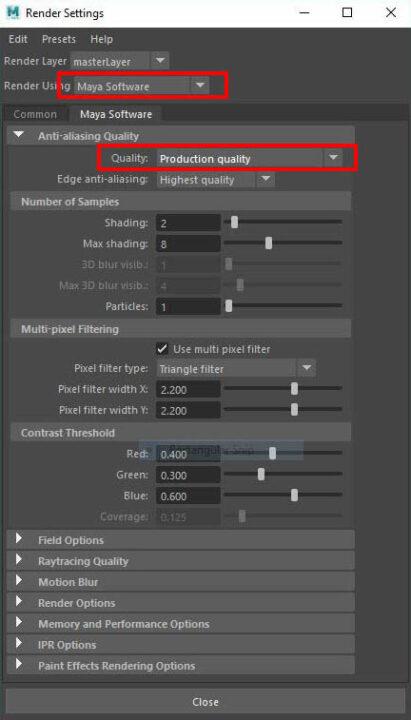
Go to windows > rendering editors > render settings. A new window with a bunch of properties comes up. Change only two properties. The renderer if it’s not already in Maya Software and the quality set it to production, and you are good to go. You may close the window.
Now, open the render view by going to windows > rendering editors > render view. The window of truth as I call it 🙂
Press the left button on the render view (the movie icon). It’s taking a couple of seconds to render your scene.
Note: the rendering process always works in conjunction with the material and lighting process and sometimes even with modeling too. As you render the scene, and you are not happy with something like the color, the amount of reflection, specular, etc. you can open the hypershade and adjust any specific material. Similar to lighting. If you are not like the intensity or the color, or you want to change the angle of the light, you can make all these things as you render.
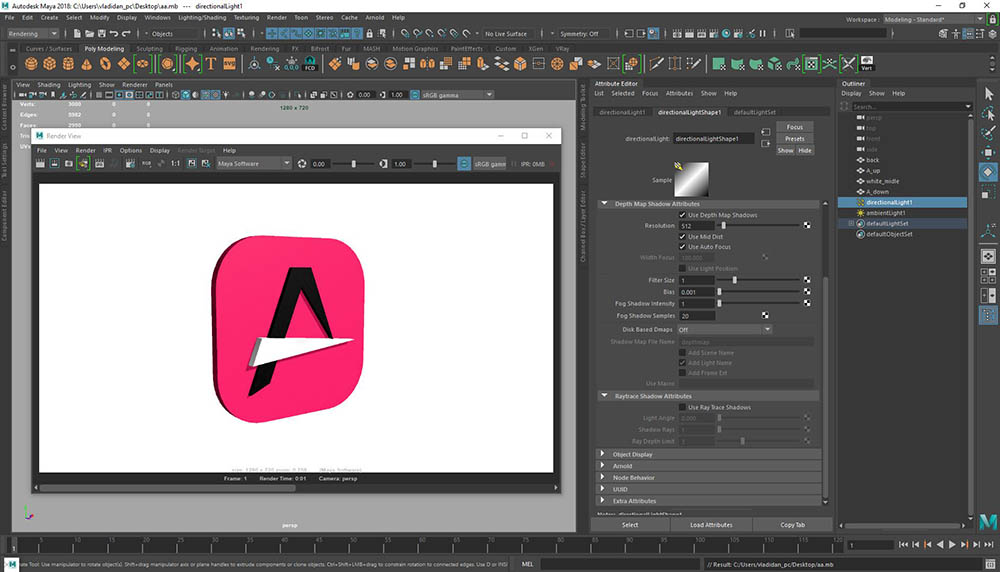

This is the final render in my case. Of course, I could make it more glossy and reflected, but I decided to keep it as simple as possible.
Conclusion:
To summarize all the steps, of converting to 3D logo in Maya.
- Clean the logo file inside the Illustrator
- Save the Illustrator file into Illustrator 8
- Import the Illustrator file into Maya through “Adobe Illustrator Object” tool
- Convert the curves into nurbs geometry
- Convert the nurbs geometry into polygon geometry
- Extrude from the face of each polygon object, to give them depth (third dimension)
- Create and assign material for each of the separate objects
- Create lighting and camera
- Render the scene
I hope you enjoyed this post. If you have any problems following through, leave a comment. I will be glad to help you out.

