The powerful function of Droplet in Photoshop is a complete life-saver. It’s by all means. Dependent on how many pictures you need to adjust. The more pictures you need to be done the bigger will be your appreciation for the function of Droplet.
The Photographers who are dealing with a bunch of pictures I am pretty sure they love it if they use it and they are going to love it when they will use it. It saves tremendous time. Of course, it’s not only loved by Photographers but by other professionals as well. Like 3D Artist dealing with animation, Motion graphic artists, etc.
Honestly, it’s loved by everyone who is dealing with a lot of pictures needed adjustments, and does not want to make the same adjustments over and over again but he/she prefers to make it the smart and easy way, to make them massively with the Droplet in Photoshop.
You could also, simply export multiple images in Photoshop without further adjustments.
In case you are not familiar with Photoshop, which something tells me it’s not the case, you could take a look at an early post about Photoshop in general from here.
Table of Contents
ToggleWhat is Droplet in Photoshop:
Droplet in Photoshop is an exe file that is produced by Photoshop to simplify the process of actions, to be more automatic. To be used over and over again.
And the way to do that is after you generate the Droplet exe file you simply drag and drop all the necessary pictures you want to adjust onto the Droplet exe file, and the Droplet will do the rest. Will automatically open – edit – save and close one by one all of your pictures.
Ok cool, but what is action in Photoshop, right!
What is actions:
Actions are basically commands in Photoshop. Every step you do in Photoshop is a command in a way. To resize a photo by going image – image size is a command, putting any adjustment layer (curve, levels, hue, etc.) is a command, and even save as is a command.
So, in order to save time when we are working on our pictures and we have to make the same adjustments over and over again in a bunch of pictures we use actions.
For example, if we shot with our camera a bunch of pictures and afterward we realize they are quite dark, we have to put some adjustment layers (brightness/contrast, exposure, etc.) on top of each picture in order to be fixed the above issue, right!.
Let’s say, we have a hundred pictures. if we try to put the same adjustment layers from scratch every time, you can realize it’s gonna take a while. But if we use an action, it’s gonna take definitely less. Depending on the complexity of the action we created, it’s gonna determine how much time we have saved.
It sounds cool, right!
For in-depth knowledge of actions, you could visit the official site of Adobe from here.
Droplet function with an example:
Now we know what a Droplet is, let’s jump into Photoshop and create a simple example with it.
In our example, I am going to create an action that will be used for the Droplet function in Photoshop. The action we are going to create will not be very simple or too complicated.
We will create an action that will resize the picture to HD resolution, add a text layer in the bottom right corner, and finally will put a black-and-white adjustment layer. And of course, to save the picture. Shall we start!
I assume you have all your pictures in a folder. I have put my folder in Desktop for easy access and I rename it “Orig Pictures”.
Just duplicate it for backup purposes, just in case the whole thing goes sideways 🙂
Creating the action for Droplet:
Now open one of the pictures you have in Photoshop. Then open the actions window by going to windows – actions (alt + F9). Probably there is a default actions folder. For organization purposes just create a new folder and name it as you like. I name my “My actions”. The way to do that is by clicking on the folder icon at the bottom of the actions windows.
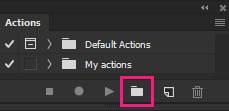
Now create a new action, by clicking the right icon next to the folder icon. A new pop-up window appears. Fill in the proper fields. Try to give a proper name for the action, cause in the future if you want to reuse the same action it’s going to be difficult to remember what it does.
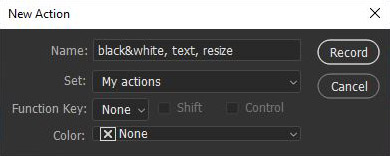
Press the record in order for the action to take place. Now every command you make it’s going to be recorded in this particular action.
The three parts of the action:
As we have already said, we are going to resize, to add text, and put a black & white adjustment layer.
Let’s start with the resize command.
Go image – image size.. and put the numbers 1280×720 pixels in order to be HD resolution. Like the image below:
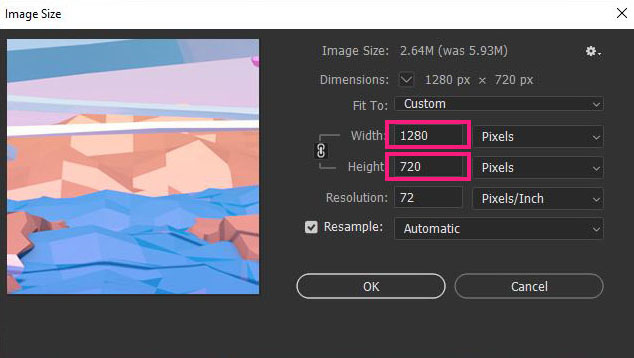
Ok cool, the image size has been done. Now it’s time to put a text as we planned.
So, grab the text tool in Photoshop and write whatever you want in your text. In my case, I wrote, “by Vladi Dan”. As it is my name 🙂 and try to align it in the bottom right corner of your picture, if you wish.
Now the last command we want to add is the black-and-white adjustment layer. Select the image layer and go to image – adjustments – black and white. Cool.
The last thing we want to make is to use the save command before we stop the recording. After you save, go to actions windows and stop the recording by pressing the square button next to the record icon.
Note: If you don’t save, and stop the recording of the action, when you apply the action in our Droplet, as you can imagine the Droplet won’t save our images. So, make sure you save before you stop the recording of the action.
Take a look at the action you just created, it will look something like the image below. It has all the steps – commands we made.
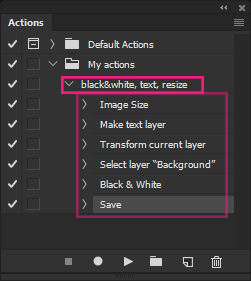
Now the action part has been done. And we are ready to go in the second part which is to create the Droplet exe file.
Creating the Droplet in Photoshop:
It’s time to use the actual Droplet in Photoshop. But before we do that, just create an empty folder, and rename it “New Pictures” next to the “Orig Pictures” you have.
As you are in Photoshop go to File – Automate – Create Droplet.. A new pop-up window appears.
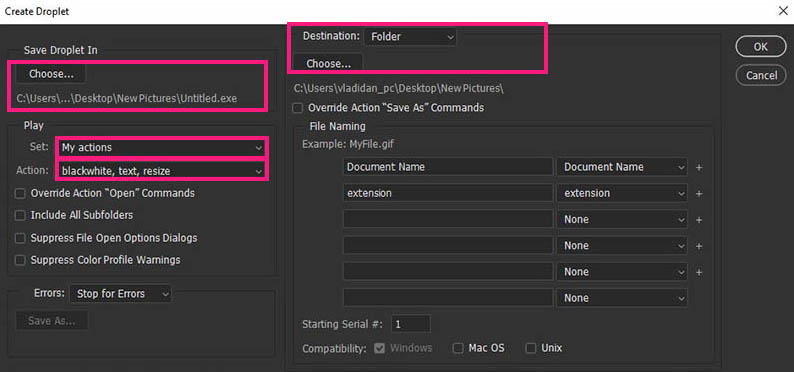
Select where to save Droplet exe file, where the new pictures will be saved and the action which will be used for this particular Droplet, and you are good to go. I have put the Droplet exe file in the same destination folder with the new pictures, of course, you can make otherwise.
Now we have created the Droplet exe file, we are done.
Select or multi-select all the pictures you have to apply the action on them and drag and drop them onto the Droplet exe file. Droplet will automatically open – edit- and save them in the destination folder you have chosen.
Note: if you get the following message as you try to drop a picture into the Droplet exe files: droplet couldn’t communicate with photoshop, no worries. It could be fixed pretty easily. Close the Photoshop and re-opened, but this time open it as administrator (right-click on the Photoshop icon and choose “Run as administrator”). Problem fixed 🙂
That’s all:
The process of generating a Droplet in Photoshop is simple enough. You could create more than one Droplet file. In fact, if you catch yourself making the same commands – steps on plenty of pictures is a good idea to take advantage of the Droplet function. You could make a library of Droplet files and have them at your disposal for future needs.
The process in summary:
- create the action with all the steps – command
- create the Droplet and assign the specific action with it
- drag and drop all your picture files which need to be done in the Droplet exe file
That’s all.
Let me know if Droplet has saved your life too 🙂




4 Responses
Hi, thank you for this great post 🙂 One problem – I did Droplet but it openning Photoshop, Is it possible to work with not opening PS?